
May
What SC2TOG Actually Is
So sc2tog is basically just decreasing in single crochet, like you’re taking two stitches and making them into one. I was making this little amigurumi octopus back in spring 2022 and couldn’t figure out why my decreases looked so lumpy and weird until I realized I was doing them completely wrong. Thought I could just skip a stitch and call it a day but that’s not how it works at all.
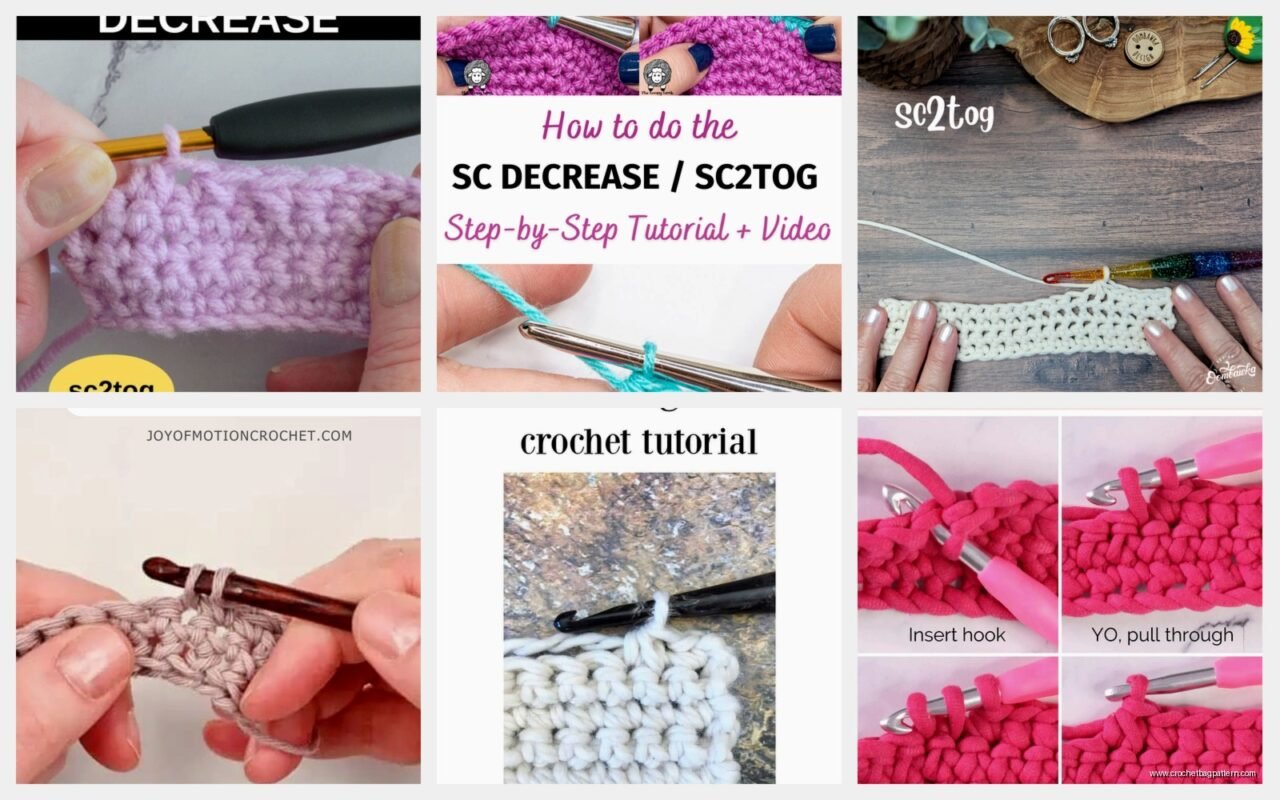
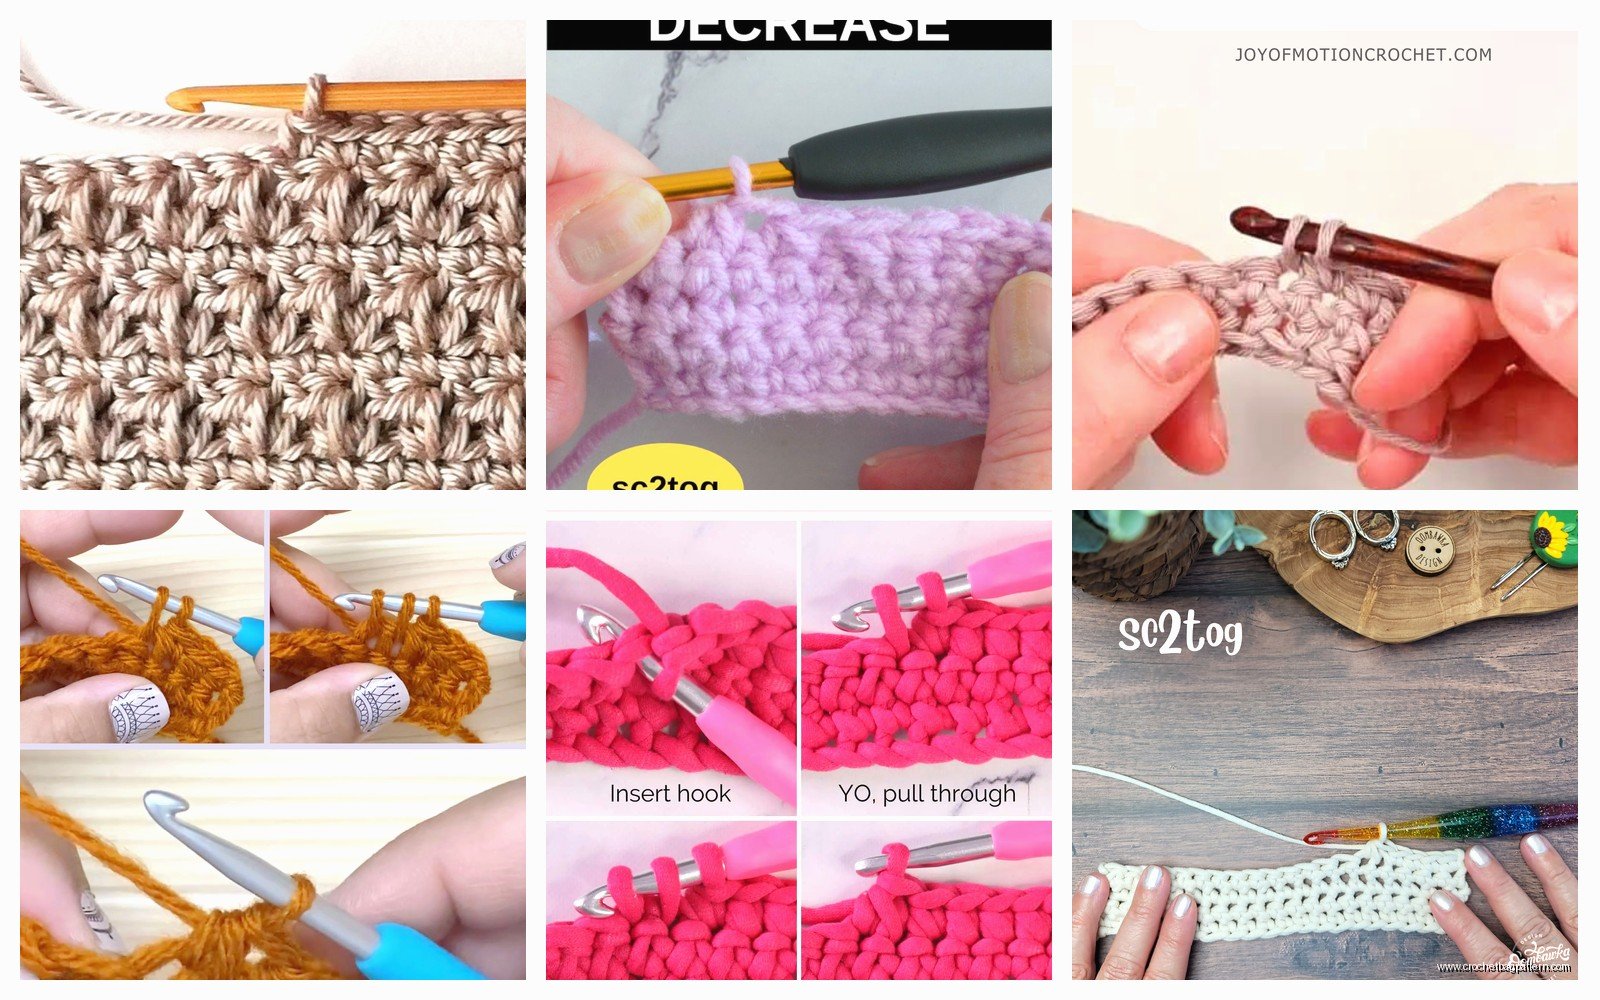
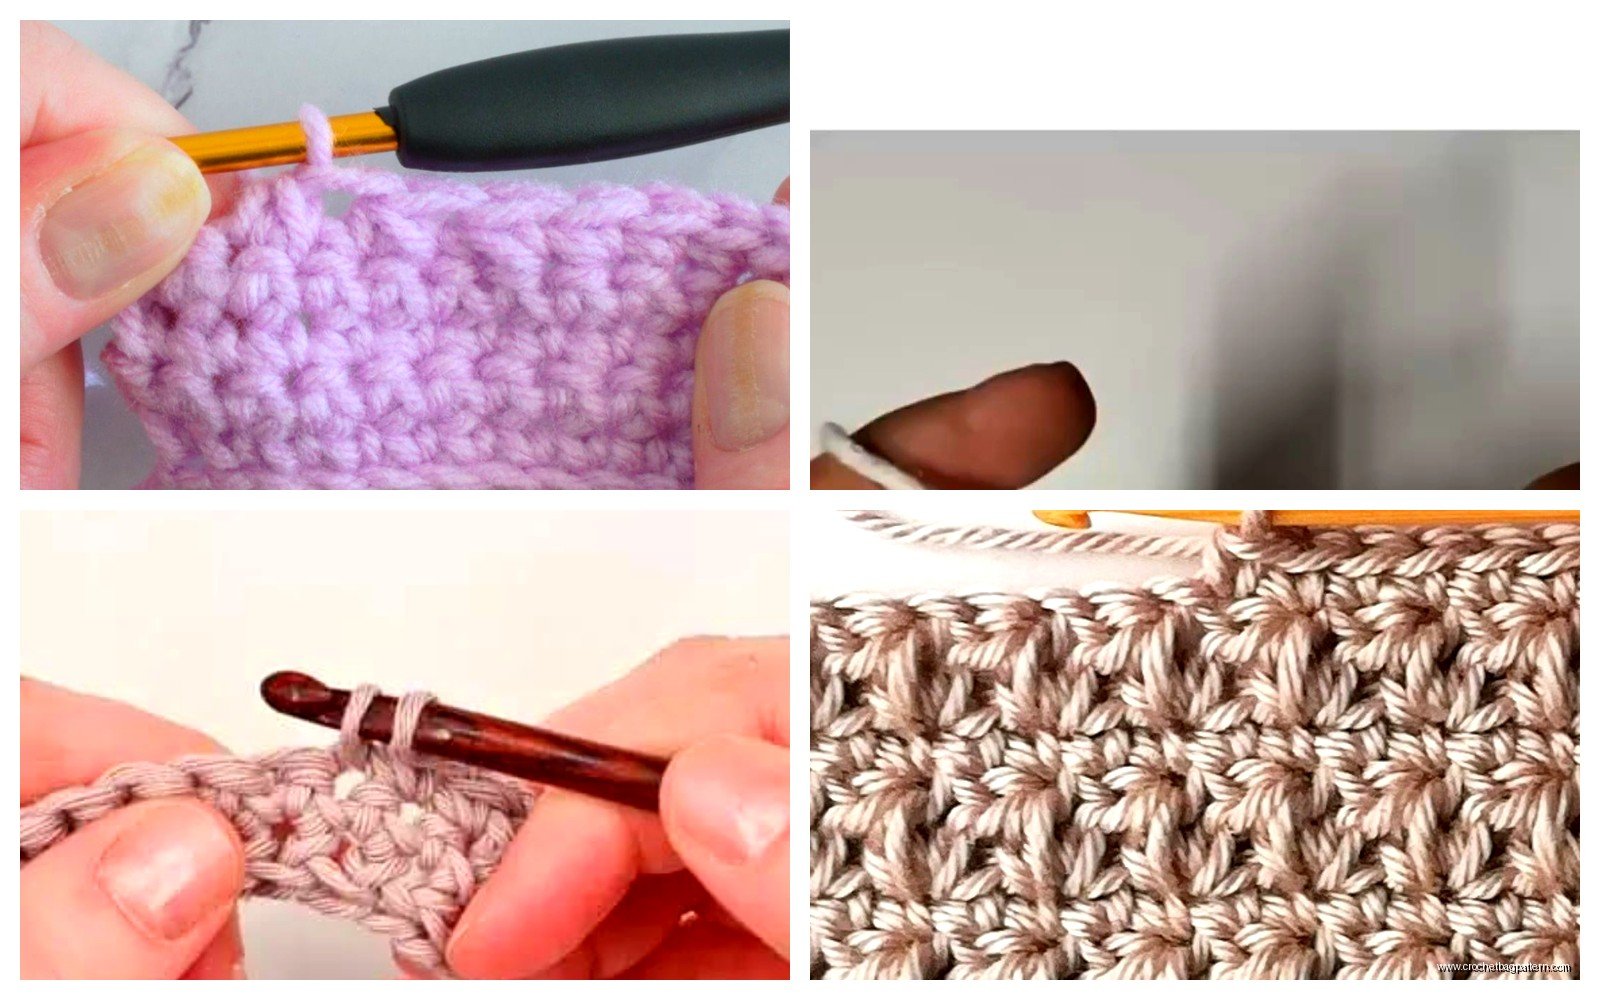
The whole point is to make the decrease invisible or at least less obvious than just skipping. You’re gonna insert your hook into the first stitch, yarn over and pull through so you have two loops on your hook, then insert into the next stitch, yarn over and pull through again so now you’ve got three loops, then yarn over one more time and pull through all three loops at once. That’s it. That’s the whole stitch.
Why You Even Need This Stitch
Anytime you’re shaping something you need decreases. Like if you’re making a hat and want it to taper at the top, or amigurumi stuff where you’re constantly increasing and decreasing to make round shapes. Regular single crochet just goes straight, so you gotta decrease to make things curve inward or get smaller.
I use Red Heart Super Saver a lot because it’s cheap and I’m not made of money, and honestly it works fine for practice. Also used some Bernat Blanket yarn once for a stuffed animal and the decreases were SO much harder to see because the yarn is so chunky. Which was actually good because I’m not great at keeping them even.
The Actual Step by Step Thing
Okay so here’s how you do it properly:
- Insert your hook into the first stitch you want to decrease
- Yarn over and pull up a loop – you should have 2 loops on your hook now
- Don’t complete the stitch, just leave those 2 loops there
- Insert your hook into the very next stitch
- Yarn over and pull up another loop – now you’ve got 3 loops on your hook
- Yarn over one more time
- Pull through all 3 loops at once
And that’s one sc2tog done. You just turned two stitches into one stitch.
Common Mistakes I Made
The first like fifty times I tried this I kept accidentally completing the first single crochet. So I’d insert, yarn over, pull through, then yarn over again and pull through both loops and finish the whole stitch. Then I’d be sitting there confused about where the decrease was supposed to happen. You have to stop yourself from autopilot finishing that first stitch.
Another thing is sometimes you insert the hook in the wrong place. With amigurumi especially you’re working in spirals and it gets confusing. I mark my rounds with a piece of different colored yarn now because I was constantly losing track and decreasing in the wrong spot. Made this whole turtle in summer 2024 where the shell was lopsided because I couldn’t count properly.
Also the tension thing – if you pull too tight on that final yarn over, the decrease gets all puckered and obvious. If you’re too loose it looks like a hole. You want it just right which is annoyingly vague advice but it’s true. Takes practice and I still mess it up sometimes.
The Thing That Annoyed Me Most
Honestly the most annoying part is when you’re doing a bunch of decreases in a row, like when you’re closing up the top of an amigurumi head or something. Your hook keeps getting caught on the previous stitches and it’s just tedious. I was watching The Bear while trying to finish this project once and had to keep pausing because I couldn’t pay attention to both things. The decreases need you to actually look at what you’re doing, at least for me.
My cat also decided that was the perfect time to lay on my yarn which didn’t help. But anyway the repetitive nature of multiple decreases in a round gets old fast.
Invisible Decrease vs Regular SC2TOG
So there’s also something called an invisible decrease which is slightly different. With invisible decrease you insert through the front loops only of both stitches first, then yarn over and pull through, then yarn over and pull through the remaining loops. It’s supposed to look even cleaner.
I tried it a few times with some Lily Sugar’n Cream cotton yarn when I was making dishcloths and honestly couldn’t tell much difference. Maybe my tension is just bad or maybe it matters more with certain yarn types. For amigurumi people swear by invisible decreases but I usually just do regular sc2tog because it’s what I learned first and it works fine enough.
The invisible one is: insert hook under front loop of first stitch, then under front loop of second stitch, yarn over and pull through both front loops (2 loops on hook), yarn over and pull through both loops. Some people say this prevents the little horizontal bar that shows up with regular decreases but like… I don’t care that much usually.
When Patterns Say SC2TOG
Most patterns will abbreviate it as sc2tog or sc dec or just “decrease.” Sometimes they’ll write it out like “single crochet 2 together” which is clearer but takes up more space. If you see dec in a pattern it almost always means sc2tog unless they specify otherwise.
I’ve seen some British patterns use “sc2tog” but they call single crochet “double crochet” which is confusing as hell. So their sc2tog is actually dc2tog in American terms and… okay I’m getting off track but just watch out for that if you’re using patterns from different places.
Counting Your Stitches
After you do a decrease you should have one less stitch than before, obviously. But it’s easy to lose count especially in amigurumi rounds. What I do is count before and after the round to make sure the numbers match what the pattern says. If you’re supposed to have 24 stitches after decreasing 6 times, count and make sure you actually have 24.
Sometimes I think I did the decrease but I actually just skipped a stitch which creates a hole and doesn’t actually decrease anything. Then your whole project gets wonky and you don’t notice until way later. I had to unravel like 15 rounds of this one project because the count was off and I didn’t catch it early enough.
Using Stitch Markers
Get stitch markers or just use bobby pins or safety pins or scrap yarn. Mark where your decreases are supposed to happen, especially if the pattern has you decreasing in the same spots every other round or whatever. It helps you see the pattern and makes counting easier.
I use these cheap plastic stitch markers from Amazon, nothing fancy. They work fine. Sometimes they fall out if I’m not careful but mostly they stay put.
Decreasing Evenly Around
A lot of patterns will tell you to decrease evenly around the piece. Like “sc 4, sc2tog around” which means you single crochet 4 stitches, then do a decrease, then repeat that pattern all the way around. This spaces out your decreases so the shaping looks even instead of having all the decreases bunched up in one spot.
The math can be confusing though. If you have 30 stitches and need to decrease 6 times, you need to figure out the spacing. I usually just follow what the pattern says but sometimes they don’t spell it out clearly and you gotta figure it out yourself.
What works for me is dividing the total stitches by the number of decreases to get a rough idea. So 30 divided by 6 is 5, which means roughly every 5th stitch should be a decrease. But then you have to account for the fact that the decrease itself takes up 2 stitches so… it gets weird. Honestly I just try different spacing until it looks right.
Decreases in Rows vs Rounds
When you’re working in rows, decreases are pretty straightforward. You just do the sc2tog wherever the pattern tells you, usually at the edges or spaced throughout the row. Working in rounds is trickier because you’re going in a spiral or joining rounds and it’s easier to lose your place.
For rows I don’t usually need stitch markers as much because I can see where I am. For rounds I need all the help I can get. I’ve tried working in joined rounds instead of spirals and it’s a bit easier to track but then you have that seam line which looks kinda obvious.
Fixing Mistakes
If you mess up a decrease you can usually just unravel back to that spot and redo it. I know some people are scared to unravel but honestly it’s not that bad. Just take out your hook, gently pull the yarn to undo the stitches, and redo them correctly. Better than having a wonky finished project.
Sometimes you don’t notice the mistake until later though and then you gotta decide if it’s worth unraveling a bunch of work or if you can just live with it. I’ve definitely left mistakes in projects before because I didn’t wanna redo everything. Depends how noticeable it is.
With that octopus I mentioned earlier, one of the legs was definitely shorter than the others because I miscounted decreases but whatever. It had character or something. I gave it to my friend’s kid and they didn’t care that it was imperfect.
Tension and Yarn Weight
Thicker yarn makes decreases more visible just because there’s more bulk. With thin yarn like sock weight or thread, decreases kind of disappear into the fabric. I made a little amigurumi with Caron Simply Soft which is worsted weight and the decreases were noticeable but not terrible. Then I tried making something similar with bulky weight yarn and you could see every single decrease really obviously.
If you want your decreases to be invisible, use thinner yarn and keep your tension consistent. If you don’t care that much, use whatever yarn you want. Most of my projects are just for me or gifts for people who don’t crochet so they don’t notice these details anyway.
Practice Project Ideas
If you wanna practice sc2tog, make a simple ball or sphere. You start with a magic ring, increase for a few rounds, work even for a few rounds, then decrease back down and stuff it. It’s basically all increases and decreases so you get a lot of practice.
Or make a simple hat. Start with a circle for the crown, work even for the sides, and you’re done. The crown uses increases and you can practice decreases if you want to taper it at the top, though some hats just stay the same width.
Dishcloths are good too if you’re doing them in rows and want to practice decreasing at the edges. They work up fast and if you mess up it doesn’t really matter because it’s just a dishcloth.
Different Decrease Stitches
SC2TOG is the most basic decrease but there are others. You can do sc3tog which is decreasing 3 stitches into 1, following the same principle but with one more stitch. Insert in first stitch and pull up a loop, insert in second stitch and pull up a loop, insert in third stitch and pull up a loop, then yarn over and pull through all 4 loops on your hook.
There’s also decreases for other stitches like dc2tog for double crochet or hdc2tog for half double crochet. They all work similarly – you work each stitch partially, leaving the last step undone, then complete them all together at the end.
I mostly use sc2tog because I mostly do single crochet projects. Amigurumi is pretty much always single crochet because it makes a tight dense fabric that holds stuffing well. If I’m doing a blanket or something with taller stitches then I might use dc2tog but that’s less common for me.
Reading Your Work
After you get the hang of it you can see where your decreases are by looking at the fabric. There’s a little V shape at the top of each stitch normally, and with a decrease that V kind of leans or combines with the next stitch. It’s subtle but once you know what to look for you can see it.
This helps when you’re trying to figure out where to put your hook for the next round. You can see the decrease from the previous round and know to skip that spot or whatever the pattern calls for. Sometimes patterns have you decrease in the same spot every decrease round, sometimes they have you offset them so the decreases spiral around the piece.
I’m still not great at reading my work honestly. I have to count most of the time. But it’s getting easier the more I practice and pay attention to what the stitches actually look like instead of just going through the motions.