
May
okay so the magic circle
Right so I was making these little amigurumi bears in summer 2023 and kept getting this stupid gap at the center when I started them the regular way with chain 2 and working into the first chain or whatever. My friend kept telling me to try the magic circle but I was convinced it was gonna be too complicated and honestly I just avoided it for like months.
The thing is once you actually do it a few times it’s way easier than it looks in those diagrams online. Like those step by step illustrations made it seem so precise and I’m really not a precise person when it comes to crafts.
what you’re actually doing
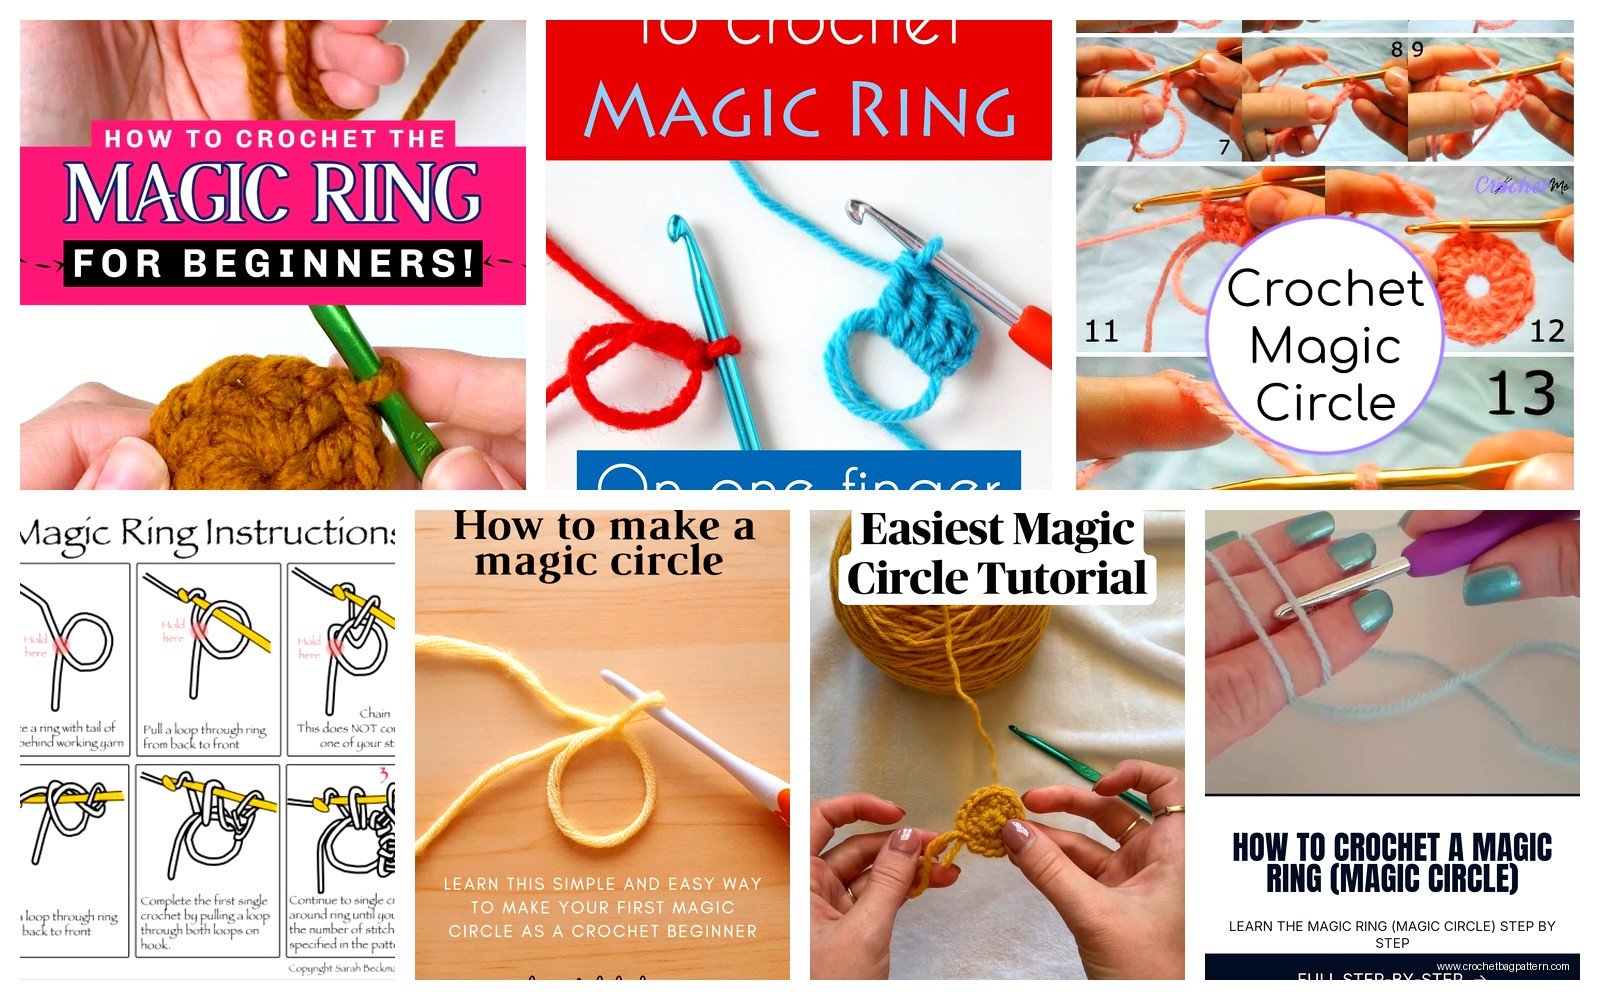
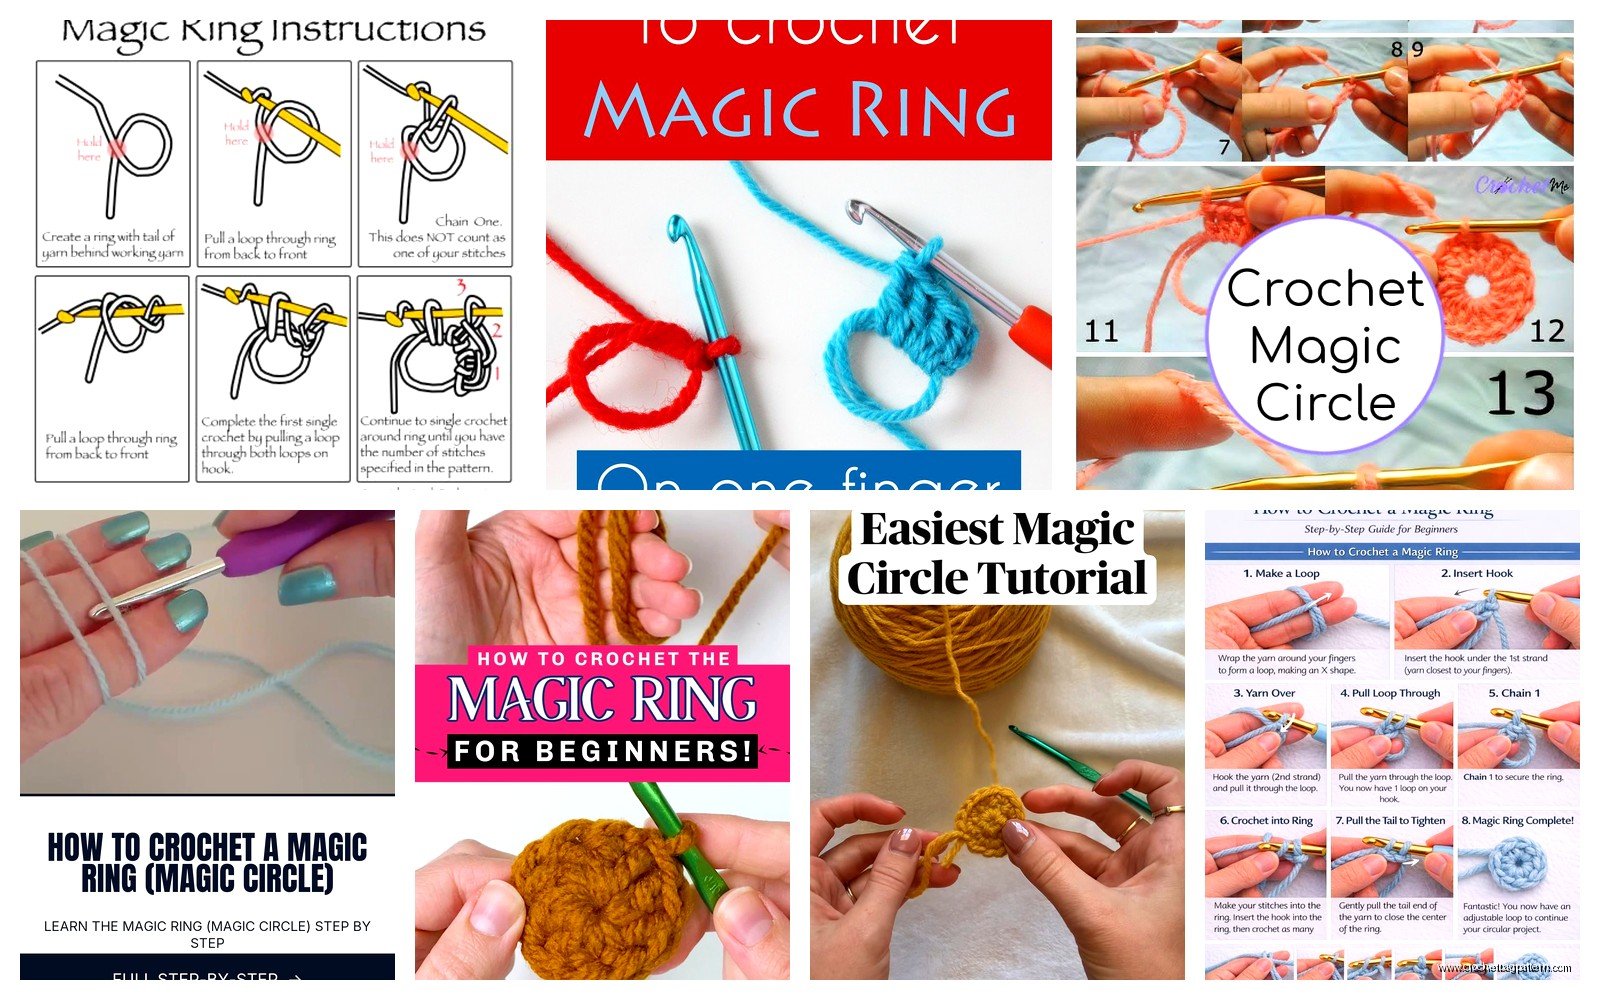
So basically the magic circle (also called magic ring or adjustable ring) is just a way to start crocheting in the round without that hole in the middle. You make a loop with your yarn that you can tighten up after you work your first round of stitches into it. That’s literally it. The “magic” is just that you can pull it closed.
I was using Red Heart Super Saver for those bears btw because I was making like 20 of them for a craft fair and wasn’t about to spend a fortune. The slight squeakiness of acrylic yarn actually makes it easier to see what you’re doing with the magic circle when you’re learning.
how to actually make the loop
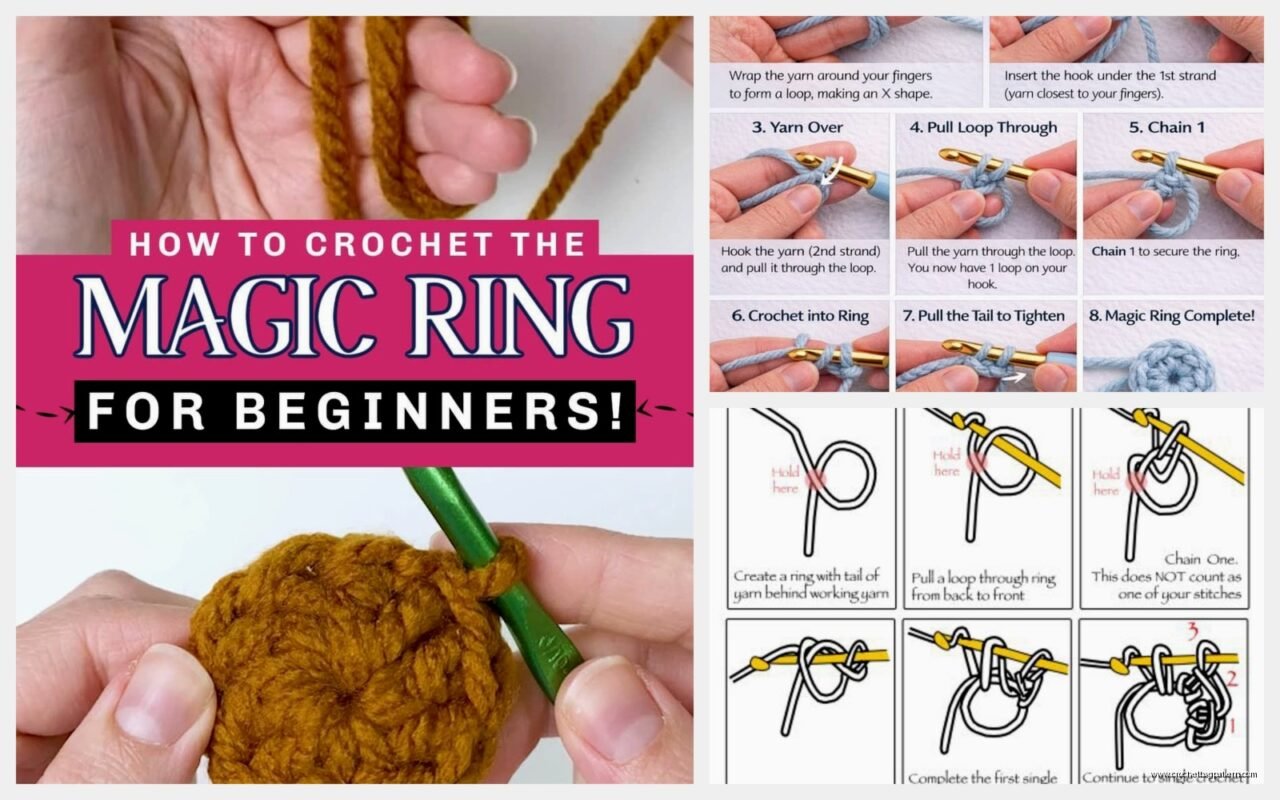
Take your yarn and make a loop like you’re gonna lasso something. The tail end should be hanging down and the working yarn (the part connected to your ball) crosses over it. Hold where they cross with your thumb and middle finger of your left hand if you’re right handed or whatever works for you.
Now here’s where people get confused in tutorials but it’s simple. You’re gonna insert your hook under the first strand (the one closer to the tail) but OVER the back strand. Scoop up the working yarn and pull it through. That’s your first loop on the hook.
Chain one. Some people don’t count this as a stitch and some do, I never count it because that’s how I learned and I’m not changing now lol.
working into the ring
Now you’re gonna work your stitches into the center of that ring. Not into any specific strand, just shove your hook through the middle of the circle and work around both strands of yarn that make up the ring.
For most amigurumi patterns you start with 6 single crochet stitches. So insert hook into the ring, yarn over, pull through (you’ll have 2 loops on hook), yarn over, pull through both loops. That’s one single crochet. Do that 5 more times.
The annoying thing about the magic circle is that those first few stitches feel really loose and floppy and you’re trying to hold onto this loop and your hook and the working yarn and honestly I usually end up with my cat trying to attack the tail end because it’s just dangling there. Her name is Miso and she’s obsessed with yarn tails specifically, like she doesn’t even care about the ball of yarn just the—anyway.
closing the circle
This is the actual magic part I guess. After you’ve worked all your stitches into the ring, you gently pull on the tail end. Not the working yarn, the tail. The circle will start to close up. Pull it snug but not so tight that you’re warping your stitches.
Then you slip stitch into the first single crochet you made (not the chain one) to close the round. Some patterns don’t have you do this if you’re working in a spiral but most will tell you specifically.
what kept messing me up at first
I kept pulling the wrong end of the yarn. Like I’d finish my stitches and pull the working yarn and nothing would happen obviously because that’s not how it works. The tail is what closes it. I probably did this wrong like 8 times before it clicked.
Also I would make the initial loop too small and then couldn’t fit 6 stitches comfortably into it. You want the loop pretty big at first, like maybe 2 inches across? You’re gonna tighten it later anyway so there’s no point making it tiny from the start.
alternative method that some people like better
There’s another way where you wrap the yarn around your finger twice and work into that but I never got the hang of it. I tried when I was making a blanket with Caron Simply Soft in like spring 2022 and the centers of my granny squares kept coming out weird. Went back to the regular magic circle method and it was fine.
Some people swear by the finger wrap method though so if the regular way isn’t working for you maybe try that. There’s no right way really, just whatever doesn’t make you want to throw your project across the room.
common problems
The circle won’t close: you probably worked your stitches over only one strand instead of both strands that make up the ring. Happens to everyone. Just pull it out and try again.
The tail keeps slipping out: before you tighten, make sure you’re holding onto that tail. I usually drape it over my finger or tuck it under my palm. Also after you close it, weave in that end pretty quickly or it can work its way loose.
Stitches are uneven: this is just gonna happen with the first round honestly. Once you work round 2, everything evens out. I used to frog things if the first round wasn’t perfect but literally no one can tell once the project is finished.
what to practice on
Don’t practice on like thread weight yarn or anything fancy. Get some cheap worsted weight acrylic. I learned on Red Heart but Paintbox Yarns Cotton Aran is also good if you want something less squeaky. Bernat Blanket yarn is actually terrible for learning this because it’s so thick you can’t see what you’re doing.
Make a bunch of little circles. Just magic circle with 6 sc, close it, pull it out, do it again. I did this while watching TV (was rewatching New Girl for the third time) and after like 15 circles it became muscle memory.
using it in actual projects
Amigurumi is the obvious use. Literally every amigurumi pattern starts with a magic circle. Hats too, if you’re working from the top down. Some people use it for granny squares or motifs but I usually just do the chain 4 and slip stitch method for those because I don’t really care if there’s a tiny hole in a granny square.
The magic circle is essential for things where the center is gonna be visible though. Like if you’re making a stuffed animal and there’s a gap at the top of the head, it looks unfinished even if you stuff it really well.
the thing that annoyed me most
Okay so the most annoying part of the magic circle isn’t actually making it. It’s that every single tutorial online has a different way of explaining it and they all act like their way is the only correct way. Some say chain 1 counts as first stitch, some say it doesn’t. Some say pull tight immediately, some say wait until after round 2.
I wasted so much time trying to figure out the “right” way when actually you just gotta do what works for your tension and your project. If your circle closes neatly and doesn’t have a hole, you did it right. That’s literally the only criteria.
Also some people can do it really loose and casual and it works fine, but my tension is pretty tight so I have to make the initial loop bigger than what most tutorials show or I can’t fit my hook through comfortably. Just adjust based on how you normally crochet.
troubleshooting your tension
If you crochet tight like me, make that first loop big. Like bigger than you think you need. You can always pull it closed but you can’t make it bigger once you’ve worked stitches into it.
If you crochet loose, you might need to hold the tail more firmly while you work the first few stitches or they’ll slide around too much. I watched my friend do this and she literally wraps the tail around her pinky twice to keep tension on it.
The working yarn should have normal tension like when you’re crocheting anything else. Only the tail needs special attention.
what about left handed crocheters
Just reverse everything I said. Loop goes the other way, you hold it with your right hand, whatever. I’m right handed so I can’t really explain it well but the principle is the same you’re just mirroring it.
My cousin is left handed and she learned from watching right handed tutorials in a mirror which seems complicated but she said it worked fine. There’s also left handed specific tutorials on youtube if you search for them.
the first time I actually got it
So summer 2023 with those bears I mentioned, I finally sat down and forced myself to figure it out. I’d watched like 5 different videos and they all confused me in different ways. Then I just… stopped watching and tried it based on what seemed logical.
Made a loop, worked some stitches into it, pulled the tail. It closed. That was it. I’d been psyching myself out about it for months and it took maybe 90 seconds once I actually tried.
Made probably 30 bears that summer and every single one started with a magic circle. Got to the point where I could do it without looking, just feeling where the strands were. That’s when you know you’ve actually learned it, when your hands just know what to do.
tips nobody tells you
Leave a longer tail than you think you need. Like 6 inches at least. Makes it easier to hold onto and you need to weave it in anyway.
Don’t pull the circle closed until you’re absolutely done with round 1. I used to pull it partway closed after like 3 stitches and then couldn’t fit the last few stitches comfortably.
If you’re using slippery yarn like bamboo or silk blends, the tail might slip even after you’ve closed the circle. Do a quick knot with the tail and working yarn before you weave in the end. I know people say never knot your yarn but sometimes it’s necessary and your project will be fine.
The chain 1 at the beginning doesn’t count as a stitch in like 95% of patterns. If it does count, the pattern will specifically say so. When in doubt, it doesn’t count.
different stitch counts
I keep saying 6 sc because that’s what most amigurumi uses but you can start with any number. I’ve done magic circles with 8 stitches for bigger projects, 12 stitches for mandalas, even 4 stitches for really tiny things.
The process is exactly the same regardless. Make loop, work stitches into it, pull tail to close. The number of stitches just depends on what your pattern calls for.
You can also use different stitch types. Double crochet magic circles are common for granny squares or motifs. Half double crochet works too. Single crochet is just the most common for amigurumi because it’s tight and doesn’t leave gaps.
when not to use it
If you’re making something flat that doesn’t need a closed center, the magic circle is probably overkill. Like bookmarks or scarves or whatever, just start with a chain.
Also if you’re a total beginner who’s never crocheted before, maybe learn basic stitches first and come back to the magic circle later. It’s not hard but it’s easier when you’re already comfortable holding the hook and yarn.
Some vintage patterns don’t call for magic circles because the technique wasn’t as widespread back then. You can usually substitute it in if you want but follow the pattern as written if you’re unsure.
final random thoughts
The magic circle has other names depending on where you learned to crochet. Magic ring, adjustable ring, sliding loop. They’re all the same thing.
British patterns might call it something different but I mostly use American patterns so I’m not totally sure what the UK term is. I think it’s still magic ring?
Once you get comfortable with it, you can start a project in like 30 seconds. Magic circle, 6 sc, close, slip stitch, done with round 1. Then you’re off and running with whatever increases the pattern calls for.
I’ve taught a few people in person and the main thing is just getting them to try it without overthinking. Let it be messy the first few times. You’re gonna pull it out anyway while you’re learning so who cares if it’s not perfect.
Use stitch markers for the first stitch of each round when you’re working in the magic circle. Otherwise you’ll lose track of where the round starts and your stitch count will be off. I use the cheap plastic ones from Clover, nothing fancy.
That’s pretty much everything I know about magic circles. Just make the loop, work your stitches, pull it closed. Practice a few times and you’ll have it down.