
Jun
okay so capybara amigurumi – I made one last spring 2023 when I was stuck at home with a sprained ankle and couldn’t do much else. The thing is huge compared to normal amigurumi and honestly that was part of why I wanted to try it because I was tired of making tiny stuff that took forever with thread-weight yarn.
What Yarn You Actually Need
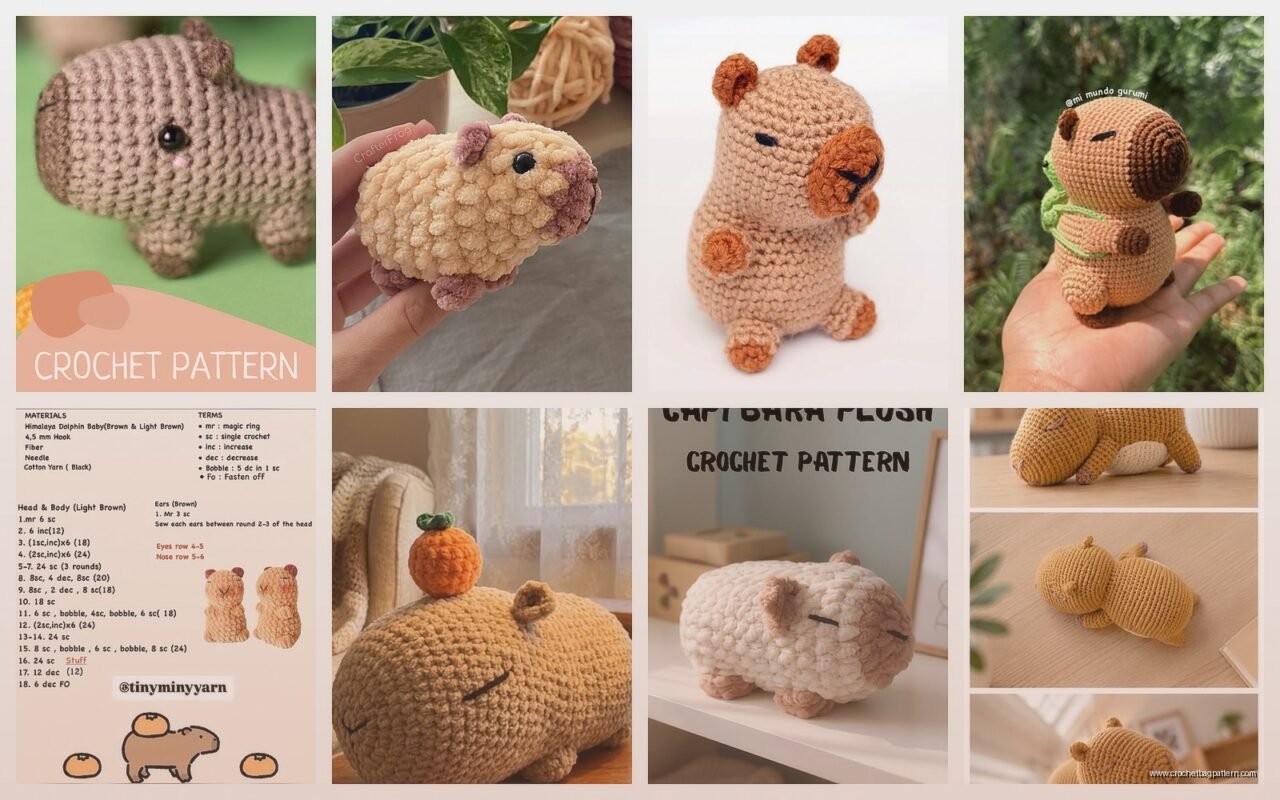
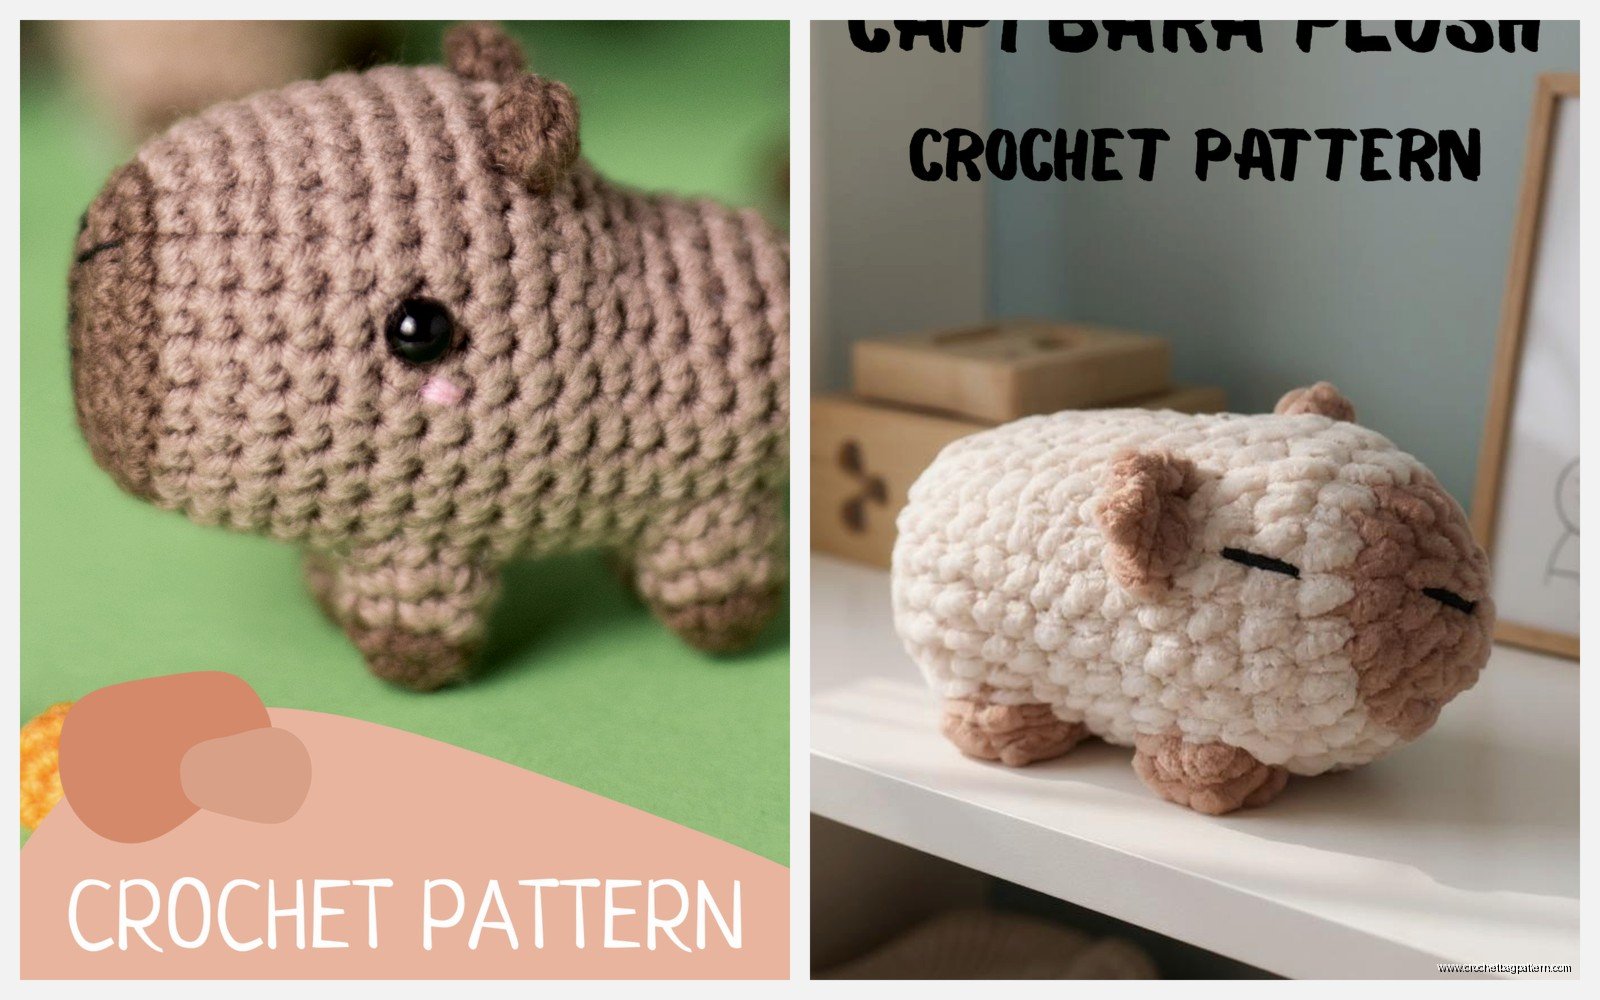
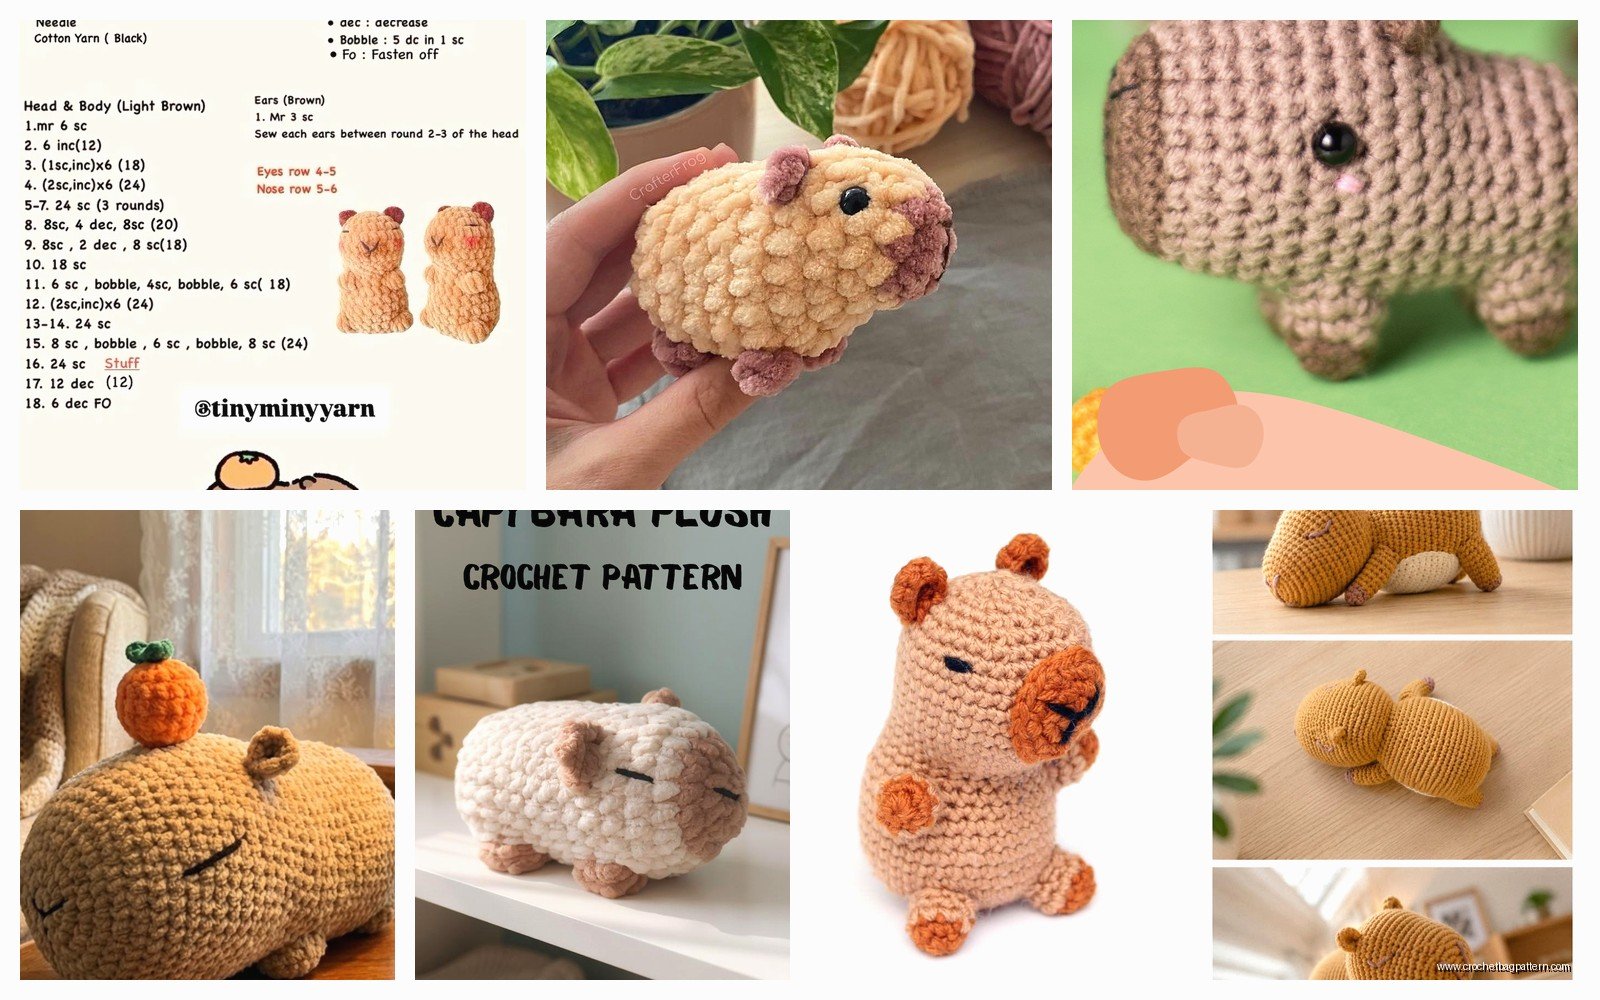
So for the body you’re gonna want a chunky yarn or at least a worsted weight if you don’t mind crocheting for longer. I used Lion Brand Wool-Ease in like a camel brown color? It worked pretty well but honestly any brown that looks sort of muddy and warm will do the job. Capybaras aren’t exactly a specific pantone color you know. I think I used about 4 skeins for the body because these things are ROUND.
For the face details I just used some black and white scraps I had lying around. The nose is black and you’ll want white for the eyes or you can use safety eyes if you’re into that. I personally just embroidered them because I’m cheap and also I find safety eyes kind of creepy on larger amigurumi.
Hook Size Matters More Than You Think
I started with a 5mm hook which is what the yarn label suggested but then I sized up to 5.5mm because the fabric was too stiff. Capybaras look soft and squishy right, so you want that same vibe in your crochet. If your stitches are super tight it’s gonna look like an armadillo or something instead.
The one thing that really annoyed me was how long it took to stuff this thing properly. Like you think you’ve stuffed it enough and then you realize there’s this weird flat spot on the side and you gotta unstuff part of it and redistribute everything. Took me like 45 minutes just for the stuffing part.
Basic Body Construction
You’re basically making an oval. Start with a magic ring and work in continuous rounds, increasing pretty aggressively for the first like 10-12 rounds. I don’t follow patterns exactly so I just kind of eyeball it – increase until the circle is about as wide as you want the capybara’s body to be length-wise. Does that make sense? They’re longer than they are tall.
Then you work straight without increases for a while to build up the height. This is the boring part where you’re just going around and around. I was watching that show Beef on Netflix during this part and it was actually perfect because I didn’t have to look at my hands much.
After maybe 20-25 rounds of straight crocheting you start decreasing to close up the other end. The decreases should be gentler than the increases were at the start. You want an oval shape not a sphere.
Leg Situation
The legs are basically thick cylinders. Make four of them, each starting with a magic ring and increasing to about 8-10 stitches around depending on how thick you want them. Then work straight for about 15 rounds. Don’t stuff them too firmly or they won’t pose well.
Attaching the legs is where it gets fiddly. You want them positioned so the capybara can sit or stand. I pinned mine in place first with regular sewing pins before I sewed them on because I kept putting them in the wrong spots. The front legs go closer to the head end obviously and the back legs need to be far enough back that the body doesn’t tip forward.
The Head Is Its Own Project
The head is another oval but smaller and you want it kind of rectangular-ish? Capybaras have that distinct blocky head shape. Start the same way with a magic ring, increase to maybe 2/3 the width of the body, then work straight for quite a few rounds before decreasing.
Before you close it up completely you need to add the face. The eyes go pretty high up on the head and far apart. The nose is basically an oval or triangle shape that you can either crochet separately and sew on or embroider directly. I embroidered mine with some Red Heart black yarn I had from another project.
The ears are small semi-circles. Make two of them, just a few rounds each, and sew them on the top sides of the head. They should be kind of subtle because capybara ears aren’t that prominent.
Attaching The Head
This part is important – the head needs to be attached at a slight downward angle because capybaras have that chill droopy look. If you attach it straight up it’ll look like a prairie dog or… I don’t know, something else that sits upright. Use a lot of pins to position it before you sew it on permanently. I used regular sewing thread doubled up to attach it because it’s stronger than yarn for this kind of structural thing.
Details That Make It Actually Look Like A Capybara
okay so this is where you can get creative but also where you can mess it up if you’re not careful. The feet need little toe details – I just did a few stitches in black yarn on each foot to suggest toes, nothing fancy. Three or four little lines.
Some people add a little tail but honestly capybara tails are so small you can skip it. I didn’t add one and nobody’s ever been like “where’s the tail” when they see it.
The mouth – you can embroider a little line under the nose if you want but I actually think it looks better without it. Capybaras have that neutral expression that’s part of their charm.
Proportions Are Weird
One thing I didn’t expect is how weird the proportions feel when you’re making it. The body looks too big compared to the head while you’re working on them separately, but then when you put them together it works out. Trust the process I guess, or don’t and adjust as you go. I’m not your supervisor.
The legs also look stumpy by themselves but that’s accurate to real capybaras so just go with it.
Stuffing Strategy
Use polyfil or any polyester stuffing. I bought the cheap stuff from Walmart. Start stuffing as you go when you’re about 2/3 done with the body – don’t wait until the end or you’ll have a hard time getting it even. My cat kept trying to steal the stuffing while I was working which was annoying because then there’d be little white fluffs all over the carpet.
For the head, stuff it pretty firmly so it holds its shape and doesn’t flop around. The body can be slightly less firm. The legs should be the least stuffed – you want them flexible enough that the capybara can “sit” if you position it that way.
Color Variations
Most capybaras are that brownish tan color but you can mess around with it. I’ve seen people make them in gray or even reddish brown. As long as it’s in that earthy tone range it’ll read as a capybara because the shape is so distinctive.
You could also do like a cream color for a younger capybara? Baby capybaras are slightly lighter than adults.
Size Considerations
Mine ended up being about 14 inches long and maybe 8 inches tall when sitting. That’s using worsted weight yarn and a 5.5mm hook. If you want it bigger use chunky yarn and a bigger hook, if you want it smaller use sport weight and a smaller hook. The principles are all the same.
Just remember that bigger means more stuffing and more time. Like significantly more time. If I was gonna make another one I might actually go smaller because the big one took me like three full evenings plus that whole stuffing ordeal.
Gauge Doesn’t Really Matter
Since this isn’t a wearable you don’t need to stress about gauge. As long as your stitches are tight enough that the stuffing doesn’t show through you’re fine. Hold your work up to the light to check – if you can see gaps between stitches you need to size down your hook or tension tighter.
What If It Looks Wrong
If your capybara looks weird it’s probably one of these things: head too small, legs in the wrong position, or body not oval enough. The body being oval instead of round is crucial. I actually had to remake my body the first time because I made it too spherical and it looked like a guinea pig.
You can also adjust the head angle after you’ve attached it if you’re not happy with it. Just cut the stitches, reposition, and sew it again. I’ve done this multiple times on various projects and it’s not as scary as it sounds.
Adding Accessories If You’re Into That
Some people put little birds on their capybara amigurumi or make tiny oranges to put on its head because there’s those photos of capybaras with stuff balanced on them. I didn’t do this because I wanted mine to be simple but you could crochet a little yellow bird or whatever.
You could also make a little water environment for it to sit in? Like a blue base that looks like water? But that’s getting into diorama territory which is a whole other thing.
Yarn Alternatives I’ve Thought About
I bet Caron Simply Soft would work really well for this if you want that really soft texture. Or if you want to get fancy, something like We Are Knitters wool would be nice but expensive for something this big. Bernat Blanket yarn would make a HUGE one but the stitches might look weird because that yarn is so thick and fluffy.
I almost used some alpaca blend I had but decided against it because it was too expensive to use that much of it on something that was basically a practice project for me.
Time Investment
Plan for at least 8-10 hours of actual crocheting time, more if you’re slower or making it really big. That doesn’t include stuffing and assembly time. It’s not a quick project but it’s also not like a blanket that takes months. Good for when you want something substantial but not endless.
Final Thoughts On The Process
The most important thing is getting that blocky head shape and the oval body right. Everything else is details. If those two elements look good the whole thing will read as a capybara even if your proportions are slightly off or whatever.
Also don’t stress too much about making it perfect. Capybaras have that chill energy anyway so a slightly wonky handmade version fits the vibe. Mine has one ear that’s slightly bigger than the other and I just decided it adds character.
Use stitch markers if you lose track of rounds easily. I don’t usually bother but for something this big with this many rounds it actually helped to mark the beginning of each round, at least for the body section.