

May
Getting Started with Crochet Summer Tops
So basically the thing with crochet shirts is they’re actually way easier than you think once you stop overthinking the whole “garment construction” thing. I made my first actual wearable top in spring 2022 and honestly it was kind of a mess but I wore it anyway because I spent like 30 hours on it.
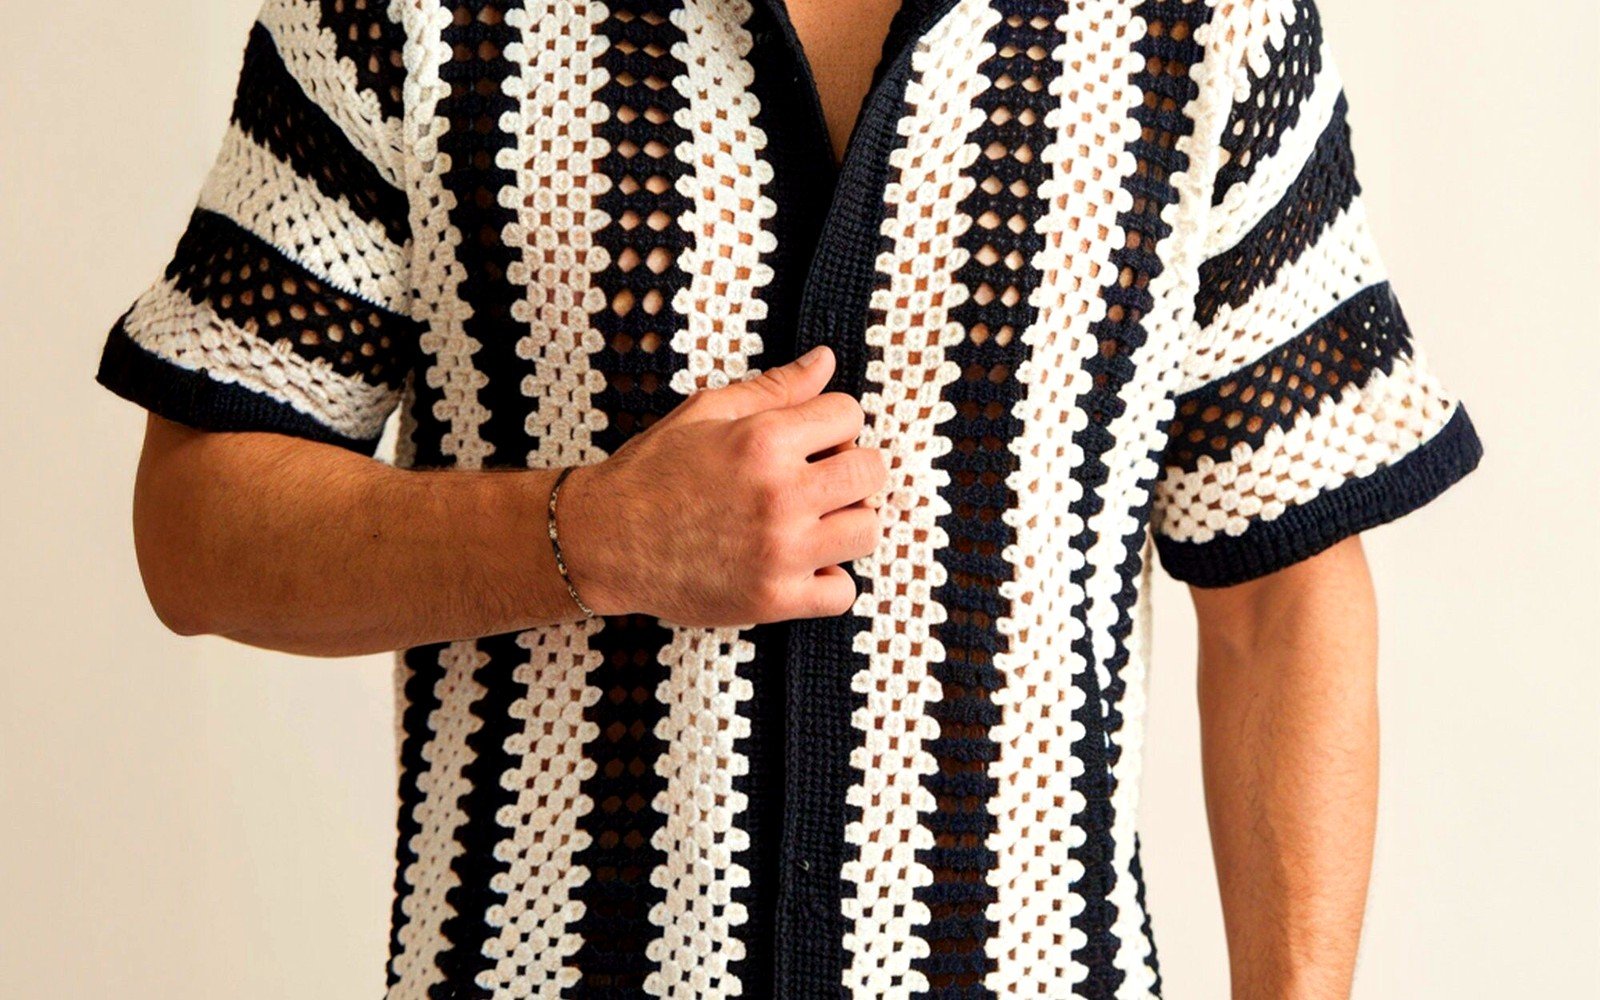
The main thing is you gotta pick a pattern that matches your skill level but also like, don’t be scared of trying something that looks complicated. Most summer tops are just rectangles or circles sewn together. That’s literally it. The fanciest looking ones are usually just granny squares arranged in a way that makes them look intentional.
Yarn Choices That Actually Work
For summer tops you want cotton or cotton blend because acrylic is gonna make you sweaty and miserable. I learned this the hard way with a tank top I made in summer 2024 using Red Heart Super Saver because it was cheap and I was being stubborn about budget. Wore it once, felt like I was wrapped in plastic wrap, never again.
Lion Brand 24/7 Cotton is pretty good and comes in decent colors. It’s not expensive and it holds up in the wash. Hobby Lobby’s I Love This Cotton works too if you have one nearby. The Lily Sugar’n Cream stuff is more for dishcloths but I’ve seen people use it for tops, just makes them stiffer than you probably want.
Paintbox Yarns Cotton DK is nice if you want something with better stitch definition. It’s a little pricier but the colors are actually interesting instead of just basic craft store shades. I used their sage green for a crop top last year and it came out looking way more professional than my skill level deserved.
Weight and Yardage
Most patterns call for DK or sport weight for summer. Worsted weight works but it gets heavy and hot. You need more yardage than you think. Like way more. A basic tank top in size medium probably needs 800-1000 yards minimum. Crop tops need less obviously but still budget like 600 yards to be safe.
I always buy an extra skein because running out of yarn when you’re 90% done is the actual worst feeling and then you can’t find the same dye lot and—anyway just get extra.
Basic Construction Methods
There’s basically three ways people make crochet tops and once you understand this it all makes sense.
The Rectangle Method
You make a big rectangle that’s wide enough to wrap around your torso and long enough to cover from your armpit to wherever you want it to end. Then you fold it in half and seam up the sides leaving arm holes. Add straps or sleeves if you want. This is how I made that first top in 2022 and it’s foolproof except for the part where you have to measure yourself accurately which I definitely didn’t do.
The annoying thing about this method is getting the armholes right. Too small and you can’t move your arms, too big and it looks like you’re wearing a pillowcase. You kinda have to try it on as you go which means lots of holding it up to yourself in the mirror.
Granny Square Tops
Make a bunch of squares, arrange them on your bed or floor in a shape that looks like a shirt, sew them together. People love these because you can work on individual squares while watching TV. I was binging Succession when I made mine and honestly the mindless repetition of granny squares was perfect for that.
The trick is making all your squares the same size which is harder than it sounds. Your tension changes throughout a project. I had some squares that were like half an inch bigger than others and had to fudge the seaming to make it work.
Top-Down Seamless
You start at the neck and work down in one piece. This is actually the superior method once you figure it out because no seaming which is the worst part of any project. But the instructions can be confusing with all the increases and decreases.
Most top-down patterns have you work a yoke (the shoulder/chest area) then split off for the armholes and work the body in rounds. It sounds complicated but you’re basically just following the pattern and trusting the process.
Sizing Issues Nobody Talks About
Okay so here’s the thing that really annoyed me when I was learning this—crochet patterns are not standardized at all. One pattern’s “medium” is another pattern’s “large” and you won’t know until you’re done. Always check the finished measurements not the size labels.
Measure yourself: bust, waist, and the length from your shoulder to where you want the hem. Write these down. Compare them to the pattern’s schematic. Most patterns include a little diagram with measurements and this is like way more important than the pretty photo.
Crochet doesn’t stretch like knitting does so you actually want a bit of positive ease (meaning the garment is bigger than your actual measurements). I’d say add 2-4 inches to your bust measurement for a comfortable fit. Crop tops can be more fitted but anything that goes to your waist or hips needs room to move.
The Gauge Swatch Thing
Everyone says do a gauge swatch and everyone skips it including me most of the time. But for a whole shirt you actually should because if your gauge is off by even a little bit it compounds over all those stitches and you end up with something that doesn’t fit.
Make a swatch that’s at least 6 inches square using the stitch pattern from the pattern. Measure how many stitches and rows you get in 4 inches. If it matches the pattern great. If not you need to go up or down a hook size until it matches. This is boring but gonna save you from remaking the whole thing.
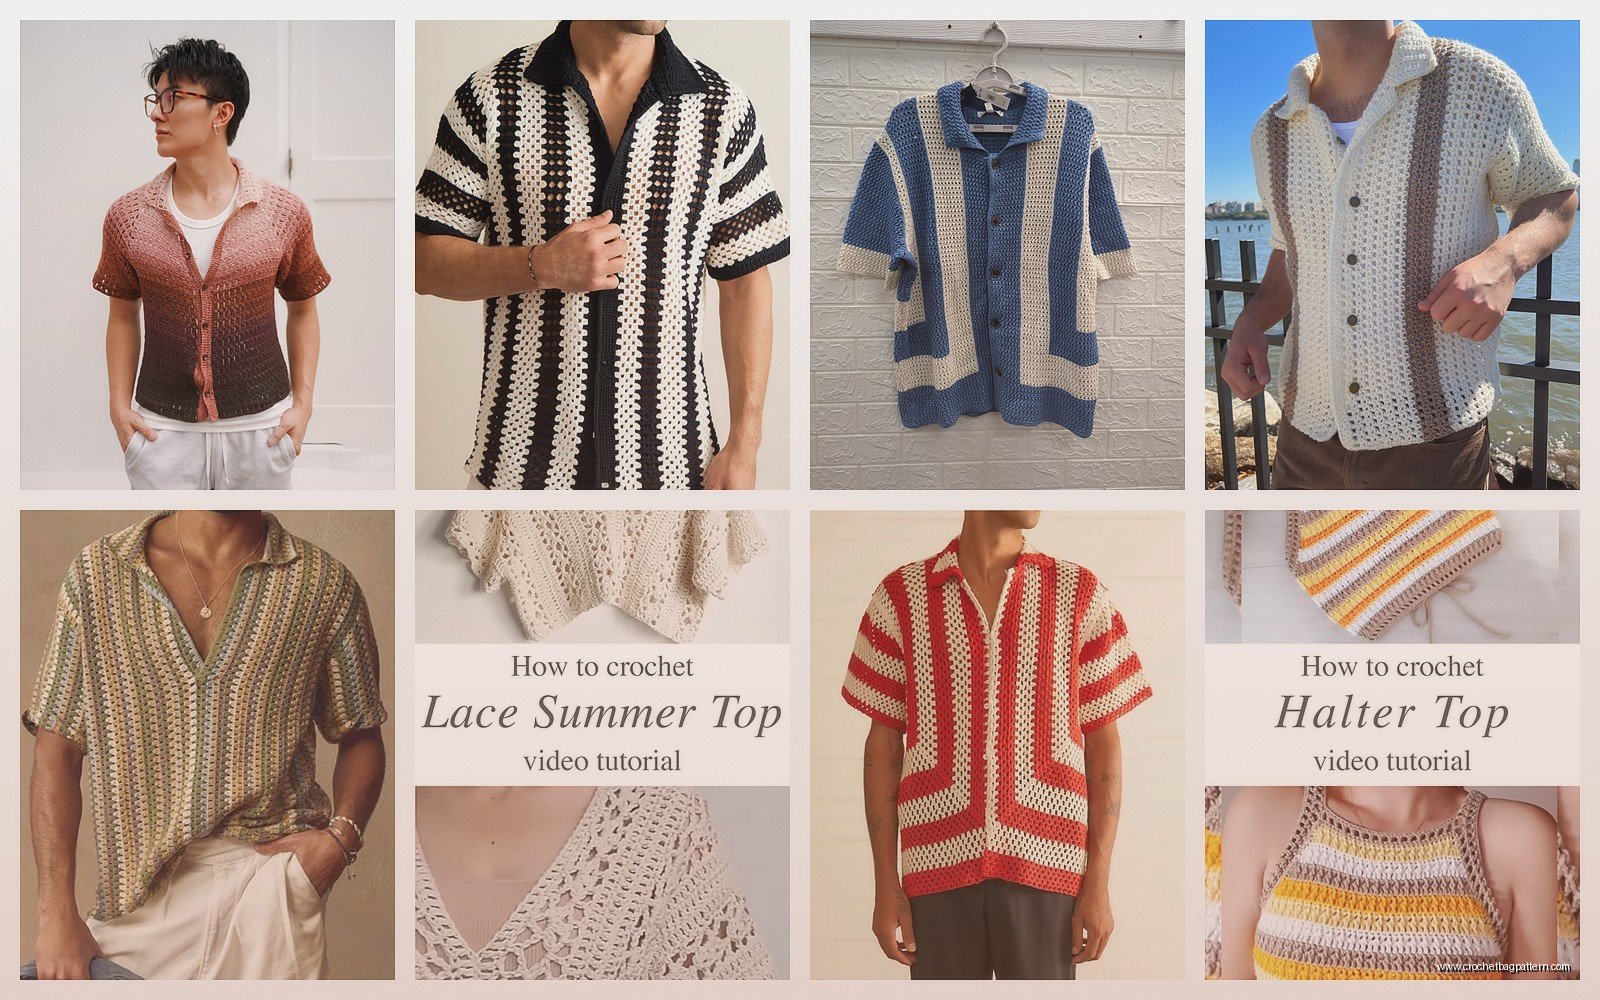
Specific Pattern Types for Summer
Halter Tops
These are good starter projects because they’re basically just a bib that ties around your neck and back. Less fabric to crochet means you finish faster. The hard part is getting the ties long enough and figuring out if you need a built-in bra situation or if you’re wearing something under it.
I made a halter in summer 2024 using this mesh stitch pattern and it was so fast I finished it in like three evenings. Wore it to a beach bonfire and my friend’s dog kept trying to grab the ties which was annoying but whatever.
Tank Tops with Straps
Classic and versatile. You can make the straps thick or thin, straight or with some shaping. Most patterns have you crochet the body flat and then add straps after but some work the straps as you go.
The annoying thing here is strap placement. If they’re too far apart they slide off your shoulders. Too close together and it looks weird. I usually place them about 4 inches in from the edge of the shoulder but this depends on your body.
Off-Shoulder/Bardot Style
These have that elastic neckline that sits below your shoulders. They look complicated but you’re just making a tube that’s gathered at the top. You can add elastic thread while you crochet or sew elastic in after.
I haven’t actually made one of these yet but I’ve watched enough tutorials to know the elastic part is crucial. Without it the whole thing just slides down and you’re constantly pulling it up which defeats the purpose of— okay anyway you need the elastic.
Crop Tops
Same as regular tops but shorter obviously. These are good if you’re nervous about garment construction because less length means less time investment and if it doesn’t work out you haven’t wasted weeks of your life.
The hem can be tricky. You want it to lay flat and not roll up. A border of single crochet or slip stitches usually helps. Some patterns have a ribbed hem which looks professional but ribbing in crochet is tedious.
Construction Tips from Actually Making These
When you’re seaming pieces together use a yarn needle and mattress stitch or whip stitch. Mattress stitch is invisible which is nice but takes longer. Whip stitch is faster and honestly for a summer top that’s gonna have a casual vibe anyway it’s fine if the seams show a little.
If you’re adding straps make them longer than you think you need. You can always trim them or tie them shorter but you can’t add length without it looking weird. I learned this making that 2022 top where the straps were too short and I had to extend them with a different yarn because I’d run out and it looked so bad.
For armholes and necklines add a border. Even just one round of single crochet makes everything look more finished and prevents stretching. I skip this sometimes when I’m lazy and always regret it because the edges get all wavy after wearing it once.
Blocking Makes a Difference
Get the finished piece damp (spray bottle works), pin it to shape on a blocking mat or towels on your floor, let it dry completely. This evens out your stitches and makes the whole thing look less handmade-by-a-beginner and more handmade-on-purpose.
I never blocked anything for the first year of making wearables and honestly what a difference it makes. That halter top I mentioned looked kind of lumpy until I blocked it and then suddenly it looked like something from a boutique. Well, almost.
Patterns to Actually Look For
Ravelry has thousands of free patterns if you search “crochet summer top” or “crochet tank top” and filter by free. The photos are usually from real people who made them so you can see how they actually look not just on a model.
YouTube tutorials are honestly better than written patterns sometimes especially if you’re a visual learner. Watching someone do the increases and decreases makes it click in a way that reading “dc2tog in next 3 sts” just doesn’t.
Look for patterns that have lots of projects in the Ravelry database because that means other people have made it and you can see their notes about sizing issues or yarn substitutions. If a pattern only has like two finished projects that’s a yellow flag that maybe it’s not tested well.
Common Problems and Fixes
If your top is too tight you can’t really make crochet fabric stretch more but you can add side panels in a contrasting color and call it a design choice. I’ve done this twice.
If it’s too loose you can take it in at the side seams or add a drawstring at the waist. Or wear it as a beach coverup and make a smaller one next time.
Curling hems mean your tension was too tight. Wavy hems mean it was too loose. Both are fixable with blocking and a border but prevention is better—check your tension every few rows.
If your straps are uneven just remake the shorter one. Trying to add to it never looks right. This is annoying but it’s faster than you think and makes the whole thing look better.
Washing and Care
Cotton can go in the washing machine on gentle but air dry it flat. The dryer will shrink it and make it all weird and twisted. I ruined a top this way and was so mad at myself.
If you used a cotton blend check what the other fiber is. Acrylic blend can handle the dryer better but cotton-linen needs to be treated like it’s fancy even though you literally made it yourself from craft store yarn.
Store them folded not on hangers because crochet fabric stretches out over time especially at the shoulders. I have one top that’s like three inches longer now than when I made it because I hung it up for a whole summer.
What to Expect Time-Wise
A simple crop top might take 10-15 hours. A full tank top more like 20-30 hours depending on the stitch pattern. Anything with a lot of lacework or complicated shaping can be 40+ hours easy.
Don’t try to rush it. Your tension gets weird when you’re tired or trying to finish before some deadline you set for yourself. I made a top in three days once because I wanted to wear it to a party and the stitches are all over the place. Still wore it but I know it looks homemade in the bad way.
Take breaks. Crochet shoulder is real and it sucks. Every hour or so put it down and stretch. Your hands and shoulders will thank you.