
May
Getting Started With the Actual Lily
So the lily pattern isn’t as bad as people make it seem but you gotta understand it’s like three different parts that all come together. I made my first one in spring 2022 when I was basically stress-crocheting through finals week and honestly it turned out better than expected even though I kept losing count.
You need worsted weight yarn for this. I used Red Heart Super Saver in white because that’s what I had, but later I tried it with Caron Simply Soft in like a pale yellow and that looked way better because it had more drape to it. The Red Heart made the petals kind of stiff which actually wasn’t terrible for a lily since they’re supposed to hold their shape but the softness of the Caron just looked more realistic.
The Center Stamen Thing
Start with the stamen parts because they’re the easiest and you’ll feel like you’re making progress. You need a 3.5mm hook or maybe 4mm depending on how tight you crochet. I always go tighter than patterns say so I size up.
Chain like 15 or so. The exact number doesn’t really matter that much honestly. Then you’re gonna single crochet back down the chain but only in the back loops. This makes it curl naturally which is what you want. Make about 5 or 6 of these little curly pieces.
For the actual stamen color I used some random brown yarn, maybe it was Hobby Lobby’s I Love This Yarn brand? The one in the big skeins. You need such a tiny amount that it’s not worth buying fancy yarn for this part. Just use whatever brown or yellow or orange scrap you have.
The annoying thing about the stamens is attaching them later because they’re so small and fiddly and my cat kept trying to grab them off the table while I was working. Had to lock her out of the room eventually.
Making the Petals
Okay so each lily needs six petals. Some patterns say five but that looks weird to me, six is more realistic. You start each petal the same way.
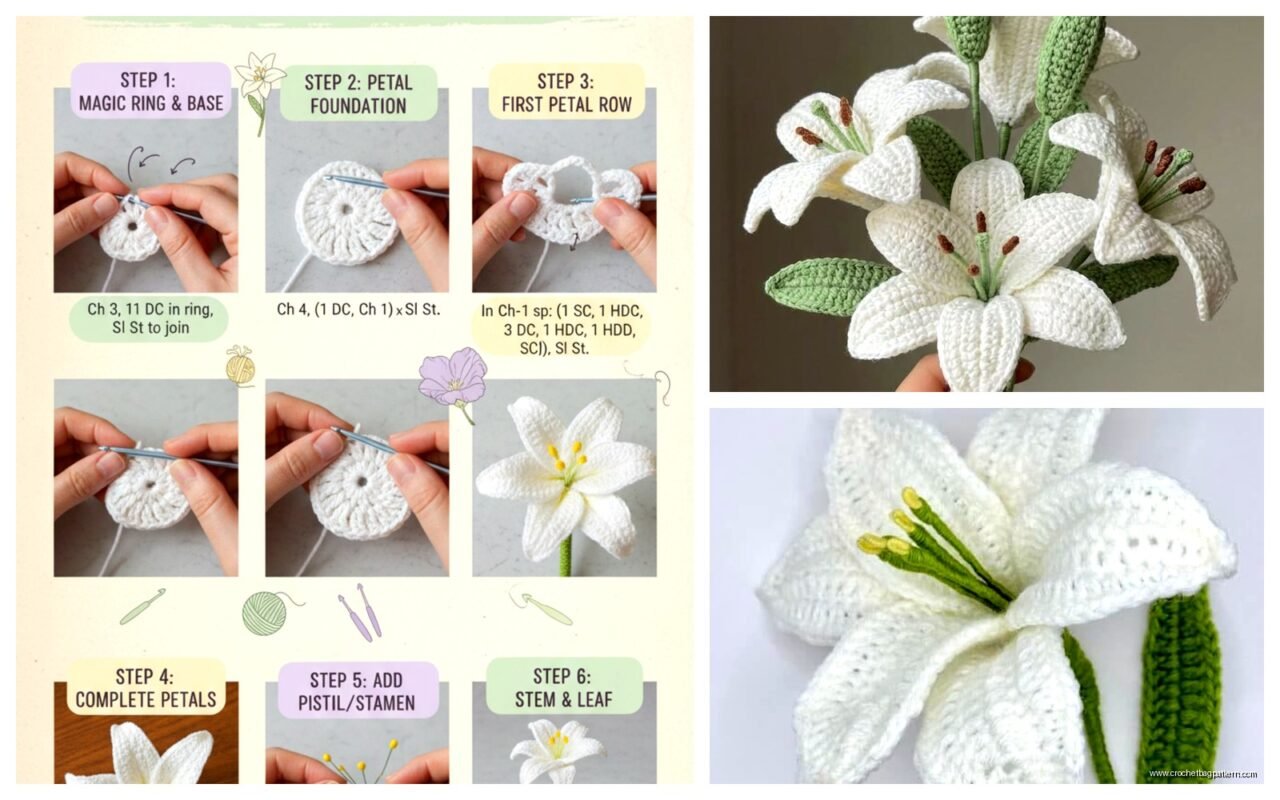
Chain 15. This is gonna be the center spine of your petal basically. Row 1 is where you start building the shape – start in the second chain from hook, do a single crochet, then half double crochet, then double crochet for most of the length. When you get near the end you’re gonna do a couple half double crochets and then single crochet at the very tip.
Now you’re at the pointy end of the petal. Chain 1 and turn your work or actually don’t turn it, you’re gonna work back down the other side of that same chain. This is what makes it petal-shaped instead of just a weird strip.
Coming back down you basically mirror what you did – single crochet at the tip, half double, then double crochet down the length, finishing with half double and single crochet at the base. When you get to the bottom you should have this oval-ish petal shape.
But here’s the thing nobody tells you – that first petal is gonna look lumpy and wrong. The tension is always weird on the first one. I made like four attempts before I got one that didn’t look completely deformed. Just accept that you might need to frog it and start over.
Shaping Because Flat Petals Look Bad
So now you have flat petals which is fine but lilies have that curved-back thing happening. After you finish each petal, don’t cut the yarn yet. You’re gonna work another row around the entire edge.
This part I kind of figured out myself because the pattern I was following (some free PDF I found on Pinterest that had weird translation issues) didn’t explain it well. Work single crochet all the way around the petal edge but when you get to the tip, do 3 single crochets in that one stitch. This makes it curve naturally.
Some people do slip stitches instead but I think single crochet gives it more body. Your choice really.
Assembly Which Is The Worst Part
Once you have all six petals and your stamen pieces you gotta put it together and this is what annoyed me the most about the whole process because there’s no clean way to do it. You’re basically sewing and crocheting at the same time and it gets messy.
Take three petals and arrange them in a circle with the bases overlapping in the center. Use your yarn needle to stitch through all three bases where they meet. Pull it tight so there’s no gap in the middle. Then add the other three petals in between the first layer, kind of offset so it looks full.
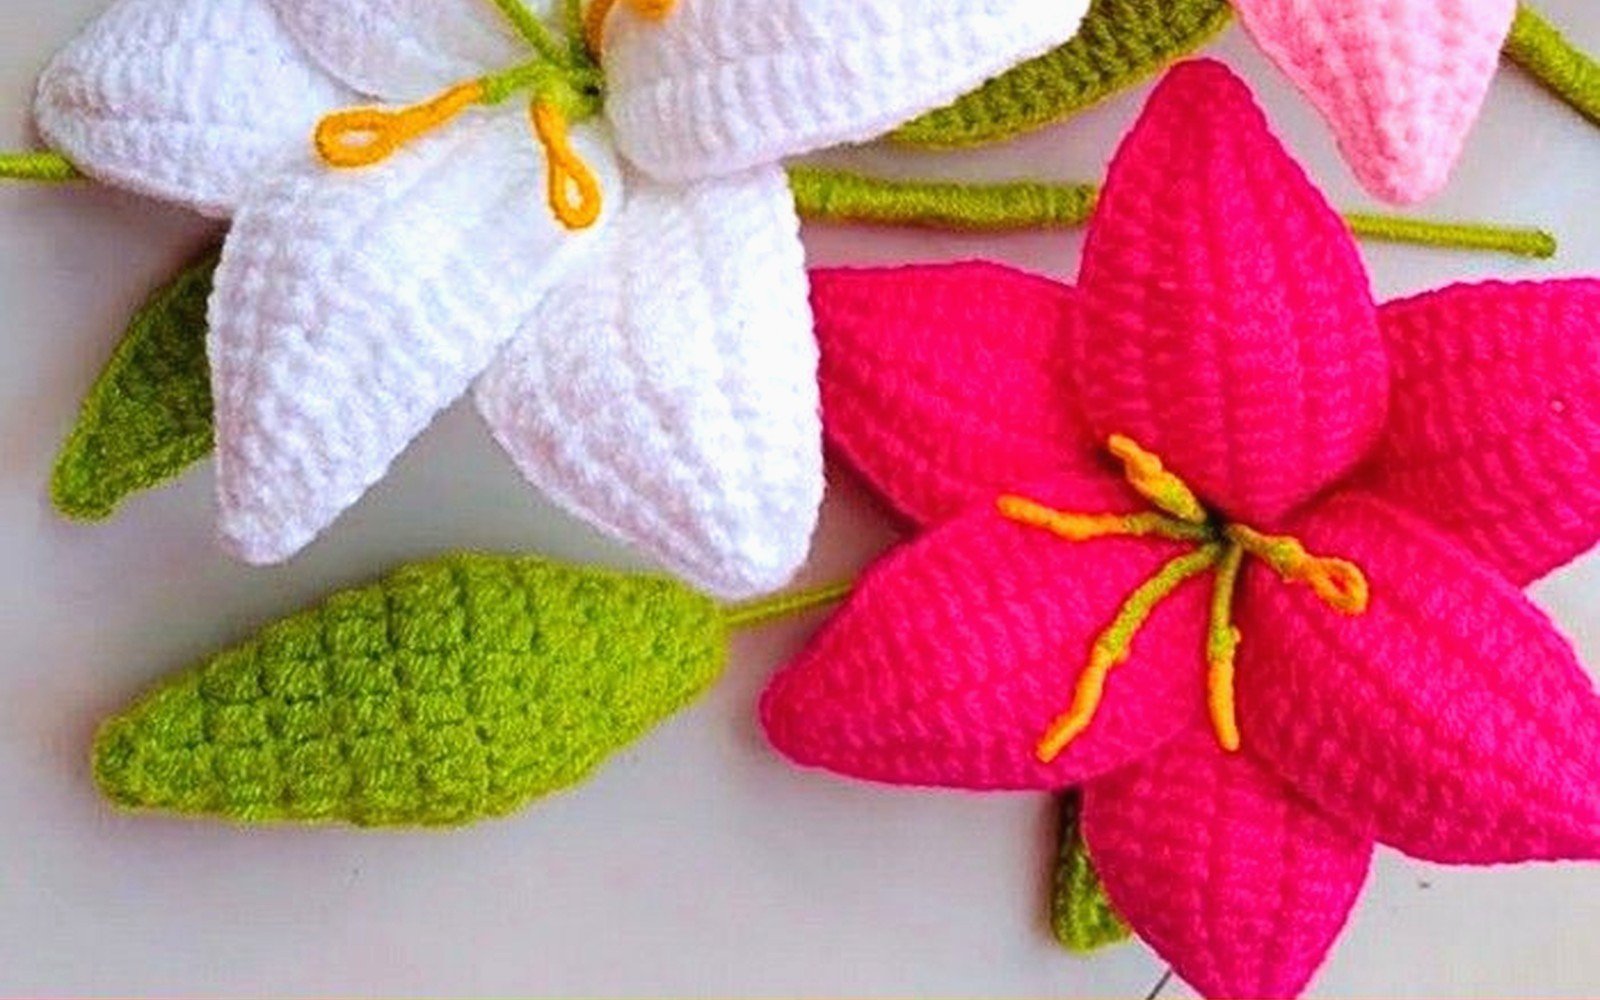
The stamen pieces go in the very center. I bundled mine together and stitched through the base of all of them at once, then attached that bundle to the center of the flower. They should stick up and curl around naturally if you made them right.
Making It Actually Look Like A Lily
Here’s where you can get creative or whatever. Real lilies have those dark spots on the petals so I took a brown marker (just a regular Sharpie) and dotted some spots near the center of each petal. Sounds weird but it actually looks pretty good from a distance.
You can also add wire to the petals if you want them to hold a specific shape. I didn’t do this on my first ones but later I tried it with some floral wire from the craft store. Just weave it through the center chain of each petal before you work the edges. Makes them poseable which is cool but also more annoying to work with.
For leaves you just make elongated ovals similar to the petals but longer and obviously green. I used Vanna’s Choice in like forest green or something. Same basic technique – chain a length, work up one side and down the other, edge it with single crochet.
Stem Situation
The stem is honestly optional depending on what you’re making the lily for. If it’s gonna be a decoration or appliqué or whatever you don’t need it.
But if you want a full flower with stem just chain a long piece – like 40 or 50 chains – and then single crochet back up. You can stuff it lightly with fiberfill to make it more sturdy or leave it flat. Attach it to the base of the flower by stitching through both pieces.
I made a whole bouquet of these in summer 2024 for my mom’s birthday and doing like eight stems in a row was mind-numbing. I was watching Love Island or something and just zoning out making stems. They all ended up slightly different lengths which actually looked more natural anyway.
Yarn Weight Actually Matters More Than You Think
So I mentioned using worsted weight but I also tried this with DK weight yarn once and it made much smaller flowers. Not bad just different. If you want really big dramatic lilies you could even use bulky weight but then you need a bigger hook obviously.
The Red Heart Super Saver is cheap and works fine but like I said it’s stiff. If you want something with better drape try the Caron Simply Soft or Lion Brand Pound of Love. That Pound of Love one is good if you’re making multiple flowers because you get so much yarn and it’s not expensive.
I haven’t tried cotton yarn for this but it might work? Cotton doesn’t have as much stretch so the shaping might be harder. Acrylic is honestly your best bet for this project.
Common Mistakes I Made So You Don’t Have To
Making the petals too tight – they need to have some flexibility or they won’t curve right. If your petals are coming out really stiff and flat you’re probably crocheting too tight. Size up your hook.
Not securing the center well enough. My first lily literally fell apart because I didn’t stitch through all the layers properly at the center. You need to go through each petal base multiple times to make sure it’s solid.
Uneven petal sizes. This happens when you’re not consistent with your chain count at the beginning. I started writing down my starting chain number after I made one lily with petals that were all different sizes and it looked ridiculous.
Forgetting which side is the right side. With single crochet especially it can be hard to tell. I usually mark the right side with a stitch marker or just a piece of contrasting yarn woven through so I don’t get confused halfway through.
Variations That Actually Work
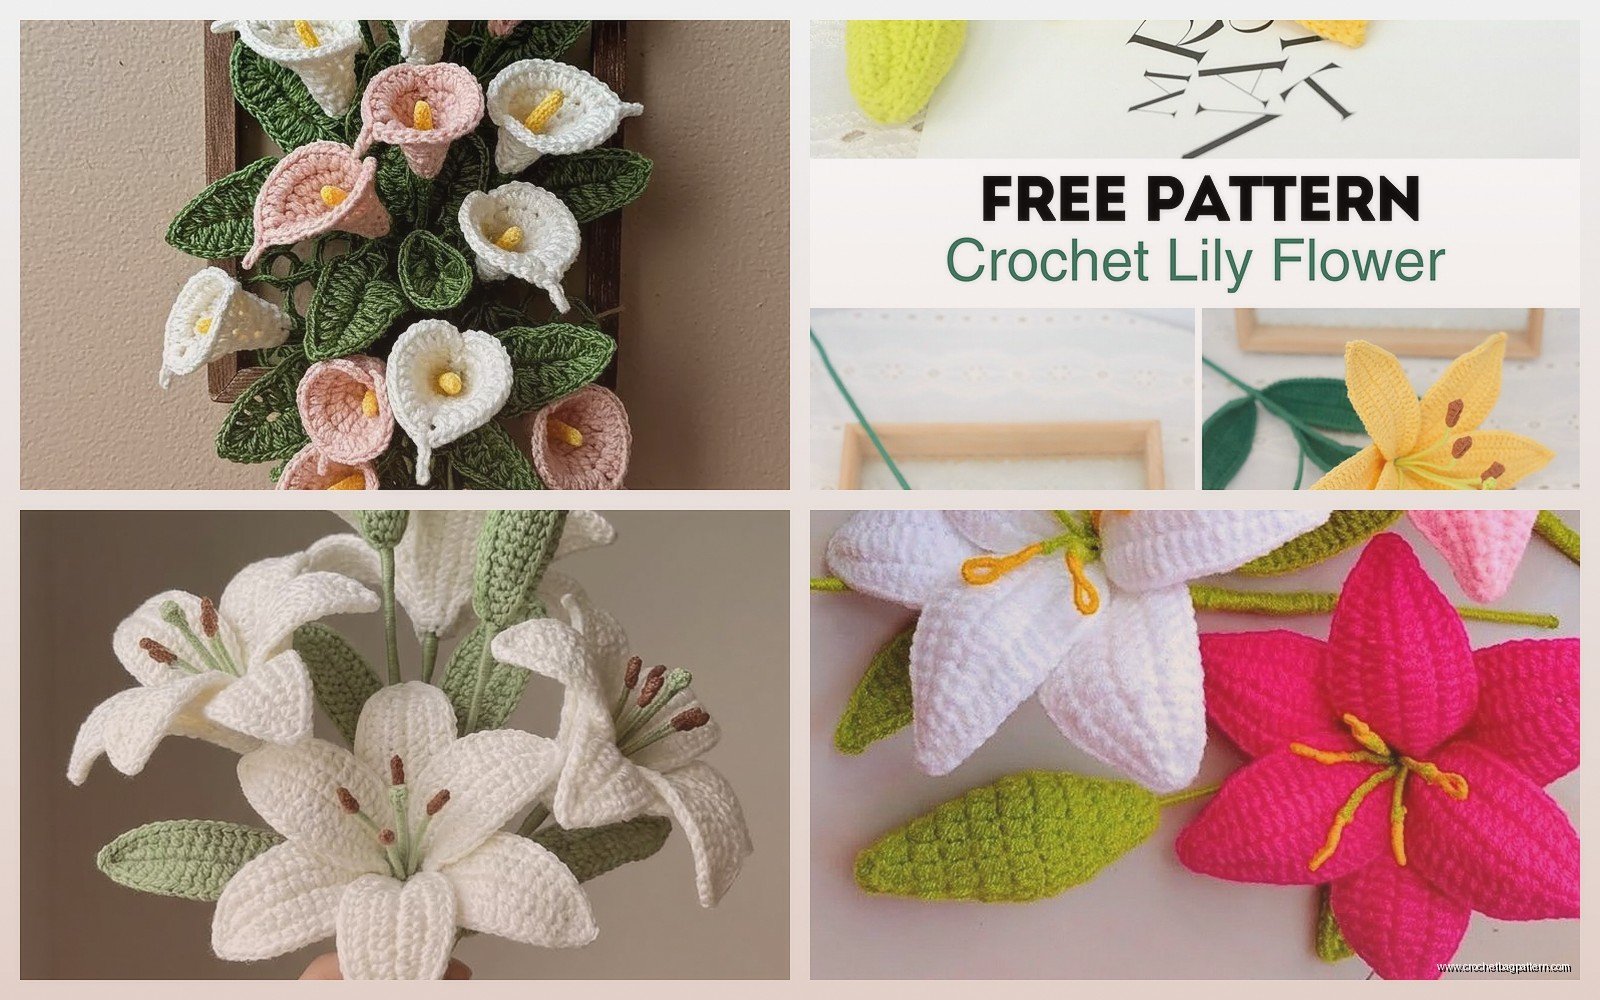
You can make these in basically any color obviously. Pink lilies are pretty, orange ones look like tiger lilies if you add the spots. I made purple ones that didn’t really look like any real lily but they were cool anyway.
Size variations – if you want a small lily for like a hair clip or something just start with fewer chains. Instead of 15 do 10 or even 8. Everything else stays the same just smaller.
Double layer petals – make twelve petals instead of six and layer them. This makes a really full dramatic flower but it’s also way more work and uses more yarn.
Adding stamens that are different lengths makes it look more realistic. Instead of making all your stamen pieces the same chain length vary them by a few chains each.
What To Actually Do With These Flowers
I’ve made them into hair clips by attaching them to those metal clip bases from the craft store. Just hot glue or stitch them on.
Bouquets are obvious – make a bunch with stems and arrange them in a vase. They last forever unlike real flowers which is the whole point.
Someone told me they made them into a garland for a wedding which seems like a lot of work but would look pretty cool. You’d need to make like 20 or 30 though.
Appliqués for bags or jackets – just make the flower without the stem and stitch it onto whatever. I put one on a plain tote bag and it actually looked decent.
Time Investment Reality Check
One lily with all six petals and stamens takes me maybe an hour and a half? That’s if I’m watching TV and not really rushing. If you’re newer to crochet maybe two or three hours. The petals themselves are quick, it’s the assembly that takes time.
For a whole bouquet of like 6-8 flowers you’re looking at a full weekend probably. I did mine over a few evenings after work which was fine but my hands were tired by the end.
Blocking Makes A Difference Maybe
I don’t usually block stuff because I’m lazy but with these flowers it actually helps. After you finish the whole thing spray it lightly with water (or use a spray starch if you want them really stiff) and pin the petals into the shape you want. Let it dry completely.
This is especially helpful if your petals are curling weird directions or not laying flat. The moisture lets you reshape them and then they hold that shape once dry.
I didn’t block my first few and they were fine but the ones I did block looked more polished and professional I guess.
Pattern Notes That Might Help
If you’re following a written pattern and it says “work in BLO” that means back loops only. This creates a ridge effect that can look good on the petals.
Some patterns use treble crochet for longer petals but I think double crochet is enough. Trebles make it too long and floppy in my experience.
Foundation single crochet is better than chain+sc if you know how to do it but chains work fine if you don’t.
When a pattern says “fasten off” you can either cut the yarn and weave in the end or just carry it to the next petal if you’re using the same color. Carrying it means fewer ends to weave in later which I’m always in favor of.
The whole thing is pretty forgiving honestly – lilies aren’t supposed to be perfect and symmetrical so if your petals are slightly different sizes or shapes it just looks more natural anyway.