
Mar
The Basic Shamrock Thing I Made Last March
So I was making these shamrocks in March 2023 while my cat kept trying to steal the yarn ball and honestly it’s not that complicated but there’s this one step that drove me absolutely nuts. You start with a magic ring which is way easier than it sounds, basically you’re just making a loop that you can tighten later.
For the yarn I used Red Heart Super Saver in Spring Green because it was literally the only green I had in my stash and it was like $3 at Walmart. Some people get fancy with the expensive stuff but honestly for shamrocks you’re gonna want something cheap because you’ll probably make like fifteen of them once you get going.
The Actual Pattern Parts
Each shamrock has three heart shapes and a stem. The hearts are the annoying part because you have to make them separately and then… well I’ll get to that. Start with your magic ring and chain one. That chain doesn’t count as a stitch which confused me for the longest time when I first started crocheting.
Work 6 single crochets into the ring. Pull it tight. This is your base for one heart petal. Then you’re gonna chain one and turn your work, which feels weird but just do it.
Row 2 is where it starts looking like something: 2 single crochet in first stitch, single crochet in next 4 stitches, 2 single crochet in last stitch. So you’re increasing on both ends. You should have 8 stitches total.
Chain one, turn again. Row 3: 2 single crochet in first stitch, single crochet across until the last stitch, 2 single crochet in that last one. Now you’ve got 10 stitches.
Here’s where it gets fiddly and this is the part that annoyed me SO MUCH. You have to shape the top of the heart with this weird combination of stitches. Slip stitch in first stitch, then do 5 double crochets in the next stitch (yeah, FIVE), skip 6 stitches (which seems insane but trust me), then 5 double crochets in the next stitch, slip stitch in the last stitch.
The thing that drove me crazy was keeping track of which stitch I was supposed to skip. I kept losing count because my cat Luna was being absolutely feral that day and I had to keep stopping to move her off my lap. Also I was watching some true crime documentary and got distracted during the important part about the—anyway.

Fastening Off and Making More Hearts
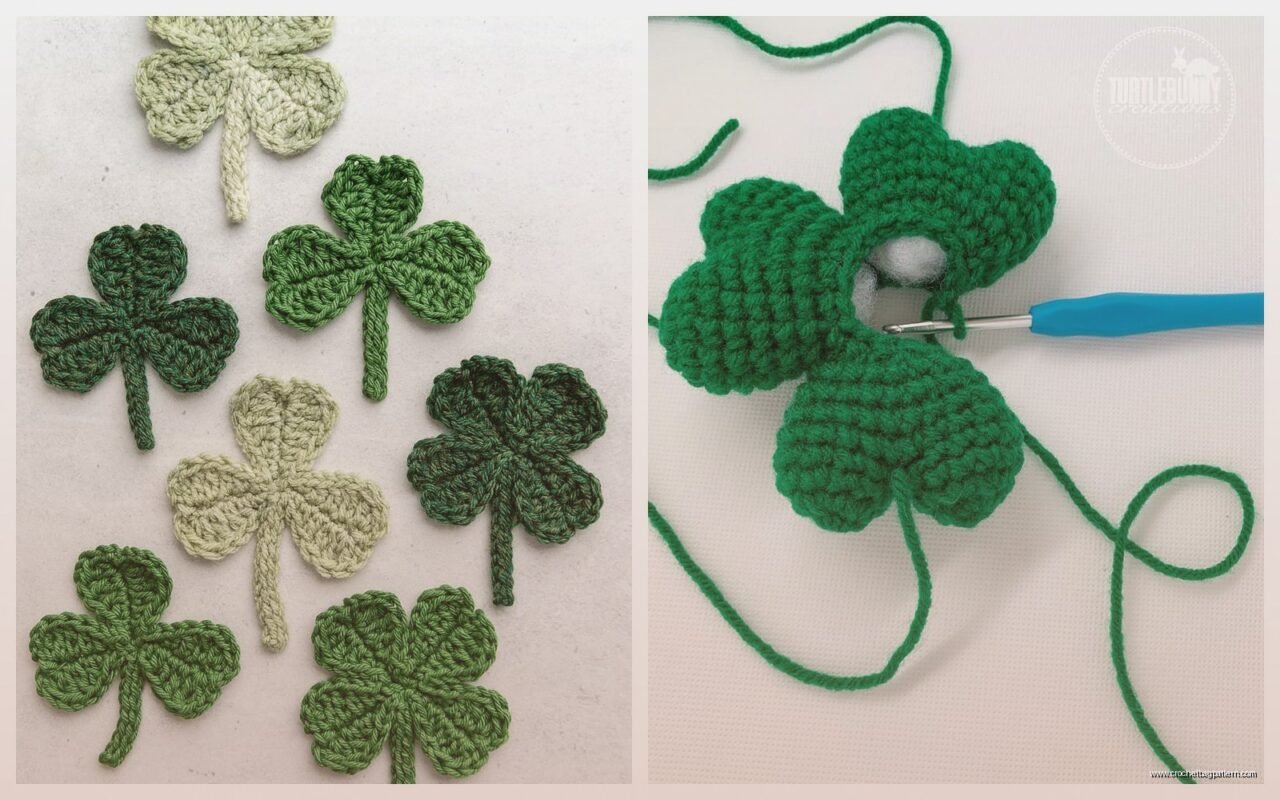
Fasten off with a long tail, like maybe 8 inches. You need this to sew everything together later. Make two more hearts exactly the same way. If you’re using different shades of green it actually looks pretty cool, like I tried one batch with Red Heart in Paddy Green and mixed it with some Bernat Super Value in Grass Green and the variation was nice.
By the third heart you’ll have the rhythm down and it goes faster. The first one took me maybe 15 minutes because I kept second-guessing myself, but the third one was done in like 6 minutes.
Joining the Hearts Together
This is the part nobody explains well in patterns online. You’ve got three hearts and they need to look like a shamrock, right? So you arrange them in a circle with the points facing outward and the rounded parts meeting in the middle.
Use your yarn needle and those long tails you left. Start by tacking two hearts together where they touch at the center. Just a few stitches through both pieces to hold them secure. Then add the third heart, attaching it to both of the first two hearts. You’re basically making a Y shape in the middle where all three hearts connect.
Don’t pull too tight or it’ll pucker weird. I made that mistake on my first attempt and had to redo the whole joining part because it looked lumpy and sad.
The Stem Part
For the stem you can either crochet a little tube or just do a chain. I’m lazy so I usually just chain like 8-10 stitches depending on how long I want the stem. Some people get fancy and make actual dimensional stems with slip stitches worked into a chain but that seems like overkill for something this small.
Attach the stem to the back of your shamrock at the center point where all three hearts meet. Sew it on with the same green yarn or if you wanna get technical you could use a darker green for the stem which looks more realistic I guess.
Size Adjustments and Hook Sizes
I used a size G hook (4.0mm) with the Red Heart Super Saver and it made shamrocks that were about 3 inches across. If you want them smaller for earrings or something use a smaller hook, like maybe an E (3.5mm). For bigger ones like coasters or decorations go up to an H or I hook.
The yarn weight matters too obviously. Worsted weight is standard but I saw someone on YouTube use cotton thread and a tiny hook to make miniature ones and they turned out really delicate and nice. I think she said she used Aunt Lydia’s crochet thread but I haven’t tried that myself.
What to Actually Do With These Things
So you’ve made shamrocks and now they’re just sitting there. I made like twenty of them last year and had to figure out what to do with them all. Here’s what actually worked:
Garland is the easiest. Just chain a long strand (I did like 6 feet) and then attach the shamrocks along it every 6 inches or so. You can sew them on or use hot glue if you’re in a hurry. Hang it across a doorway or mantel or whatever.
Coasters work if you make them bigger and stiffen them. I used this Mod Podge fabric stiffener stuff, you just soak the shamrock in it and shape it flat on wax paper. Let it dry overnight. Makes them waterproof-ish and they hold their shape.
Hair clips are cute if you have kids or if you’re into that look. Hot glue a shamrock onto a plain hair clip from the craft store. Done.
Bookmark version: make the shamrock smaller and attach it to a ribbon. Actually useful if you read physical books.
The Stiffening Issue
Regular shamrocks without stiffener are kind of floppy. That’s fine for garland or anything that’s just hanging, but if you want them to stand up or hold a shape you gotta stiffen them. There’s a bunch of methods and I’ve tried most of them:
Fabric stiffener (Mod Podge or Aleene’s): Works great, dries clear, makes them kind of plastic-y. Downside is they’re not washable after.
Sugar water: Old school method, mix equal parts sugar and water, boil it, soak your shamrock, shape it, let it dry. It works but attracts bugs if you’re in a humid place and also it can get sticky in summer heat.
White glue diluted with water: Cheap option, works okay. Mix like 3 parts glue to 1 part water. Similar results to fabric stiffener but takes longer to dry.
Spray starch: Easiest but weakest hold. Good if you just want them slightly less floppy.
Color Variations That Don’t Look Stupid
Okay so green is obvious for St Patrick’s Day but after you’ve made a dozen green ones it gets boring. I experimented with some other colors that still felt themed:
White shamrocks with green stems look really clean and modern. I used Lily Sugar’n Cream in white (it’s cotton so it has nice stitch definition) and it looked way fancier than the acrylic ones.
Ombre effect using three different shades of green, one for each heart. Caron Simply Soft has like five different greens that work well together.
Gold metallic yarn for fancy ones. Lion Brand has this Metallic yarn that’s kind of annoying to work with because it splits but the finished product looks expensive.
I tried rainbow shamrocks once thinking they’d be fun but honestly they just looked like generic flowers, not shamrocks. Didn’t have the right vibe.
Common Mistakes I Made
Making the hearts different sizes because I wasn’t consistent with tension. This matters more than you’d think because when you join them together it’s super obvious if one is bigger. I had to remake hearts several times to get a matching set.
Not leaving long enough tails for joining. Then I had to weave in new yarn and it was messy.
Pulling the magic ring too tight at the start. It puckered the whole heart and I couldn’t fix it without starting over.
Trying to join them with hot glue instead of sewing. It looked lumpy and the glue showed through the stitches. Just sew them properly, it takes an extra 3 minutes.
Speed Tips Once You’ve Made a Few
After you’ve made like five shamrocks you’ll notice you can work faster if you chain your assembly process. I started making all the hearts first in batches of nine (so three shamrocks worth) while watching TV or whatever, then I’d do all the joining at once. Way more efficient than making one complete shamrock at a time.
Keep your yarn tails organized. I clip them with those little binder clips so they don’t tangle while I’m working on other pieces.
Use stitch markers for the magic ring if you’re new to them. Just mark where your first stitch goes so you don’t lose your place.
The Pattern Written Out More Clearly
Since I kind of scattered the instructions earlier, here’s the full thing in order:
For each heart (make 3):
Magic ring, ch 1. Work 6 sc into ring, pull tight. Ch 1, turn.
Row 2: 2 sc in first st, sc in next 4 st, 2 sc in last st. (8 sts) Ch 1, turn.
Row 3: 2 sc in first st, sc in next 6 st, 2 sc in last st. (10 sts) Ch 1, turn.
Row 4: Sl st in first st, 5 dc in next st, skip 6 st, 5 dc in next st, sl st in last st. Fasten off with long tail.
For stem:
Ch 10 (or desired length). Fasten off.
Assembly:
Arrange hearts in shamrock shape with points facing out. Sew hearts together at center where they meet. Attach stem to back center. Weave in ends.
Variations I Saw Other People Do
There’s this whole community of people who make shamrocks apparently and some of them get really creative. Someone made giant floor cushion shamrocks using bulky yarn and like a Q hook. Another person made shamrock bunting with tiny ones attached to bias tape.
I saw a version where each heart had a different stitch pattern – one was all single crochet, one was shell stitch, one was popcorn stitch. It looked textured and interesting but also like way too much work for me.
There’s also 3D puffed shamrocks where you make two flat ones and stuff them together with fiberfill. They’re cute but you use twice as much yarn and they’re harder to store.
Actual Time Investment
People always ask how long these take. For me now, about 20 minutes per shamrock including joining and weaving in ends. When I first started it was more like 45 minutes because I kept recounting stitches and checking the pattern.
If you’re making a bunch for decorations, plan on an evening of crocheting to make maybe 8-10 shamrocks. That’s enough for a decent garland or to scatter around as decorations.
The stiffening process adds time if you’re doing that – you gotta wait for them to dry which is usually overnight.
Honestly the hardest part is deciding when to stop making them because once you get going it’s kind of addictive and before you know it you have forty shamrocks and no idea what to do with them all. I ended up giving a bunch away to coworkers last year.