
Mar
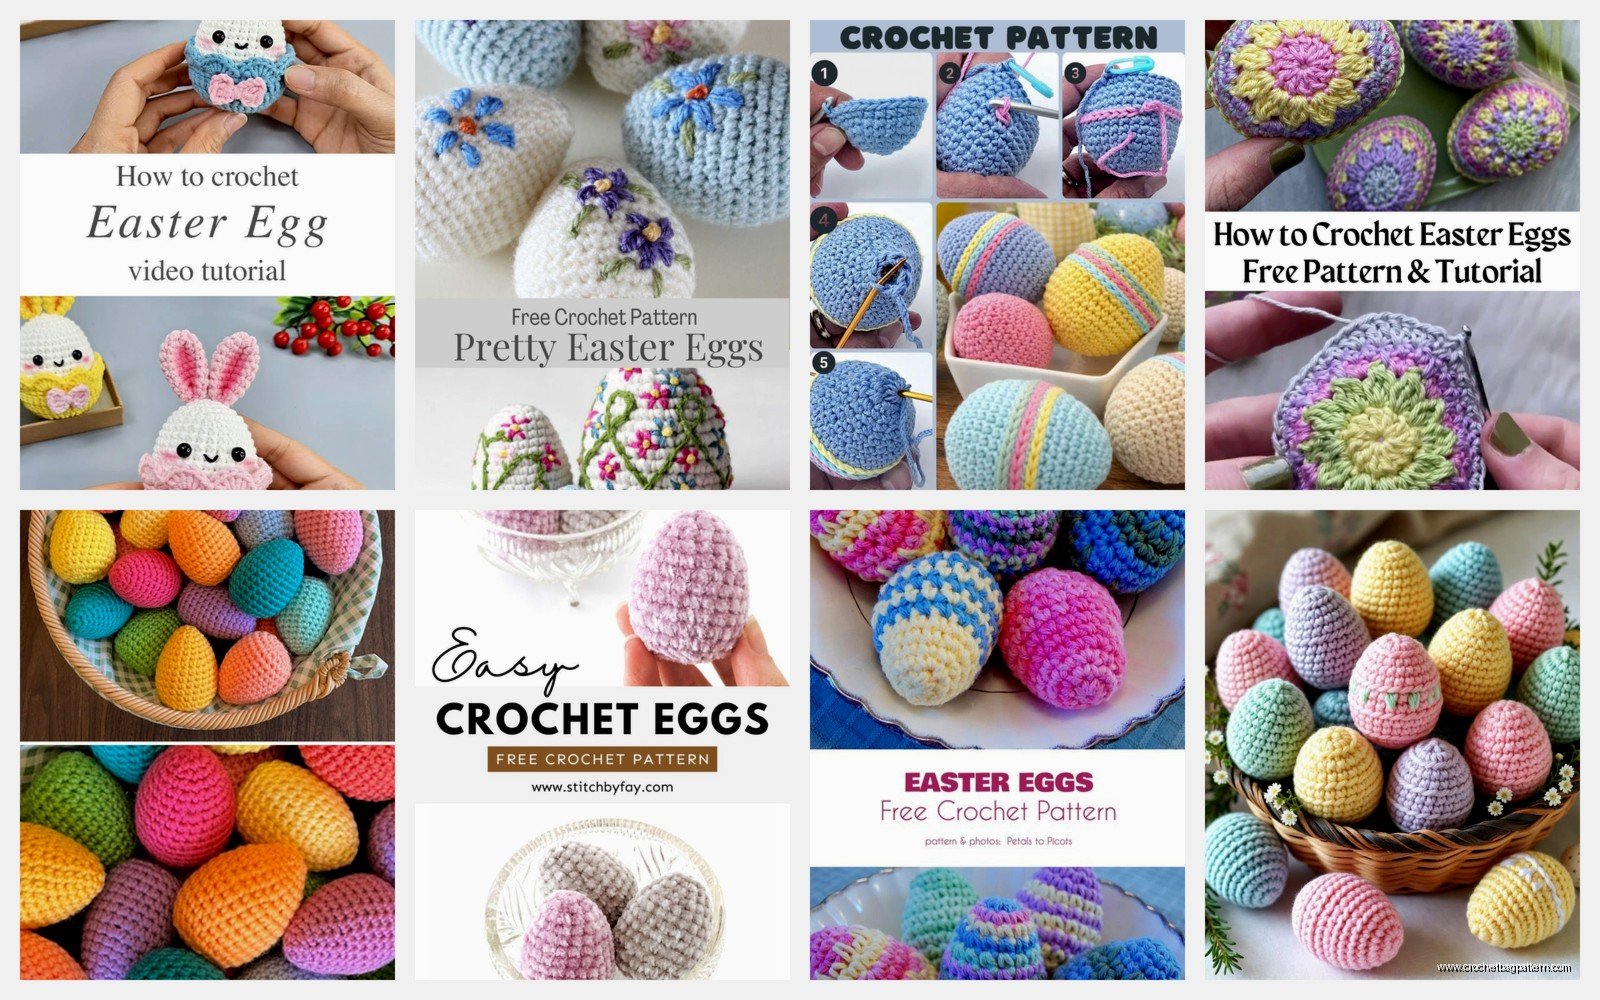
okay so crochet easter eggs
So I made these back in spring 2022 when I was basically just trying to keep my hands busy because my sister kept texting me about family drama and I needed something mindless to do while half-watching her meltdowns unfold. Easter eggs are actually perfect for that because they’re small enough that you can finish one in like an hour or two depending on the size.
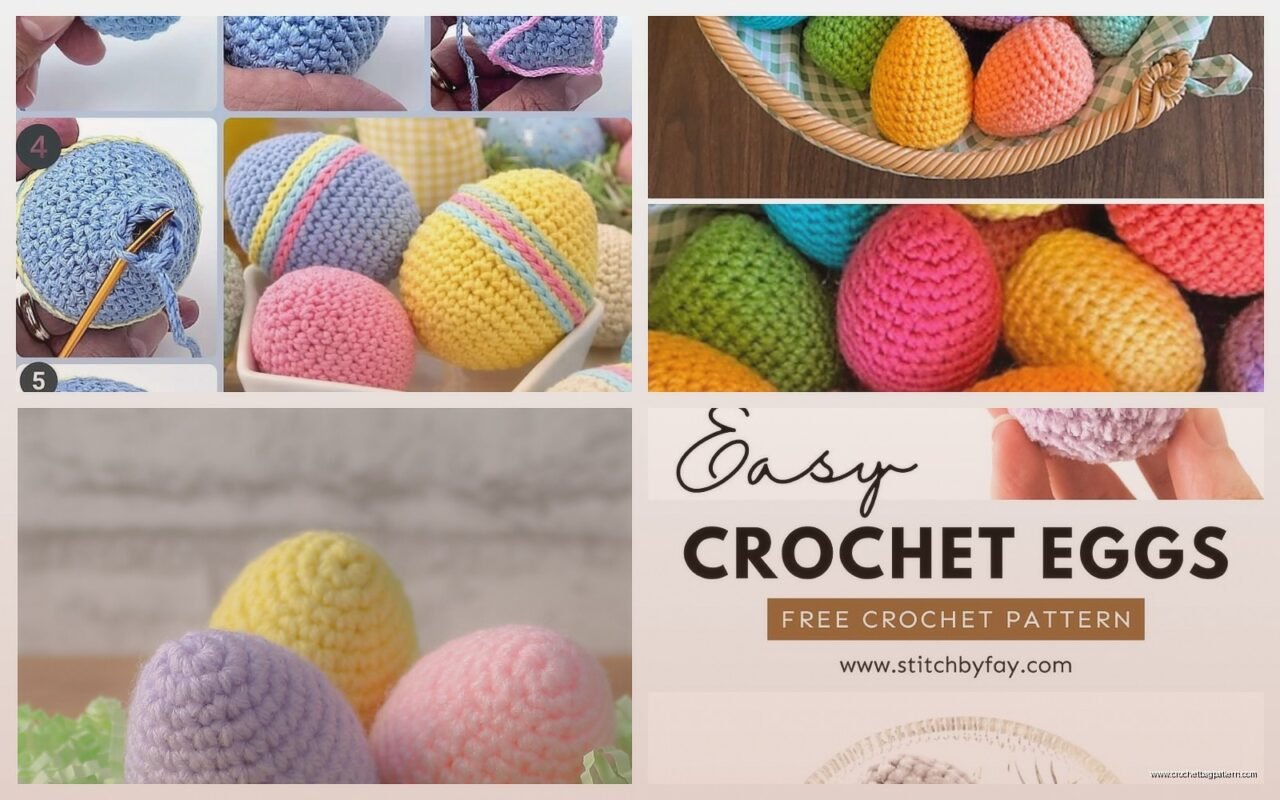
The basic idea is you’re gonna crochet around a plastic easter egg. You know those cheap ones that come in bags of like 50 from the dollar store? Those work perfect. I used the medium sized ones, maybe 2.5 inches tall or something. You could also stuff them with polyfil if you want soft ones but honestly the plastic ones are sturdier and you can hide little candies or whatever inside which kids actually like.
what you actually need
I used Red Heart Super Saver because that’s what I had in my stash. Got a bunch of pastel colors – the soft pink, that minty green one, pale yellow. Also used some Caron Simply Soft in like a lavender shade because it’s a bit softer if you’re making these for little kids who might chew on them or whatever. Hook size depends on your yarn but I used a 4mm hook (G hook I think?) because you want a tight stitch so the stuffing doesn’t show through or the plastic egg doesn’t peek out.
You also need:
- plastic eggs obviously
- yarn needle for weaving in ends
- maybe some polyfil if you’re doing the stuffed version
- stitch markers help but aren’t necessary
the basic pattern thing
So there’s no like official pattern for these because you’re basically just making an oval shape that fits around your egg. Start with a magic ring. If you don’t know magic ring just chain 4 and slip stitch to make a circle, whatever works.

Round 1: Make 6 single crochet in the ring. Don’t join, you’re working in a spiral which is way easier than joining every round.
Round 2: Increase in every stitch so you have 12 stitches total.
Round 3: *1 sc, inc* repeat around. That gives you 18.
Round 4: *2 sc, inc* repeat around. Now you have 24.
Keep going with this pattern until your circle is wide enough to cover the widest part of your egg. For medium eggs I usually stopped at like 30 or 36 stitches. Just hold it up to your egg and check. The thing that annoyed me SO MUCH about this process is that every egg is slightly different even from the same bag, so you kinda have to adjust as you go and it’s not like you can just follow a pattern blindly.
the middle part
Once your circle is big enough, you just work even (no increases or decreases) for several rounds. This creates the sides of the egg. How many rounds? I don’t know, hold it up to your egg and see. For me it was usually like 8-10 rounds of just straight single crochet around and around.
My cat kept trying to steal the plastic eggs while I was doing this btw, she thought they were toys and would bat them across the room.
Here’s where you gotta pay attention – when you get to about halfway up your egg, slip the crochet piece over the egg to make sure it fits. If it’s too tight you might need to add a couple increases scattered around. If it’s too loose… well that’s trickier, you might need to start over with a smaller hook or tighter tension.
closing it up
The top part is basically the reverse of the bottom. You’re gonna start decreasing to close up the egg.
Start with: *4 sc, dec* around (or whatever number works for your stitch count)
Next round: *3 sc, dec* around
Then: *2 sc, dec* around
Then: *1 sc, dec* around
Finally: dec around until you have just a few stitches left
Before you close it completely, make sure your plastic egg is inside! I forgot once and had to undo like 5 rounds which was super annoying. If you’re doing the stuffed version, stuff it firmly with polyfil before closing.
Cut your yarn leaving a long tail and use your yarn needle to weave through the remaining stitches, pull tight to close the hole, then weave in your end.
making them actually look cute
Plain eggs are fine but kind of boring. I added stripes to some of them by just changing colors every few rounds. To change colors, finish your last stitch with the new color – so like when you pull through the last loop of a single crochet, pull through with the new color instead. Carry the old color along inside your work or cut it and weave it in later.
You can also do polka dots by embroidering them on after with a yarn needle. Just make little circles with whatever color you want. Or use surface crochet to add lines or zigzags or whatever.
Some people get really fancy and add little flowers or bows but honestly I think that’s… I mean you can do it but it seems like a lot of extra work for something that’s already pretty cute on its own.
the stuffed version differences
If you’re not using plastic eggs and just stuffing with polyfil, the pattern is basically the same but you wanna work a bit tighter so the stuffing doesn’t show through. I actually prefer a 3.5mm hook for this even with the same yarn weight. Makes it firmer.
Also you’re gonna stuff it REALLY full to get that egg shape. Like more than you think. Keep adding polyfil and shaping it with your hands to make it oval-ish. The bottom should be slightly wider than the top to look like a real egg.
I made like 6 of these for my niece and she actually played with them for months which was surprising because kids usually forget about stuff after like a day.
size variations
You can make tiny ones with thread and a tiny hook. I tried this once with some Aunt Lydia’s crochet thread and a size 7 steel hook (1.5mm I think?) and made eggs that were maybe an inch tall. They’re cute for garlands or jewelry or whatever but they take forever because the stitches are so small.
Or go huge – I saw someone online who made one with like Bernat Blanket yarn and it was the size of an actual ostrich egg basically. Would be good for decoration I guess but seems impractical.
tension issues
If your tension is inconsistent (mine definitely is) your eggs might come out lopsided. Just go with it honestly. They’re supposed to look handmade. Or you can block them by getting them wet, shaping them around the plastic egg, and letting them dry. I’ve never bothered with this because blocking seems like extra steps but some people swear by it.
pattern variations I’ve tried
Striped eggs are probably the easiest variation. Just change colors every 2-3 rounds. You can do thick stripes or thin ones. I did some with Red Heart in Spring Green and White alternating every 2 rounds and they looked pretty good.
Speckled eggs are fun too – use a variegated yarn or one of those speckled yarns that are popular now. I can’t remember the brand name but there’s one that has little flecks of different colors in it… Lion Brand maybe? It gives that robin’s egg look without having to do anything special.
You could also do granny square eggs where you make two granny circles and seam them together around the egg but that seems more complicated than just working in rounds.
what to do with them once you make them
I put mine in a bowl on the table for like a month and then packed them away. You could string them on ribbon to make a garland I guess. Or use them for an easter egg hunt where they’re reusable year after year. Some people fill the plastic ones with candy or small toys before crocheting around them so when kids find them they get a surprise.
My sister uses hers as decorative bowl fillers which seems very pinterest-y but whatever makes her happy.
common problems
If your egg is too pointy on the ends, you increased or decreased too fast. Try spreading the increases/decreases over more rounds for a gentler curve.
If it’s too round and not oval enough, you didn’t work enough even rounds in the middle section. Add more rounds of straight single crochet before starting your decreases.
If the plastic egg shows through, your tension is too loose or your hook is too big. Go down a hook size or work tighter stitches.
If you can’t get the last few stitches closed neatly at the top, just accept that it won’t be perfect and use your yarn tail to stitch it closed as best you can. Then make sure that end is facing down when you display it.
yarn amounts
One medium egg uses maybe 20-30 yards of yarn? I never measured exactly but it’s not much. You could probably make 10-15 eggs from one skein of Red Heart Super Saver which is like 364 yards I think. So it’s a pretty economical project if you’re trying to use up scrap yarn.
Actually that’s what I did – just grabbed random leftover bits from other projects and made a whole bunch of eggs in different colors. Some were solid, some striped, whatever I had on hand.
timing
Like I said earlier, one egg takes maybe an hour if you’re watching TV or talking or whatever. If you’re really focused probably 30-45 minutes. The tiny thread ones take longer, maybe 2-3 hours because the stitches are so small and you need more of them.
I was watching some true crime documentary when I made most of mine in 2022… can’t remember which one but it was about a cult or something. Anyway the eggs were a good distraction during the intense parts.
kid-friendly versions
If you’re making these for babies or toddlers, definitely use the stuffed version without plastic eggs. And make sure you weave in your ends REALLY well because kids will find any loose end and pull on it. I usually weave ends in multiple directions and even add a tiny dot of fabric glue to secure them though some people think that’s overkill.
Also maybe avoid buttons or beads for decoration if they’re for little kids. Embroidered details are safer.
storage
I just toss mine in a plastic bin with my other seasonal decorations. They don’t take up much space and they’re pretty durable. The plastic egg ones are definitely more durable than the stuffed ones which can get squished if you stack heavy stuff on top of them.
You could also store them in those cardboard egg cartons which would be cute and keep them organized but I never got around to doing that.
selling them
If you’re thinking about selling these at craft fairs or whatever, price them based on your time and materials. I’d probably charge like $5-8 per egg depending on size and detail level. The tiny thread ones could go for more because they take longer. But honestly the market for handmade easter decorations is pretty saturated so don’t expect to make a fortune.
Some people do custom orders with specific color schemes to match someone’s decor which seems like it could work better than just making random ones and hoping they sell.
Anyway that’s basically everything I know about crocheting easter eggs. They’re a pretty straightforward project, good for beginners because you’re just doing basic increases and decreases in rounds. And if you mess up it’s not a huge deal because they’re small and don’t take much time or yarn to remake.