
Jun
Getting Started with the Basic Body Shape
So the flamingo body is basically just an oval when you think about it, which means you’re gonna start with a magic ring and work in continuous rounds. I made my first flamingo in summer 2022 while watching that ridiculous reality show about people buying islands and it took forever because I kept getting distracted by how rich those people were.
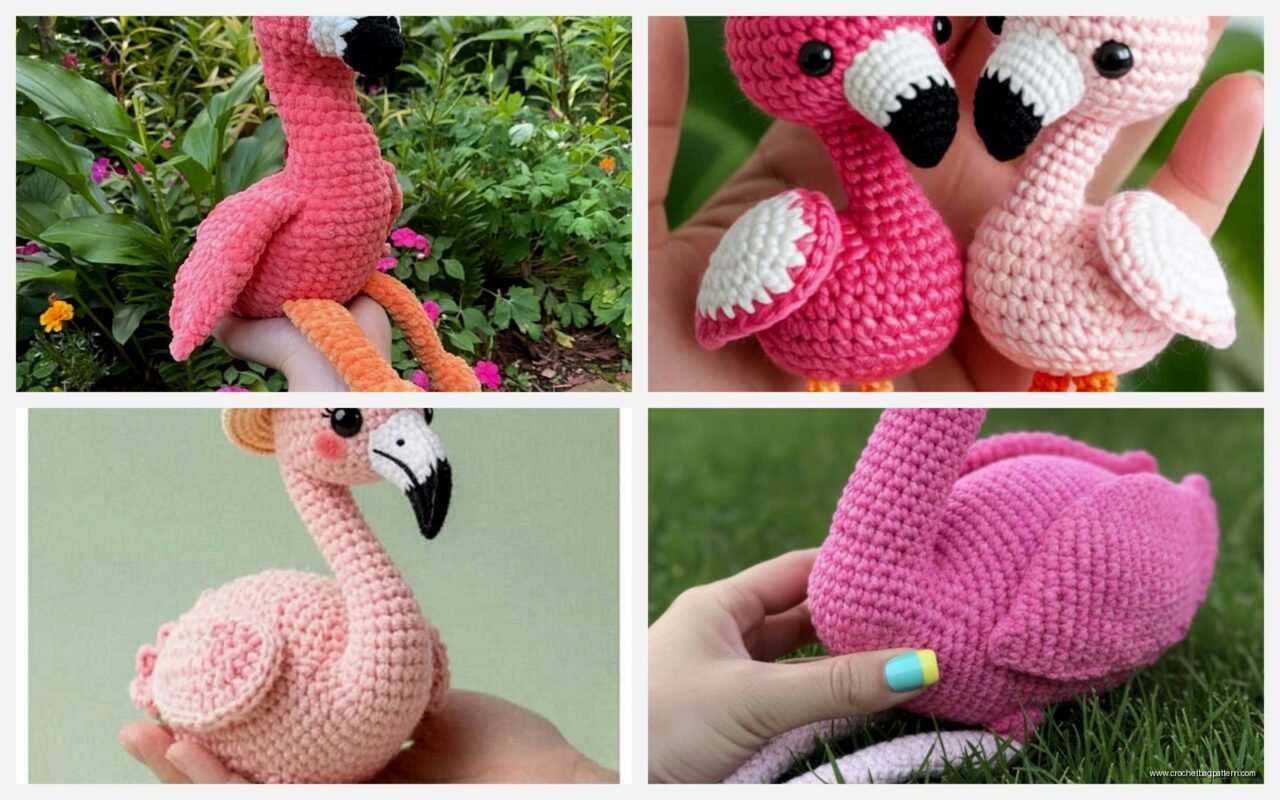
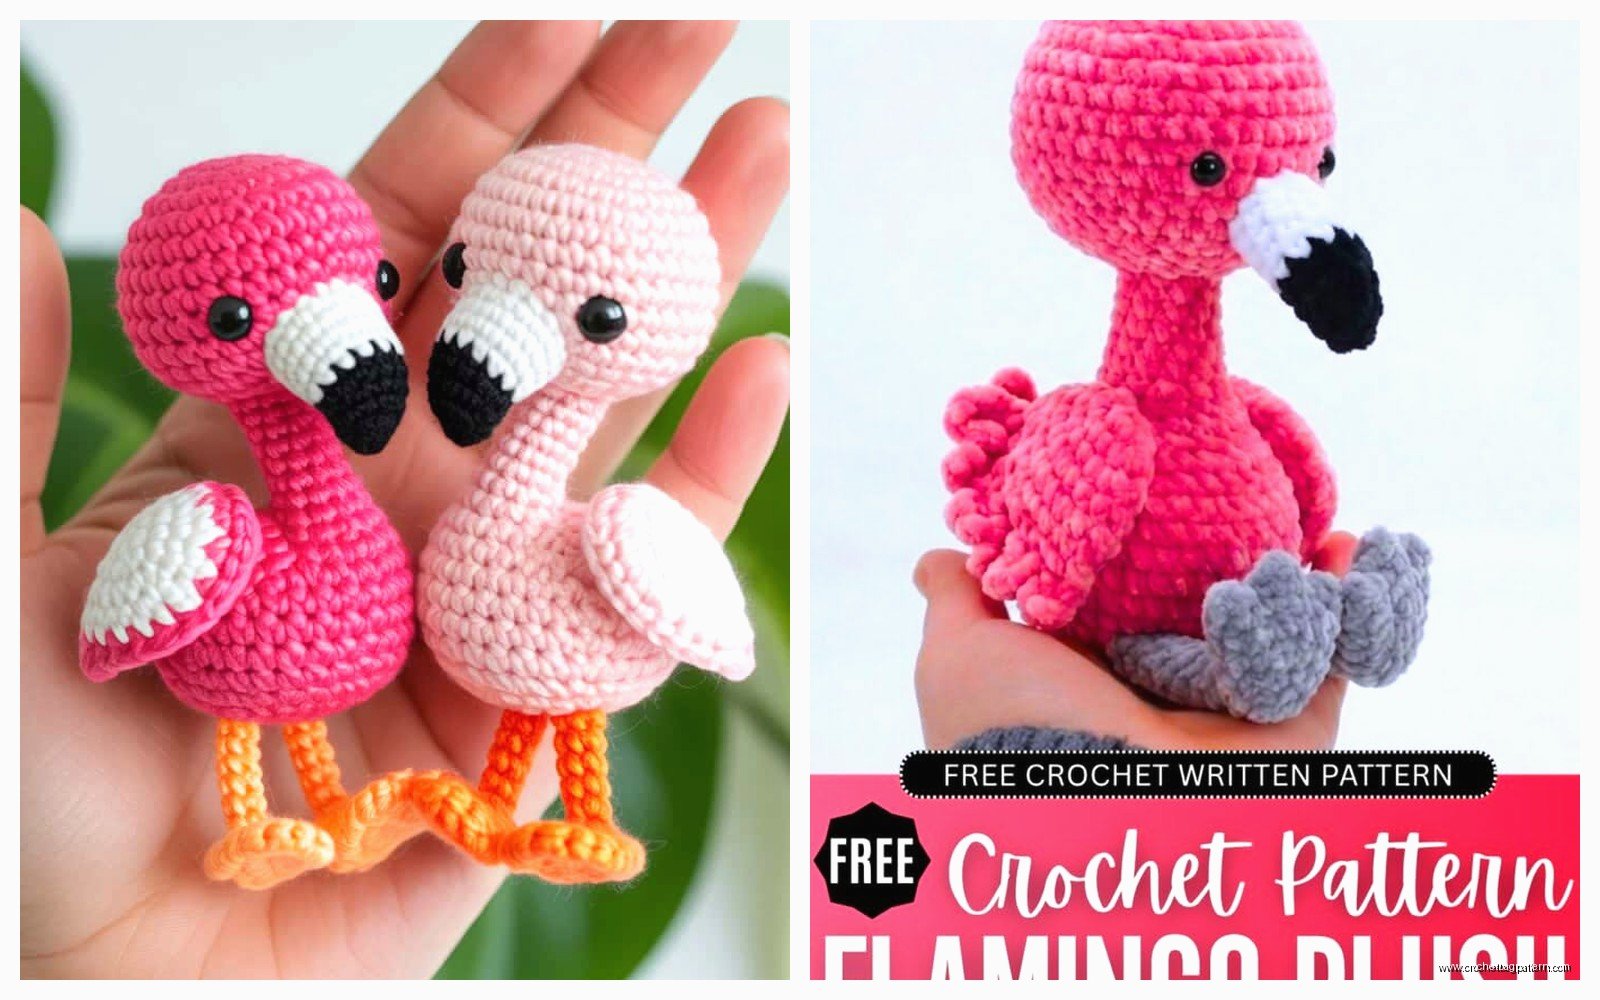
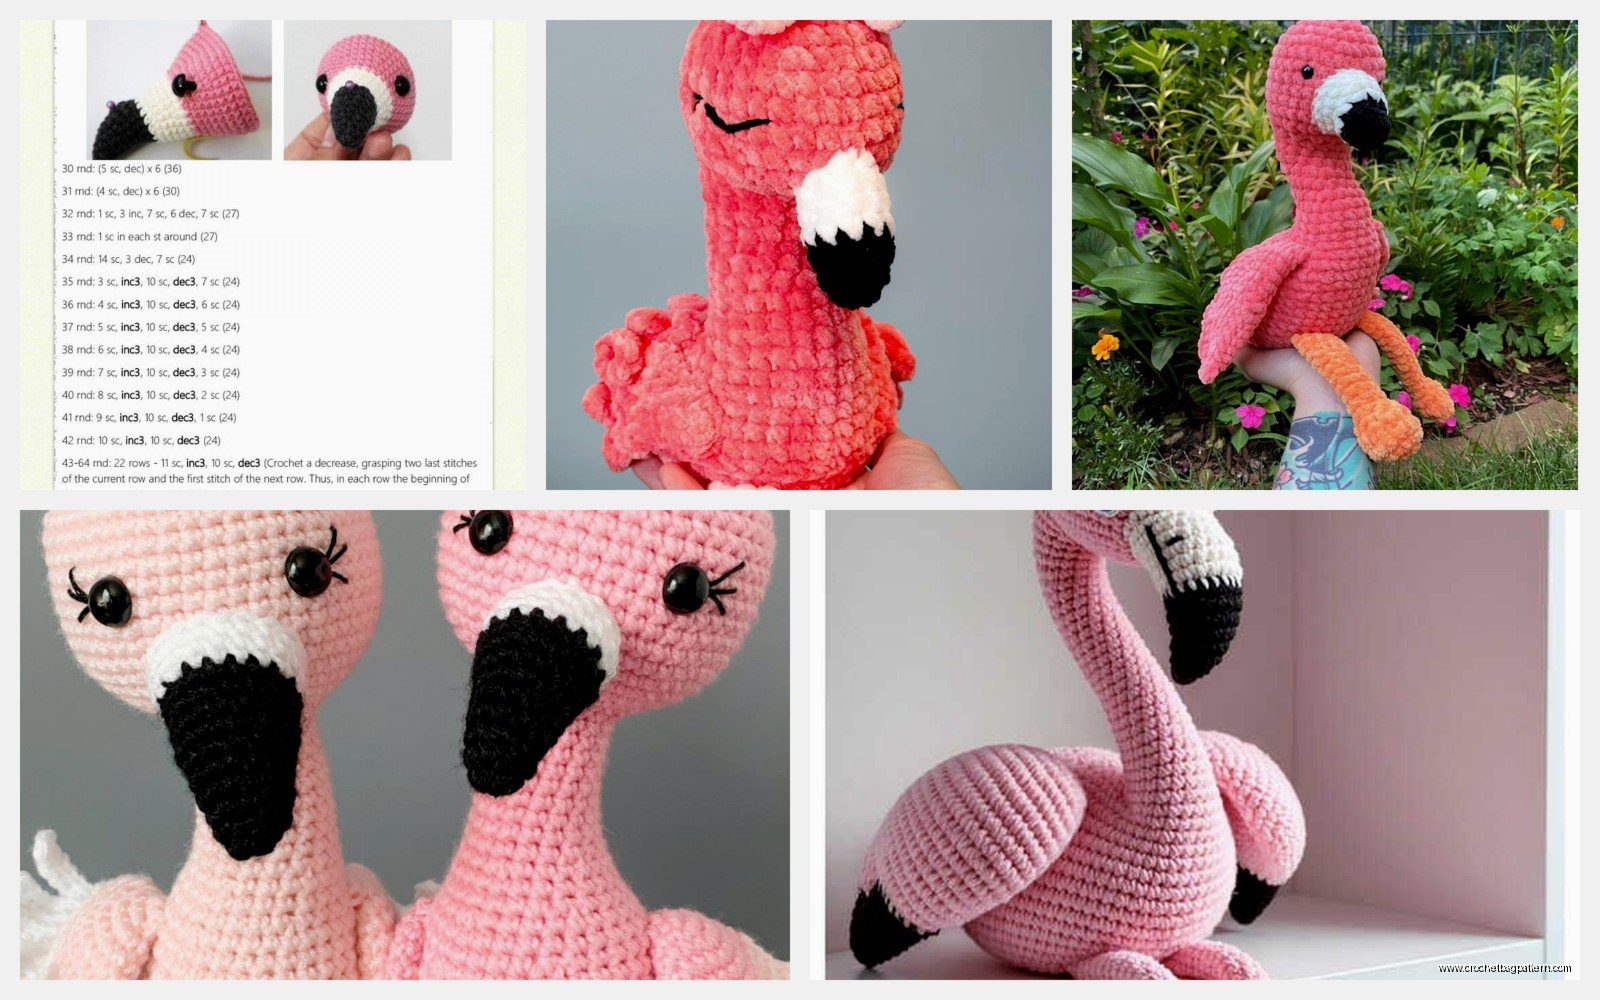
Start with 6 single crochets in your magic ring. Then you’re increasing like you would for any amigurumi head or body—12 stitches in round 2, then 18, then 24. I usually go up to about 36 stitches for the widest part of the flamingo body because they’re kinda chunky birds in real life. Use Red Heart Super Saver in Flamingo or whatever pink you can find, honestly the exact shade doesn’t matter as much as you’d think.
The annoying thing about flamingo patterns is that the neck is SO long and it wants to flop around like crazy if you don’t stuff it right. I learned this the hard way when my first one looked like it had a broken neck just hanging there all sad.
Stuffing Strategy Because This Matters
You gotta stuff as you go with the body, don’t wait until the end. Pack it pretty firm but not like rock hard. For the neck though—and this is important—you need to either use a pipe cleaner or some wire wrapped in a bit of batting. I’ve tried it without and the neck just collapses or bends in weird ways. My cat knocked one off the shelf once and the neck just crumpled.
When you’re stuffing the body, the bottom part should be heavier than the top so it actually stands up. I sometimes put a few poly pellets in the very bottom before adding the regular polyfil stuffing. Makes a huge difference in stability.
That Ridiculously Long Neck
The neck is basically a tube that you crochet for like 20-25 rounds depending on how tall you want your flamingo. I use about 12 stitches around for the circumference. Just single crochet in continuous rounds until your arm falls off or it looks long enough.
Here’s where the pipe cleaner comes in—before you close up the top of the body where the neck attaches, insert your pipe cleaner or wire down through the neck and into the body. You want it anchored in the stuffing of the body part so it doesn’t just slide around. Then finish stuffing the neck around the wire, keeping it centered. This lets you pose the neck in that classic S-curve shape flamingos do.
I used Caron Simply Soft for one flamingo neck because I ran out of the Red Heart and honestly it worked fine, maybe even a little better because it was slightly thinner and the neck looked more elegant or… whatever, it just looked better.
Attaching the Neck to Body
You can either crochet the neck directly onto the body by working into the stitches at the top, or make them separately and sew together. I’m lazy so I usually make them separate because then if I mess up the neck I don’t have to restart the whole thing. Just whipstitch it on securely, like really secure because that neck is heavy and will pull away if you don’t.
The Head Shape
The head is smaller than you think it should be. Start with 6 in a magic ring again, increase to 12, then 18, then maybe 24 for a few rounds. You want it oval-shaped, not round. So do your increases on the sides more than the top and bottom if that makes sense.
Add safety eyes around round 8 or 9, positioned on the sides of the head because flamingo eyes are on the sides, not front-facing like some amigurumi. I use 9mm or 10mm black safety eyes. Place them before you stuff and close up the head obviously.
The beak is the most recognizable part and also the most annoying to get right. It’s got that weird bent shape with the black tip. I’ve made this like four times now and I still don’t love how any of them turned out.
The Beak Construction
Make the beak in two colors—pink for the base and black for the tip. Start with pink yarn and make a cone shape by doing 6 sc in magic ring, then increase every other round or so until you have maybe 15 stitches around. Work straight for a few rounds, then switch to black yarn and start decreasing to form the hooked tip.
The bend in the beak is tricky. Some patterns tell you to crochet it curved but I just make it straight and then bend it when I stuff it, using the stuffing to hold the curve. Stuff it FIRM. Like really firm so it holds that downward hook shape. Then sew it onto the head positioned more toward the top than you’d think, because flamingos have their beaks sorta on top of their head when you look at them from the side.
Wings That Actually Look Like Wings
Wings are basically flat teardrop shapes. Chain about 8, then single crochet back down, but increase at the tip to make it rounded. Then work around in rows, increasing along one edge to make the wing curve. I usually do about 6-8 rows total.
For the feather texture, you can either leave them plain or add some surface crochet lines to suggest feathers. I tried the surface crochet thing once while making one during spring 2024 and it looked okay but took forever and I’m not sure it was worth it. Your choice really.
Attach the wings to the sides of the body, positioned maybe a third of the way down from where the neck connects. Sew them flat against the body or leave them sticking out slightly—I’ve seen both ways and they both look fine.
Legs and Feet Are Their Own Problem
Flamingo legs are stupidly thin and long. I use a smaller hook for the legs, like a 3.0mm or 3.5mm even if I used 4.0mm for the body. This makes them thinner and more proportional.
Each leg is just a tube of 6 stitches around worked for like 30-40 rounds depending on how tall you want them. The thing is they need internal support or they’ll just bend and collapse. I’ve tried:
- Pipe cleaners (they rust eventually if you live somewhere humid)
- Wooden skewers (too stiff, looked weird)
- Floral wire doubled over (this worked best for me)
- Just stuffing them really firm (didn’t work at all)
Insert the wire before you finish the leg, stuff around it loosely because you want the leg to look thin not thick. Leave some wire sticking out the bottom to anchor into the feet.
Feet Part
Flamingo feet are webbed which is annoying to crochet in 3D. I usually cheat and make flat feet by chaining and doing single crochet in kind of a three-pointed star shape. Chain 8, sc back, then make two more chains branching off for the other toes. It doesn’t have to be perfect because honestly no one looks that closely at the feet.
Attach the feet to the bottom of the legs, making sure the wire from the leg pokes into the foot for stability. You might need to add a bit of glue or extra stitching to keep everything secure.
Making It Stand Up Without Falling Over
This is the actually hard part that patterns don’t really explain well. The weight distribution has to be right or your flamingo just tips over constantly. Put those poly pellets in the bottom of the body like I mentioned. Position the legs slightly forward under the body, not directly centered. The body should sit kinda over the legs.
I’ve made flamingos that fell over every time someone walked past the table and it’s so frustrating. You can also make a little base for it to stand on—just crochet a flat circle in green or blue yarn for water/grass and tack the feet down to it. Not as impressive as free-standing but way more practical.
Color Variations and Yarn Choices
Most people use pink obviously but baby flamingos are actually gray so you could make a gray one if you want to be different. I used Bernat Blanket yarn once thinking it would be cute and fluffy but it was way too thick and the whole thing looked lumpy and weird, so stick with worsted weight yarn.
Red Heart Super Saver in Perfect Pink or Flamingo works great. Caron Simply Soft in any pink shade. I’ve also used Paintbox Yarns Cotton DK in Pale Pink doubled up and it was really nice and smooth. The cheaper acrylic actually works better than fancy yarn for this project because it’s firmer and holds the shape better.
Some patterns add white or lighter pink to the chest area which looks good if you want to spend the time on color changes. I usually don’t bother because it’s already taking long enough.
Details That Make It Look More Realistic
You can add black feather tips to the wings using black yarn and surface stitches or just sewing on some black felt pieces. Real flamingos have black flight feathers so this adds authenticity or whatever.
Some people embroider nostrils on the beak with black thread. I did this once and immediately regretted it because it looked creepy, like the flamingo was judging me. But you might have better embroidery skills than me.
The leg joints—that backward knee thing—you can suggest by making a slight bump or color change partway down the leg. Or just leave them smooth, it’s fine either way.
Size Considerations
I’ve made these anywhere from 8 inches tall to like 18 inches. The bigger ones are more impressive but take SO much more yarn and time. For your first one, aim for maybe 10-12 inches total height. That’s manageable and doesn’t use up three full skeins of yarn.
If you make it bigger, everything gets heavier and the structural issues get worse. That neck will flop even with wire support if it’s too long and heavy. Scale up gradually if you want a bigger one, don’t just jump to giant size.
Common Problems I’ve Run Into
The neck flopping over even with wire—this means either your wire isn’t thick enough or your stuffing is too loose. Use thicker gauge wire or double up pipe cleaners twisted together.
Legs splaying out to the sides—sew them closer together under the body and angle them slightly inward at the top where they attach.
Head too heavy for the neck—make the head smaller or the neck thicker, or both. Proportions matter more than you think.
Beak not staying bent—stuff it firmer and maybe add a tiny piece of wire in there too, though that’s kinda overkill.
The whole thing falling over—add weight to the body bottom, position legs forward, make a base, or accept that it’s gonna live sitting down.
How Long This Actually Takes
First time maybe 6-8 hours total if you’re working on it steadily? Not all at once obviously. The body and neck take the longest because they’re just round after round of the same stitch. The legs are tedious because they’re so many rounds of basically nothing.
If you’re making multiple flamingos, the second one goes way faster because you know where the annoying parts are and can plan better. I made three in a row once as gifts and by the third one I had it down to maybe 4 hours.
Don’t rush it though or you’ll make mistakes and have to redo sections which wastes more time than just going slow and steady in the first place.