
Jun
Getting Started with Cat Amigurumi
So the first time I actually finished a cat amigurumi was summer 2022 and honestly I was watching this terrible reality show the whole time which probably explains why one ear ended up bigger than the other. But anyway, you’re gonna need some basic supplies and the good news is you don’t need fancy stuff to start.
For yarn I usually grab Red Heart Super Saver because it’s cheap and everywhere, or sometimes Lily Sugar’n Cream if I want something a bit nicer feeling. The cotton one is actually better for cats I think because it holds its shape more? But acrylic works fine too. You want worsted weight yarn mostly, that’s the medium thickness stuff. I’ve tried making cats with that really thin crochet thread and oh my god never again, my hands hurt for days.
What Hook Size Actually Matters
The hook size thing is where people get weird and specific but honestly just use whatever makes a tight fabric. I use a 3.5mm or 4mm hook with worsted weight yarn. The whole point is that you don’t want the stuffing showing through the stitches. Hold your work up to the light and if you see gaps, go down a hook size. That’s it. That’s the secret.
Some people will tell you that you MUST use this exact hook with that exact yarn but like… I’ve used a 3.75mm hook with Red Heart and it worked fine. Just make it tight enough that the polyfil doesn’t poke through.
Basic Cat Shape Structure
Okay so most cat amigurumi patterns follow the same basic idea. You make a head, a body, four legs, a tail, two ears, and sometimes a muzzle piece depending on how detailed you want to get. Everything starts with a magic ring which I know sounds fancy but it’s just a way to start crocheting in a circle without having a hole in the middle.
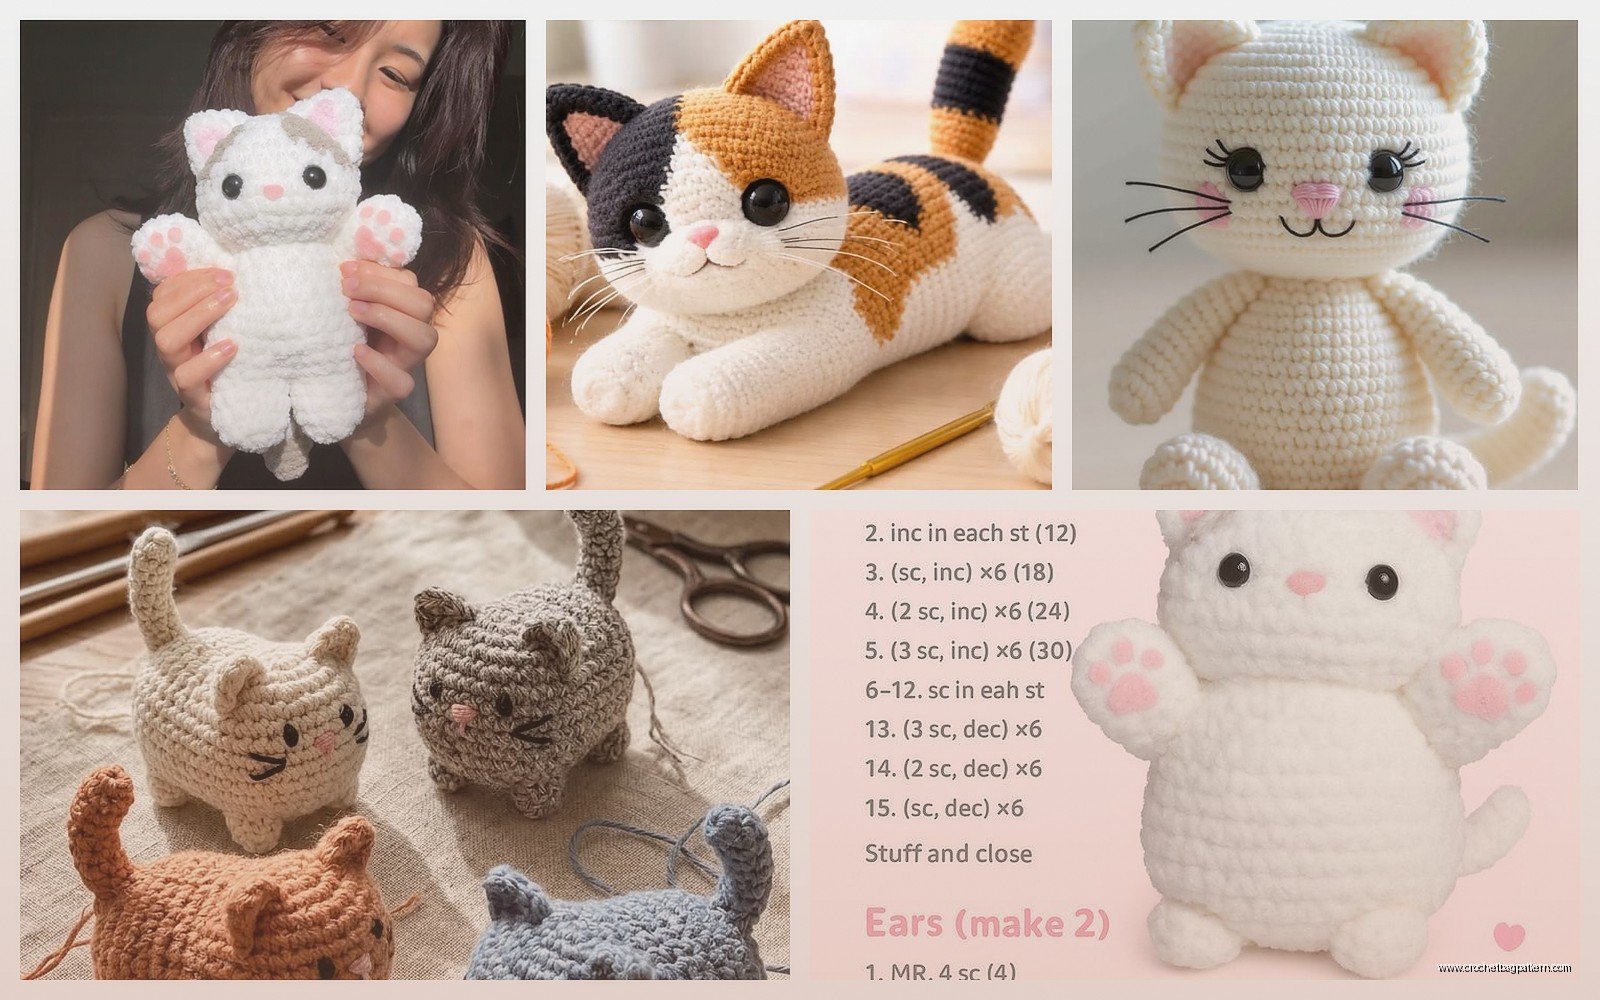
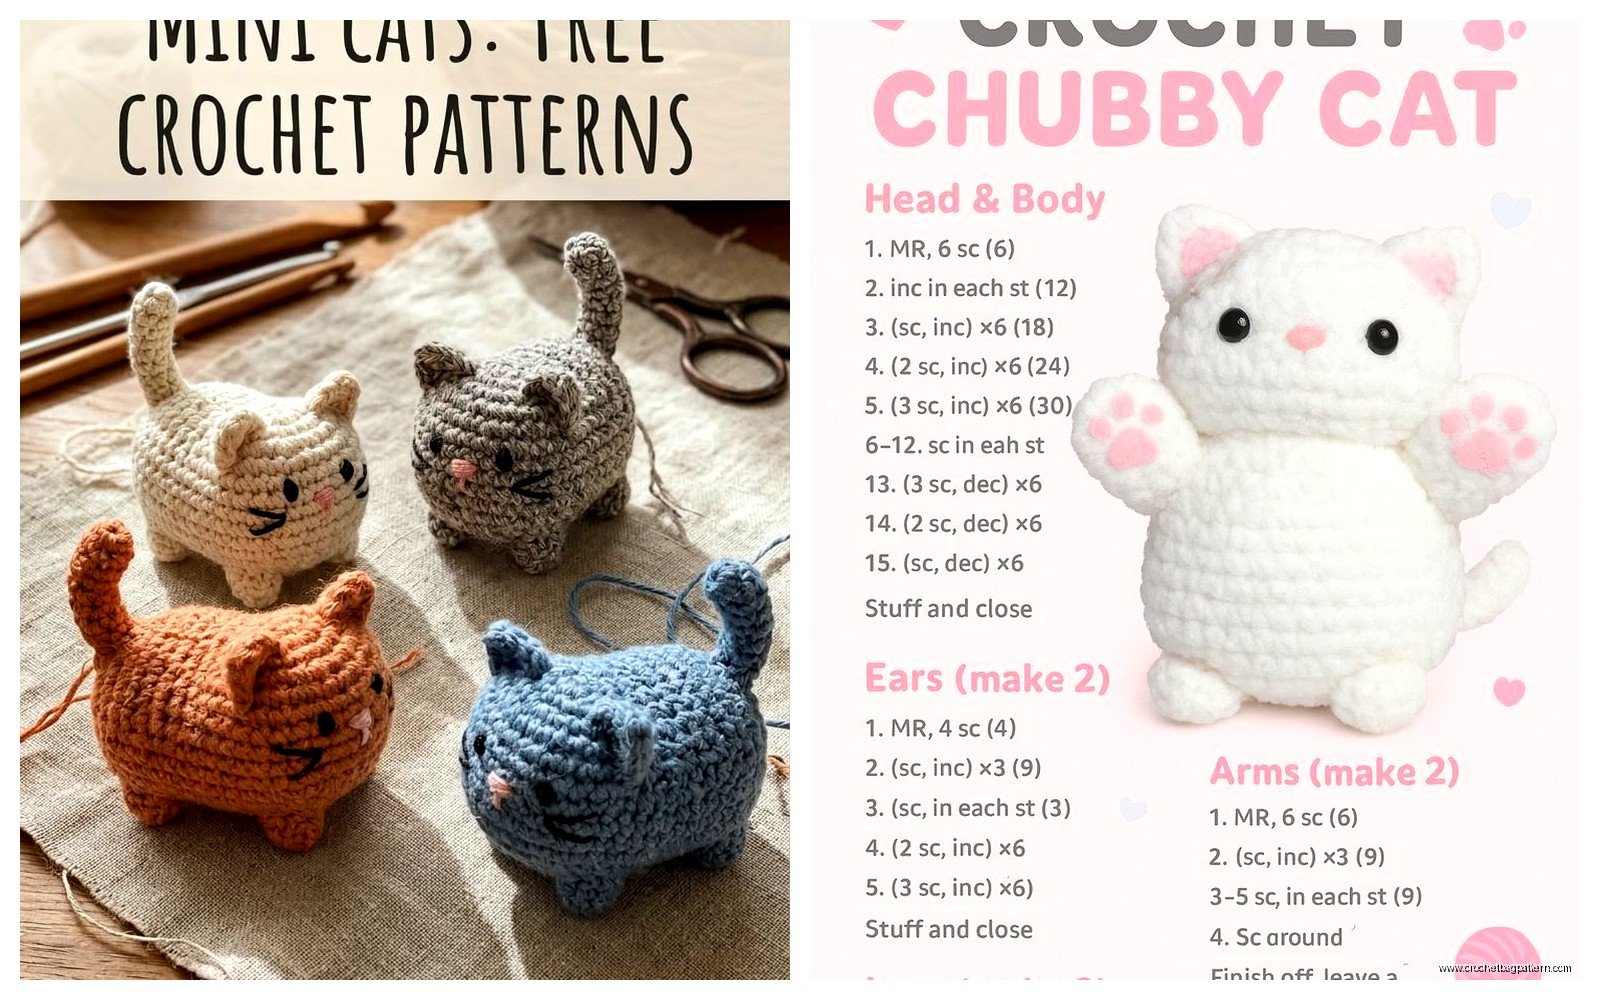
The head is usually the most involved part. You start with 6 single crochets in a magic ring, then you increase every round for a bit until you get to whatever size you want. Then you work straight (no increases or decreases) for several rounds to make the cylinder shape. Then you decrease back down to close it up. It’s basically making a ball but slightly oval shaped.
For a basic cat head I usually do something like:
- Round 1: 6 sc in magic ring
- Round 2: inc in each stitch (12 stitches)
- Round 3: sc, inc around (18 stitches)
- Round 4: sc 2, inc around (24 stitches)
- Round 5: sc 3, inc around (30 stitches)
- Rounds 6-12: sc in each stitch
- Round 13: sc 3, dec around
- Round 14: sc 2, dec around
And then you stuff it and close it up. The body is similar but usually a bit bigger and more oval.
The Thing That Drove Me Crazy
One thing that really annoyed me about making cat amigurumi is that the legs never want to stay in the right position. Like you sew them on and think they look good, then you set the cat down and suddenly it’s doing the splits or leaning to one side like it’s drunk. I’ve tried so many different ways to attach them and honestly I still haven’t found the perfect method. Sometimes I sew through the body multiple times to really anchor them, but then you can see the yarn going through if you look closely and it bugs me.
The best solution I’ve found is to stuff the body really firmly and use a long needle to sew the legs on, going all the way through the body to attach opposite legs at the same time. That way they’re balanced. But it’s still annoying and takes forever.
Ears and Face Details
Ears are pretty easy. You can make them as triangles or more rounded, whatever looks cat-like to you. I usually do:
- Round 1: 4 sc in magic ring
- Round 2: sc, inc twice (6 stitches)
- Round 3: sc 2, inc twice (8 stitches)
- Round 4: sc in each stitch
Then flatten it and sew it on. Don’t stuff the ears or they look weird and puffy.
For the face you need safety eyes if you want that professional look. I use 9mm or 12mm depending on how big the cat is. The important thing is to place them BEFORE you finish stuffing and closing the head because once those safety backs are on, they’re on forever. I learned that the hard way when I put eyes on a cat and hated where they were positioned but couldn’t move them. Had to start the whole head over.
You can also embroider eyes with black yarn if you don’t have safety eyes or if the cat is for a small kid who might pull them off. Just do a few stitches in a circle or make little X shapes.
The nose is usually just a small triangle embroidered with pink or black yarn. I do like three or four stitches in a triangle shape right between where the eyes are, but lower. The mouth is optional but if you want it, just do a Y shape with the top of the Y being the nose.
Assembly Is Where It Gets Real
So you’ve made all your pieces and now you gotta put this cat together. This is where I always end up with yarn ends everywhere and my dog trying to steal the stuffing because she thinks it’s a toy or something.
Start by attaching the head to the body. I use the same color yarn as the body and just whipstitch all the way around where they connect. Make sure the head is positioned how you want it before you finish sewing it on completely. I usually have the cat sitting up so the head goes on top of the body angled slightly forward.
Then do the legs. Back legs first because they’re easier to position. The cat should be able to sit without falling over. Front legs can be positioned however but I usually have them pointing slightly forward like the cat is sitting politely. Or you can make all four legs point down if you want a standing cat.
The tail gets sewn onto the back of the body, usually at the bottom but you can position it curved up or to the side or whatever. I make my tails pretty long and skinny, maybe like 15-20 rounds of just sc in each stitch after the initial increases.
Ears go on top of the head angled slightly outward. This is where you can really change the expression of the cat – if the ears are too far apart it looks surprised, too close together looks angry or something.
Different Cat Variations You Can Try
Once you know the basic structure you can mess around with it to make different looking cats. I made an orange tabby once using Caron Simply Soft in… I think it was called Mango or Persimmon? And I did stripes by changing colors every few rounds. Didn’t weave in the ends until the very end which was probably stupid because there were like 40 ends to deal with but it looked cool.
You can make long-haired cats by using fuzzy yarn or by adding extra yarn pieces after you’re done. I’ve seen people cut yarn into short pieces and pull them through the stitches to make fur but that seems like way too much work for me.
For different body types, just adjust the rounds. Want a fat cat? Do more increase rounds and fewer straight rounds. Want a skinny cat? Less increases, more length. The proportions don’t have to be exact, that’s what’s nice about amigurumi – it’s pretty forgiving.
Color Changes and Patterns
If you want to make a tuxedo cat or calico or whatever, you just change yarn colors as you go. The tricky part is making the color changes look clean and not having a million ends to weave in. What I do is I carry the yarn I’m not using inside the piece so it gets hidden by the stuffing. Only works if you’re using the same weight yarn for both colors though.
For a tuxedo cat you’d do white for the face and chest and belly, black for the back and top of the head. I usually start the head in white and switch to black partway through, then switch back to white for the muzzle area if I’m adding one.
Stuffing Tips Because This Actually Matters
Use polyfil stuffing, the cheap stuff from any craft store works fine. Don’t overstuff or your stitches will stretch out and look weird, but don’t understuff either or the cat will be floppy. You want it firm enough to hold its shape but still slightly squeezable.
I stuff as I go with the head and body – like when I’m about halfway through the decreases, I start adding stuffing. That way I can really pack it in there and make sure there are no gaps. With legs and tail I wait until they’re almost done because they’re so small it’s hard to stuff them while working.
One trick is to use the back end of your crochet hook or a chopstick to really push the stuffing into the smaller parts like legs and tail. Otherwise you end up with lumpy legs that look weird.
What Yarn Actually Works Best
I mentioned Red Heart Super Saver already but I’ve also used Bernat Premium and that worked fine too. Vanna’s Choice is good if you want more color options. The cotton yarns like Lily Sugar’n Cream or I Love This Cotton from Hobby Lobby make cats that are more sturdy and less squishy, which some people prefer.
The really cheap acrylic yarn from like Walmart works okay but it tends to split more when you’re crocheting which gets annoying. But if you’re just learning or making a cat to test out a pattern, it’s fine. I wouldn’t use it for a gift though because it doesn’t feel as nice.
Avoid the really fuzzy or eyelash type yarns for your first cats because you can’t see your stitches and it’s impossible to count rounds. Save that for when you’re more comfortable with the construction and can kind of wing it.
Counting Rounds and Not Losing Your Mind
Okay so one of the hardest parts about amigurumi is keeping track of where you are in the pattern. I use a stitch marker (just a piece of scrap yarn in a different color works fine) to mark the beginning of each round. Move it up as you go so you always know where the round starts.
I also keep a piece of paper next to me and make tally marks for each round I complete because I WILL forget what round I’m on if I don’t write it down. Especially if you’re watching TV or talking to someone while you crochet.
Some patterns have you join rounds with a slip stitch and chain, but most amigurumi is worked in a continuous spiral which is easier once you get used to it. You just keep going around and around without joining or chaining.
When Things Go Wrong
Sometimes you finish a piece and it’s just… wrong. The head is too big or the legs are too short or whatever. Don’t be afraid to take it apart and redo it. Acrylic yarn can handle being frogged (that’s what we call ripping it out) a few times without getting too messed up.
I’ve restarted cat heads like five times before getting one I liked. It’s annoying but it’s part of the process. The more you make them the better you get at eyeballing the proportions.
If one leg ends up longer than the others you can either redo it or just stuff that leg less so it compresses down to match. Or own it and say you made a cat with a stretched out leg because it was sleeping weird.
Making It Actually Look Like a Cat
The face is really what makes it look like a cat versus just a generic blob. Eye placement is crucial – they should be fairly close together and positioned in the upper half of the head but not right at the top. I usually place them around round 8 or 9 if I did the head pattern I mentioned earlier.
The nose should be small and centered between the eyes but lower, maybe like 2-3 rounds below where the eyes are. If you make the nose too big it looks more like a dog or bear.
You can add a little white muzzle piece by crocheting a small oval and sewing it on between the eyes and the neck area. That makes it look more realistic. I usually do it in white even if the cat is black or orange because that’s where cats have that lighter colored fur.
Whiskers are optional but they add a lot. I use embroidery floss or thin yarn and just thread it through where the muzzle area is, tie a knot on the inside, and trim the ends to whatever length looks good. Three whiskers on each side is standard.
How Long This Actually Takes
A basic cat takes me maybe 4-6 hours total if I already know what I’m doing and don’t have to keep referring to a pattern. Your first one will probably take longer because you’re figuring out the construction and probably messing up the stitch count and having to redo stuff.
The head and body are the most time consuming parts. Legs and tail and ears go pretty quick once you get in a rhythm. Assembly takes longer than you’d think though, especially if you’re trying to get everything positioned right.
I usually make all the pieces in one sitting and then do assembly later because by the time I finish all the crocheting I’m tired of looking at it.
Free Patterns vs Making Your Own
There are tons of free cat amigurumi patterns online if you search for them. Ravelry has a million. Some are better than others – look for ones with clear instructions and photos of the finished product. Read the comments or reviews if there are any because people will mention if the pattern has errors or if the sizing is off.
But honestly once you understand the basic structure you can just make up your own pattern. That’s kind of how I learned because I’m bad at following patterns exactly anyway. I’d start with someone else’s pattern and then change stuff until I liked how it looked, and eventually I didn’t need the pattern anymore.
The basic formula is: magic ring, increase rounds until desired size, straight rounds for length, decrease rounds to close. That works for literally every part of the cat. Just adjust the number of rounds and stitches based on how big you want each piece.