
Jun
Getting Started with Your Minion Thing
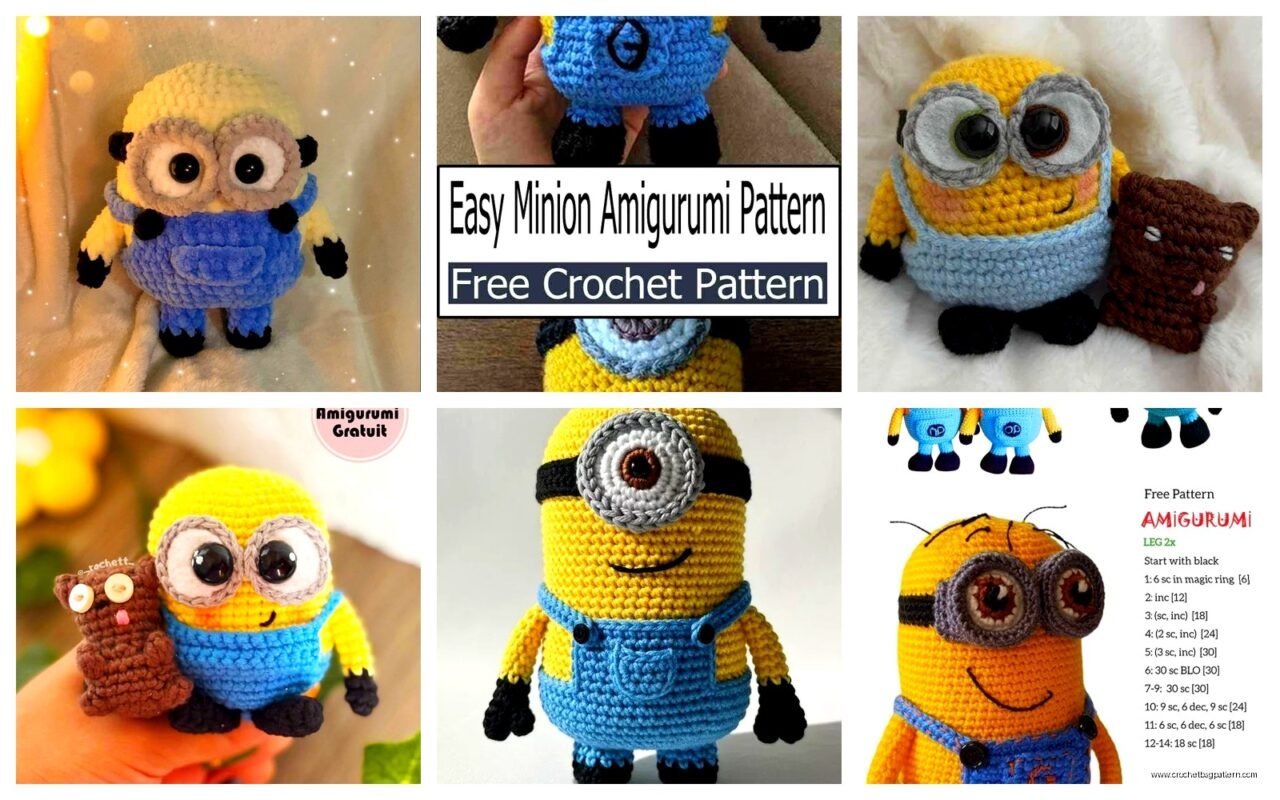
So I made my first minion back in spring 2022 when I was binge-watching The Office for like the third time and honestly the pattern seemed way more complicated than it actually was. The basic shape is just a cylinder really, which is literally the easiest amigurumi shape you can make besides a ball.
You’re gonna need yellow yarn obviously. I used Red Heart Super Saver in Bright Yellow because it was cheap and I had a bunch left from another project. For the overalls I grabbed some Caron Simply Soft in Royal Blue – not the light blue, the darker one. The black for goggles and stuff, any black works. I think I used whatever scrap black I had lying around.
The Body Part Which Is Actually Super Simple
Start with a magic ring and work in continuous rounds. I do 6 sc in the magic ring, then increase every stitch for round 2 so you get 12. Round 3 you do sc, inc around to get 18. Keep going with this pattern until you hit like 54 stitches or whatever size feels right for what you want.
Once you get to your full width just crochet straight rounds without increasing. This is where I messed up the first time because I wasn’t counting and my minion ended up lopsided. Count your stitches every few rounds or you’ll end up with something weird.
The height depends on if you want a tall minion like Kevin or a short one like Bob. I made Bob because he seemed easier and also my cat kept trying to attack the yarn so I wanted to finish faster. For a Bob-sized one I did maybe 20-25 rounds of straight crocheting after reaching full width.
Decreasing and Stuffing
When you’re ready to close up the bottom you just reverse what you did at the top. Stuff it pretty firmly with polyfil – and this is important – stuff it MORE than you think you need to. Amigurumi always looks better overstuffed than understuffed. The one thing that really annoyed me about making minions specifically is that the yellow yarn shows the stuffing through it really easily if you don’t crochet tight enough, so I had to redo my tension halfway through.
Decrease gradually doing sc, dec around each round until you can close it up completely. Weave in your end and you’ve got your basic body.
The Goggle Situation
Okay so the goggles are what make it actually look like a minion and not just a yellow blob. You need to make the grey band first – I used grey yarn, like Vanna’s Choice in Grey Heather or something similar works fine.
Chain enough to go around the minion’s body where you want the goggle band. Mine was like 50 chains maybe? Just measure it against your actual minion. Then do 2 or 3 rows of single crochet to make a strap. Sew the ends together to make a loop.
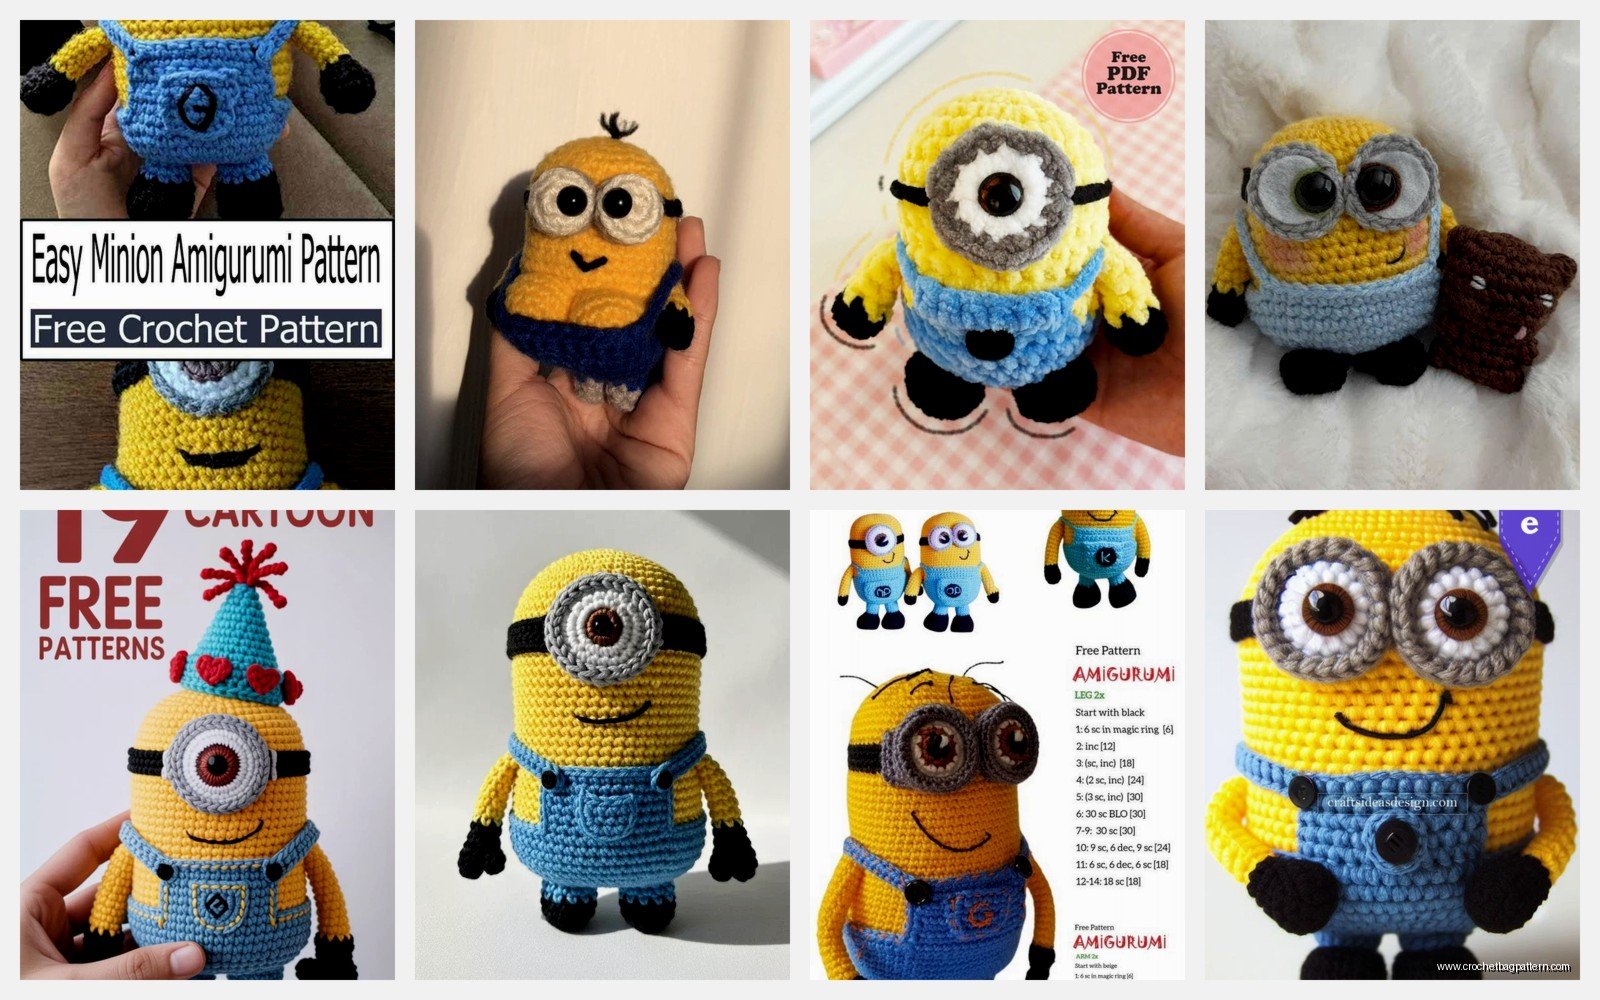
For the actual goggle part you make circles in black. Magic ring with 6 sc, then increase every stitch to get 12. You can add one more round of increases if you want bigger goggles. I made two the same size for a two-eyed minion but if you’re doing Stuart with one eye just make one bigger circle.
The white part of the eye is just a smaller white circle inside the black ring. And then the actual eye – I used brown felt circles that I cut out and glued on because trying to crochet something that tiny seemed like a nightmare. You could embroider it or use safety eyes too.
Arms and Legs or Whatever
The limbs are basically just tiny tubes. For arms start with 6 sc in a magic ring and just crochet straight for like 10-12 rounds depending on how long you want them. I made mine pretty short because Bob has stubby little arms.
For the gloves switch to black yarn for the last 3 or 4 rounds. You can shape fingers if you want but honestly I just left mine as mittens because who’s gonna notice. Stuff them lightly – not as firm as the body – and sew them onto the sides.
Legs are basically the same thing but you do the black part at the bottom for shoes. I made the shoes slightly wider by doing a few increases in the last rounds to make like a foot shape. Pin everything in place before you sew it on permanently because I had to redo one leg when I realized it was way lower than the other one.
The Overalls Which Are Kinda Fiddly
This is where patterns vary a lot and you can honestly just wing it. I made a rectangular piece in blue that wraps around the bottom half of the minion. Chain like 30 or however wide you need it, then do rows of sc until it’s tall enough to cover from the legs to partway up the body.
For the straps I just chained two long pieces and sewed them in an X on the back. You can add a pocket by making a small square and sewing it on the front. I did mine in a slightly darker blue but you could do grey or black or whatever.
The little circles on the overalls – I just used black yarn and made tiny circles, like 6 sc in a magic ring and that’s it. Sew those on as buttons. Some people get fancy with this but like… it’s a minion, not a wedding dress.
Hair Stuff
For hair I cut pieces of black yarn and pulled them through the top of the head using a crochet hook. Bob has like barely any hair so I just did 2 or 3 strands sticking straight up. If you’re making a minion with more hair you’d add more strands and maybe style them differently.
The trick is to pull the yarn through, tie it in a knot on the inside, and leave the ends sticking out the top. Trim them to whatever length looks right. I used fabric stiffener spray to make them stand up but hairspray probably works too or just leave them floppy.

Random Tips That Helped Me
Use stitch markers. I know everyone says this but seriously especially for the body when you’re doing continuous rounds. I lost count so many times before I started using them.
The gauge doesn’t matter that much for amigurumi as long as your stitches are tight enough that stuffing doesn’t show through. I used a 4mm hook with worsted weight yarn which is pretty standard.
If you’re making multiple minions you can assembly-line it – make all the bodies first, then all the arms, etc. I did this when I made three of them as gifts and it went way faster than doing one complete minion at a time.
The eyes are honestly the hardest part to get right. I redid mine twice before they looked centered and even. Take your time with placement and use lots of pins before sewing anything down permanently.
Variations and Different Minion Types
If you wanna make Kevin who’s tall just do more straight rounds on the body before decreasing. Like maybe 35-40 rounds instead of 20. Everything else stays basically the same just proportionally you might want longer arms.
For Stuart with one eye you make one big goggle circle instead of two smaller ones. Center it on the face and make the goggle band go around it.
Some people add tools like a hammer or whatever the minions carry but I skipped that because it seemed like extra work and my minions were cute enough without props. You could make tiny accessories though if you’re into that – just look up basic shapes like cylinders and spheres.
What Yarn Actually Works Best
I mentioned Red Heart Super Saver and Caron Simply Soft already but honestly any worsted weight acrylic works fine. Some people use cotton yarn like Lily Sugar’n Cream but I think acrylic is better because it’s cheaper and more forgiving if your tension isn’t perfect.
The yellow is the most important color to get right – you want a bright yellow not a pale or mustardy yellow. I tried using some weird yellow I had in my stash once and it looked more like a diseased banana than a minion.
For the blue overalls don’t use baby blue or navy, you want that medium royal blue shade. I’ve seen people use denim looking yarn which is cool too if you can find it.
Common Problems I Had
The biggest issue was getting the goggle band to sit flat and not twist. I had to sew it down in several spots around the whole body to keep it in place. Just stitching the ends together wasn’t enough.
My first minion’s head was pointy instead of rounded because I decreased too fast at the top. Make sure you’re doing gradual decreases or it’ll look cone-shaped which is… not great.
The arms kept falling off because I didn’t sew them securely enough. Go around multiple times with your yarn needle and really anchor them. They’re gonna get played with or squeezed so they need to be sturdy.
I also initially made the body too loose and you could see white stuffing through the stitches which looked terrible. Had to crochet tighter and use a smaller hook to fix it. If you can see through your stitches when you hold it up to light you’re crocheting too loose.
How Long Does This Take
My first one took maybe 6-8 hours total? Spread over a few days because I kept getting distracted and also had to redo stuff. Once you know what you’re doing you could probably finish one in 4-5 hours.
The body goes really fast because it’s just round and round of the same stitch. The detail work – goggles, overalls, assembling everything – that’s what takes time. And if you’re like me and have to check your stitch count every two seconds it adds up.
I made mine while watching TV which definitely slowed me down but also made it more enjoyable. Can’t do complicated patterns while watching shows but minions are mindless enough once you get going.
Sizing Stuff
The minion I made ended up being like 8 inches tall which is a decent size. If you want a bigger one use a thicker yarn and bigger hook. Bulky weight yarn with a 6mm hook would make like a 12 inch minion probably.
For a tiny keychain sized one you’d use sport weight or even thread weight yarn with a tiny hook. I haven’t tried that because it seems tedious but people do it.
The width to height ratio is important – minions are pretty round and wide, not tall and skinny. So when you’re deciding how many stitches to increase to, think about making it wider rather than… wait actually some minions ARE tall and skinny so I guess it depends which one you’re making.
Final Assembly Tips
Do all your weaving in of ends as you go instead of saving it for the end. Future you will thank past you for this.
When sewing pieces on use the same color yarn as the piece you’re attaching so stitches blend in. Like use black yarn to sew on the goggles, blue for the overalls, etc.
A yarn needle with a big eye makes life so much easier. I was using a regular needle at first and wanting to throw it across the room every five minutes.
You can add details like embroidering a mouth or making a little tongue sticking out if you want. I just did a simple embroidered smile in black and called it done because I’m lazy and also it still looked cute.