
Apr
okay so tapestry crochet basics
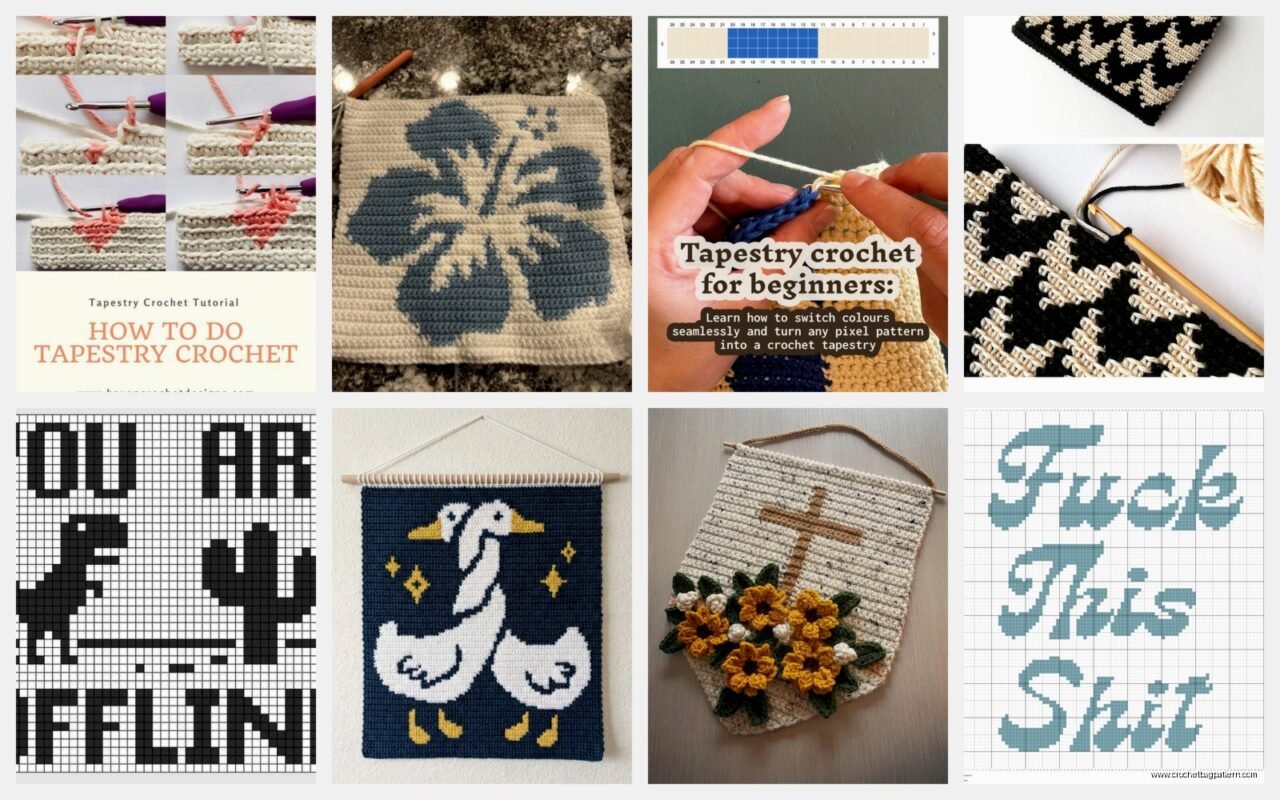
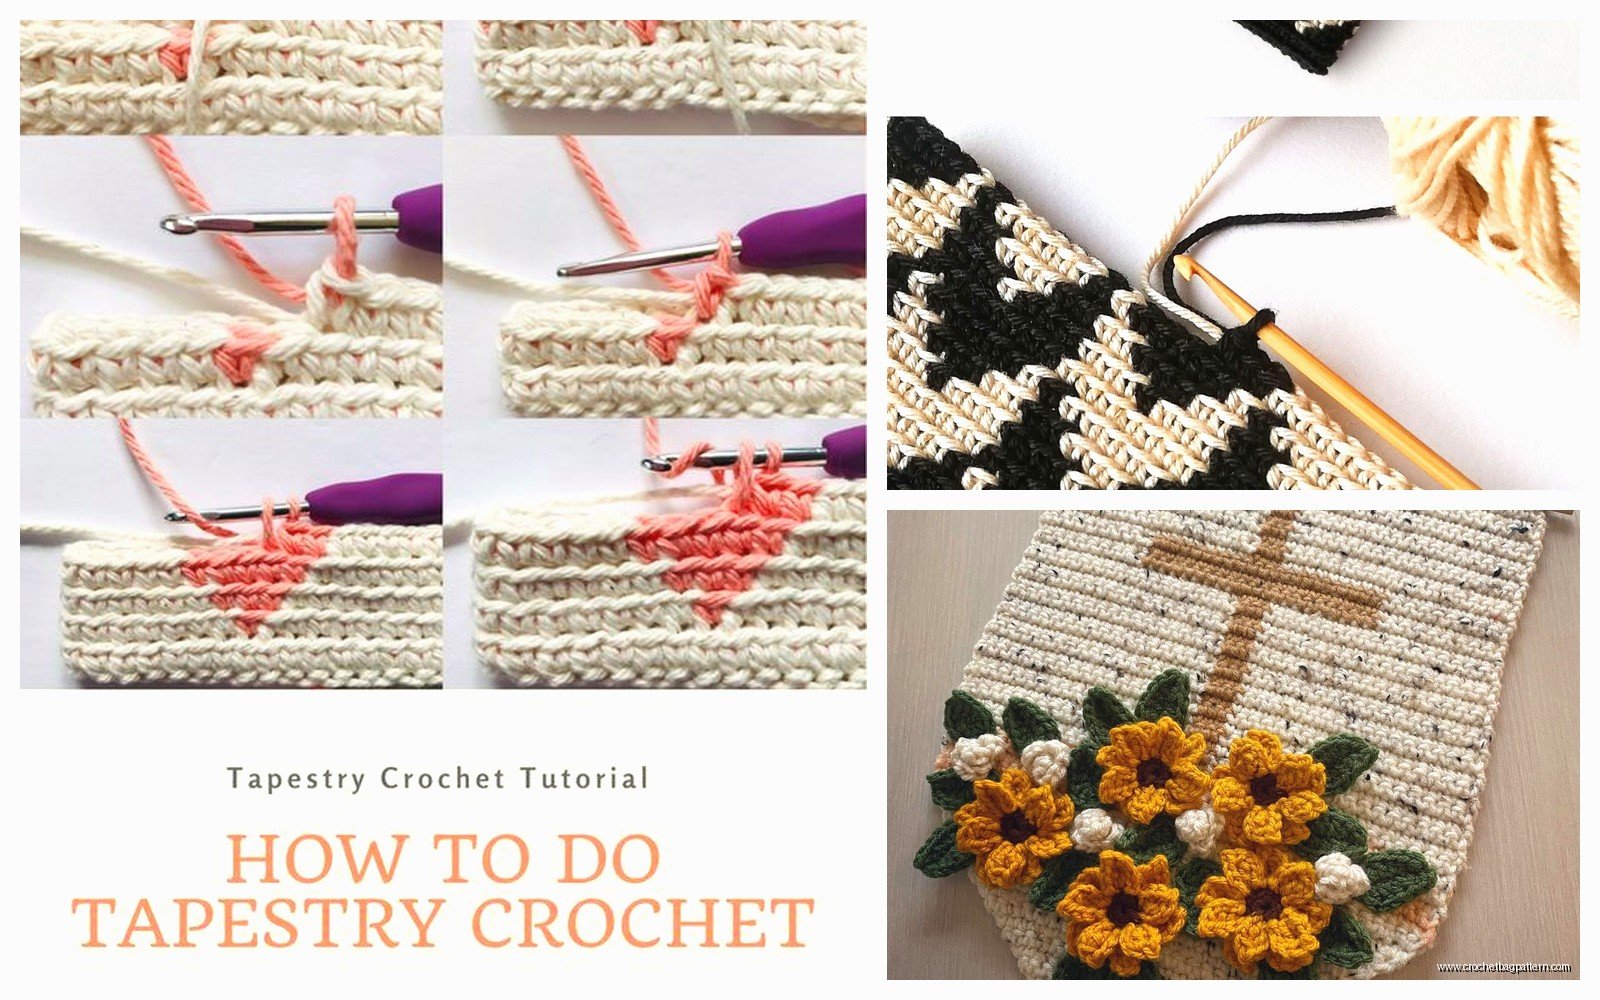
Right so tapestry crochet is basically where you’re working with multiple colors at once to create patterns or images, and you carry the unused yarn along inside your stitches instead of cutting it every time you switch colors. I made this ridiculous geometric bag in summer 2022 while binge-watching The Bear and honestly it took forever but looked pretty cool when it was done.
The main thing to know is you’re gonna be working in single crochet mostly because it gives you tight, even stitches that show the color patterns clearly. Double crochet gets too loose and the carried yarn shows through which looks messy. You hold the yarn you’re not using against the top of your previous row and crochet over it to hide it inside the new stitches.
how the color switching actually works
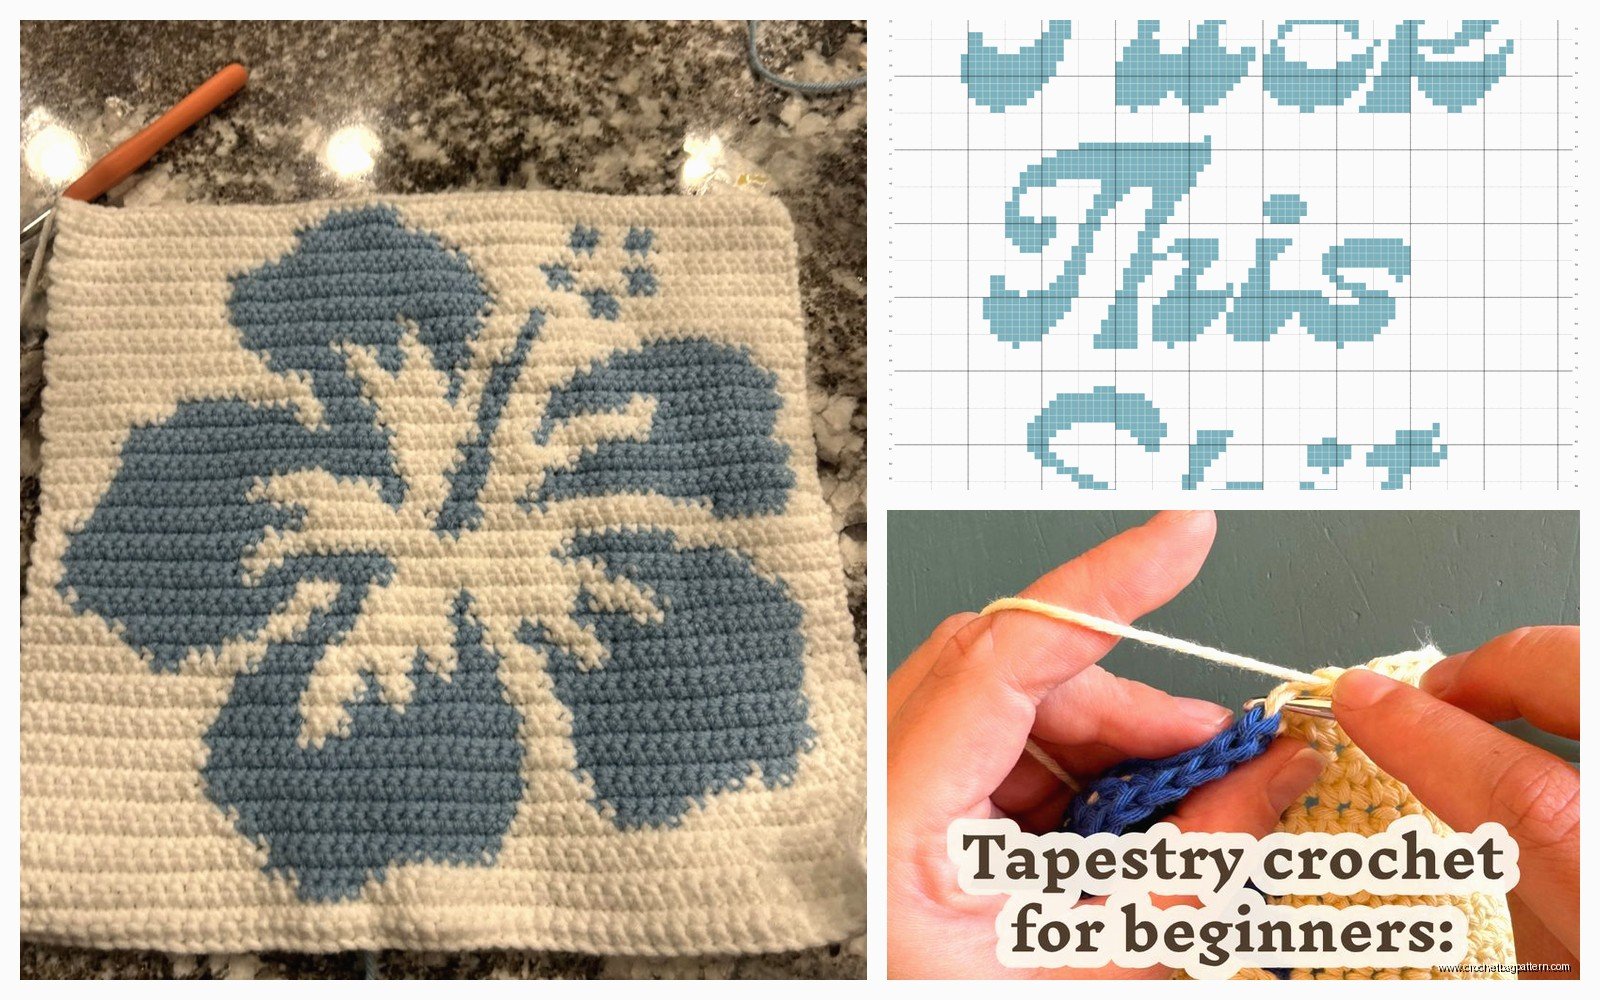
So when you need to change colors, you don’t wait until you finish the stitch. You work the stitch up until the last yarn over and pull through, then you grab your new color for that final pull through. That way the new color is already in position for the next stitch. The old color gets carried along inside the stitches you’re making with the new color.
I used Red Heart Super Saver for that first bag because it was cheap and I wasn’t sure if I’d even finish it, got the black and this teal color. The yarn has to be the same weight though or your tension goes all weird and the pattern distorts. Learned that the hard way when I tried mixing some random acrylic with cotton yarn and the whole thing puckered.
reading charts vs written patterns
Most tapestry crochet uses charts where each square represents one stitch and the colors tell you what to use. You read them from bottom to top, right to left on odd rows and left to right on even rows if you’re working flat. Working in the round is actually easier for this stuff because you’re always reading the chart the same direction.
I always print out the charts and use a sticky note to mark which row I’m on because losing your place is SO annoying and there’s nothing worse than getting 15 stitches into a row before realizing you’re following the wrong line. Did that like four times on one project.
tension is everything and it sucks
The thing that really annoyed me about tapestry crochet is how much the tension matters. Like way more than regular crochet. If you pull the carried yarn too tight, your work puckers and curves inward. If you leave it too loose, you get these saggy loops on the back and the fabric feels sloppy. You gotta find this perfect middle ground and maintain it for the entire project.
What helped me was stopping every few stitches to check that the carried yarn was laying flat against the back without pulling. I’d literally hold up the work and look at the back side constantly. My cat kept trying to attack the working yarn during this which… didn’t help with consistent tension.
starting a tapestry crochet project
For your foundation chain, just use one color. Pick whichever color is gonna be your main background or whatever shows up most in the first row. Make sure your chain isn’t too tight because you need to get your hook in there easily.
When you’re ready to add the second color, I just lay it alongside the working yarn and start crocheting over it from the first stitch. Some people join it more formally but honestly just trapping it under those first few stitches works fine. The ends get woven in later anyway.
actual techniques for different situations
vertical stripes or color blocks
These are the easiest tapestry crochet patterns. You’re just switching colors every few stitches across the row and the color changes stay in the same position as you go up. Keep both yarns attached and carry the one you’re not using.
The trick is to make sure when you carry a color across more than like 4 or 5 stitches, you twist it with the working yarn every couple stitches so you don’t get these long floats on the back. Long floats catch on stuff and pull.
diagonal patterns
Diagonal designs shift by one stitch each row which creates that angled effect. These look complicated but they’re actually not harder, just require more attention to your chart because the color changes move position constantly.
I made this chevron pouch in spring 2023 using Caron Simply Soft in grey and cream, and the diagonal lines formed naturally by shifting the color change one stitch over each row. Looked way fancier than the effort it took.
complex images and motifs
Now if you’re doing actual pictures or detailed geometric stuff, you might have sections where a color appears, disappears for a bunch of rows, then comes back. For these you actually do cut the yarn instead of carrying it across like 30 stitches. That would be ridiculous and wasteful.
When you cut a color off, leave like a 6 inch tail. When you need it again later, just join it fresh where the chart shows it and you’ll weave all those ends in at the finish. I know people say weaving in ends is relaxing or whatever but honestly it’s just tedious, there’s no way around it with complex tapestry work.
working flat vs in the round
Working flat means you’re turning your work at the end of each row. This is fine but remember that every other row you’re working from the opposite direction, so you gotta flip how you read your chart. Also the back and front look different with tapestry crochet when worked flat, the back has all the carried yarn visible.
In the round is better for bags, baskets, or anything tubular. You never turn the work so you’re always looking at the right side and always reading the chart the same way. The carried yarn stays on the inside automatically. I prefer this method whenever possible.
For in the round, you can either join with a slip stitch at the end of each round or work in a continuous spiral. Joining creates a visible seam but makes it easier to count rows. Spiral is seamless but you need a stitch marker to track where rounds begin and end or you’ll get lost.
yarn choices that actually matter
Like I said before, same weight is crucial. I usually use worsted weight because it works up relatively quick and the stitches are big enough to see your pattern clearly but not so big that it looks chunky.
Wool and wool blends are actually great for tapestry crochet because they’re a bit sticky and grip each other, which helps with tension. But they’re more expensive. For practice stuff or casual projects, acrylic is totally fine. I’ve used Hobby Lobby’s I Love This Yarn for a couple tapestry projects and it worked fine, comes in a million colors too.
Cotton is popular for bags and home stuff because it’s sturdy and washable. Lily Sugar’n Cream is good for this if you want cotton. Just know that cotton has zero stretch so your tension really shows, like every inconsistency is visible.
The one thing I’d say is use yarn with good stitch definition. Really fuzzy or textured yarn hides the color pattern, which defeats the whole purpose. Smooth yarn shows your work better.
color selection strategy
High contrast makes patterns pop. If you’re doing a two-color geometric thing, pick colors that are really different in value, like dark and light. Medium blue and medium green next to each other kinda blur together and the pattern gets muddy.
For more colors, I usually plan it out by literally putting the yarn skeins next to each other and taking a photo. The camera shows you how the colors interact better than just looking sometimes. Also looking at it in different lighting helps because what looks good in the store might look weird in your actual house.
common problems I’ve run into
the fabric curves or ripples
This is almost always a tension issue with the carried yarn. If it curves inward, you’re pulling the carried strand too tight. If it ripples outward, your working stitches might be too loose or you’re leaving the carried yarn too slack. Sometimes you gotta rip back and redo it, which sucks but fixing it early is better than finishing a wonky project.
the wrong color shows through
When you carry a really dark color behind a light color, sometimes it shadows through. Not much you can do about this except maybe use a lighter shade of the dark color or accept it as part of the handmade look. It bothered me more at first but honestly most people don’t even notice.
losing track of your place in the chart
I mentioned the sticky note thing but also taking a photo of your work every few rows helps. You can zoom in on the photo to count stitches if you think you messed up. Way easier than trying to count on the actual fabric while you’re holding it.
patterns to try when starting out
Don’t jump into a detailed portrait of your dog or whatever right away. Start with simple geometric repeats. Stripes, checkerboards, simple diamonds. These teach you the basic mechanics without requiring intense chart-reading concentration.
I did a simple two-color checkerboard coaster set as my first real tapestry project and it was perfect for learning. Each square was like 4 stitches by 4 rows so the color changes were frequent but predictable. Used some leftover Bernat Super Value in navy and white.
After that, try a basic fair isle or nordic-style pattern. They look fancy but usually repeat every 2-4 rows so you memorize the pattern quickly and don’t need to reference the chart constantly. There’s tons of free charts online for these.
where to find patterns and charts
Ravelry has a bunch obviously. You can also use cross-stitch patterns for tapestry crochet since they’re both grid-based. Just remember that crochet stitches are wider than they are tall, so cross-stitch patterns might look slightly squished. Single crochet is roughly 4:5 ratio or something like that… you might need to adjust.
Pinterest has charts but be careful because people post stuff without checking if it actually works. I’ve downloaded patterns that had mistakes in the chart or impossible color transitions.
You can also make your own charts using graph paper or apps. There’s stitch fiddle and other online tools. I’ve never bothered because I’m not that creative with design but some people love it.
finishing techniques
Weaving in ends is just part of it, can’t avoid that. I use a yarn needle and weave them through the back of stitches in the same color so they’re hidden. Go in one direction for a few stitches, then back the other way to secure it.
For bags or anything that needs structure, you might want to line it with fabric. I made a tapestry tote bag in summer 2024 with this southwestern geometric pattern using Paintbox Yarns cotton and the fabric lining made it way more functional. Otherwise stuff catches on the yarn inside.
Blocking helps too, especially if your tension was inconsistent. Pin it to shape, spray with water or use a steamer depending on the yarn fiber, and let it dry. This evens things out surprisingly well.
what I’d do differently knowing what I know now
I would’ve practiced tension on swatches before starting my first real project. I thought I could just wing it and the first like 10 rows of that bag were noticeably tighter than the rest. Also would’ve invested in better stitch markers earlier because the cheap ones pop open constantly and then you’ve lost your place.
Start with in-the-round projects rather than flat ones because seeing the right side the whole time is just easier psychologically. And pick patterns with fewer than 4 colors at first because managing multiple yarn strands gets annoying fast.
Anyway that’s most of what I’ve figured out about tapestry crochet through actually doing it. It’s not as hard as it looks once you get the basic color-switching thing down, just requires patience and attention to detail which some days I have and some days I absolutely don’t.