
Mar
okay so spiral granny squares
I made one of these last summer, like August 2024 I think, because I was bored with regular granny squares and kept losing track of where rounds ended. My cat kept batting at the yarn while I worked which was super annoying but anyway. The spiral version is actually way easier once you get the hang of it because you literally never have to join or turn or any of that stuff.
So the main thing with spiral granny squares is you just keep going around and around without slip stitching to join each round. It creates this cool spiral effect where the color changes or pattern shifts kind of wrap around the square instead of having that obvious seam line. Some people hate how it looks but honestly I think it’s cleaner than trying to make invisible joins.
what you actually need
You need yarn obviously. I used Red Heart Super Saver for that first one because I had a ton of it lying around from another project. The colors were I think Cherry Red and Soft White? Or maybe it was their Tea Leaf color, I can’t remember exactly. But any worsted weight works fine. I’ve also done these with Caron Simply Soft which is nicer if you’re making something that’ll touch your skin a lot since Red Heart can be kinda scratchy.
Hook size depends on your yarn but I usually use a 5mm (H hook) for worsted weight. You’re gonna want a stitch marker too, this is actually super important for spiral stuff because otherwise you’ll lose track of where your rounds start and it becomes a mess.
starting the actual square
You start with a magic ring or just chain 4 and slip stitch to form a ring, whatever you prefer. I do magic ring because it’s tighter but some people find it confusing.
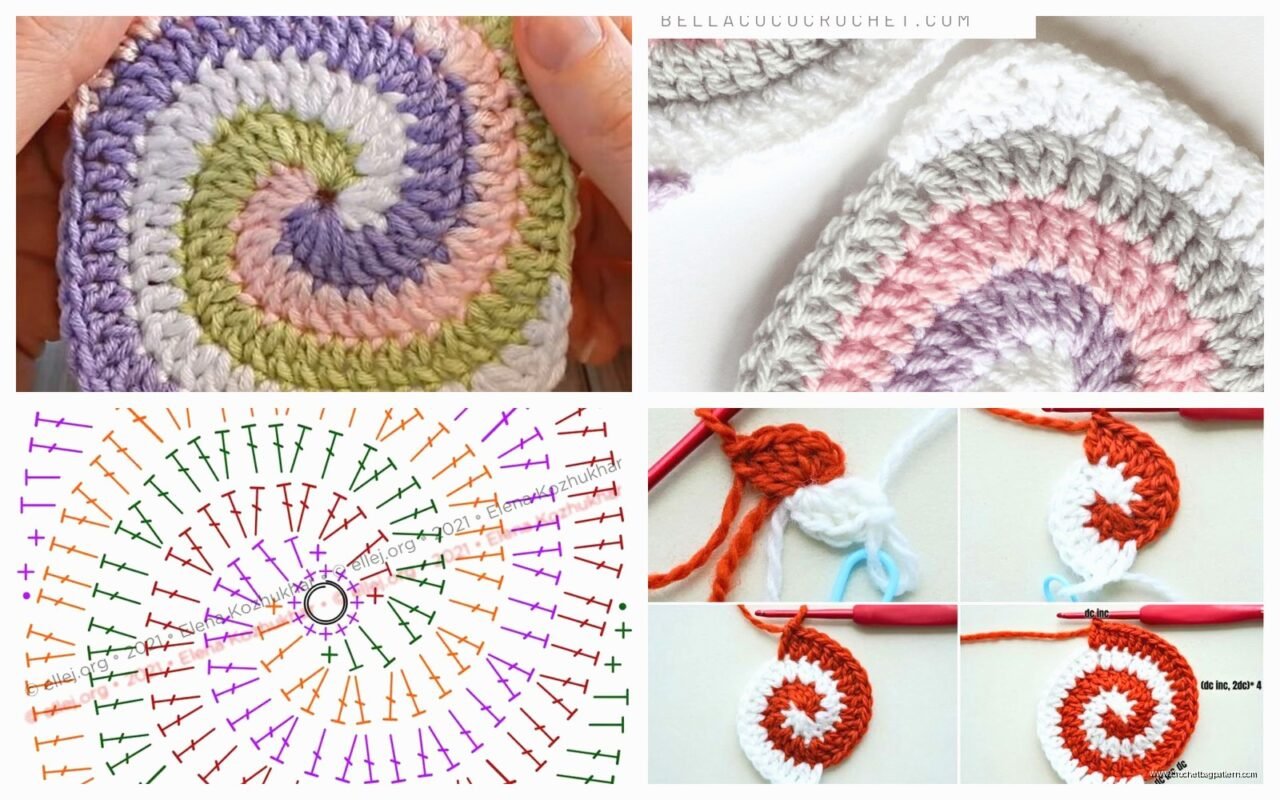
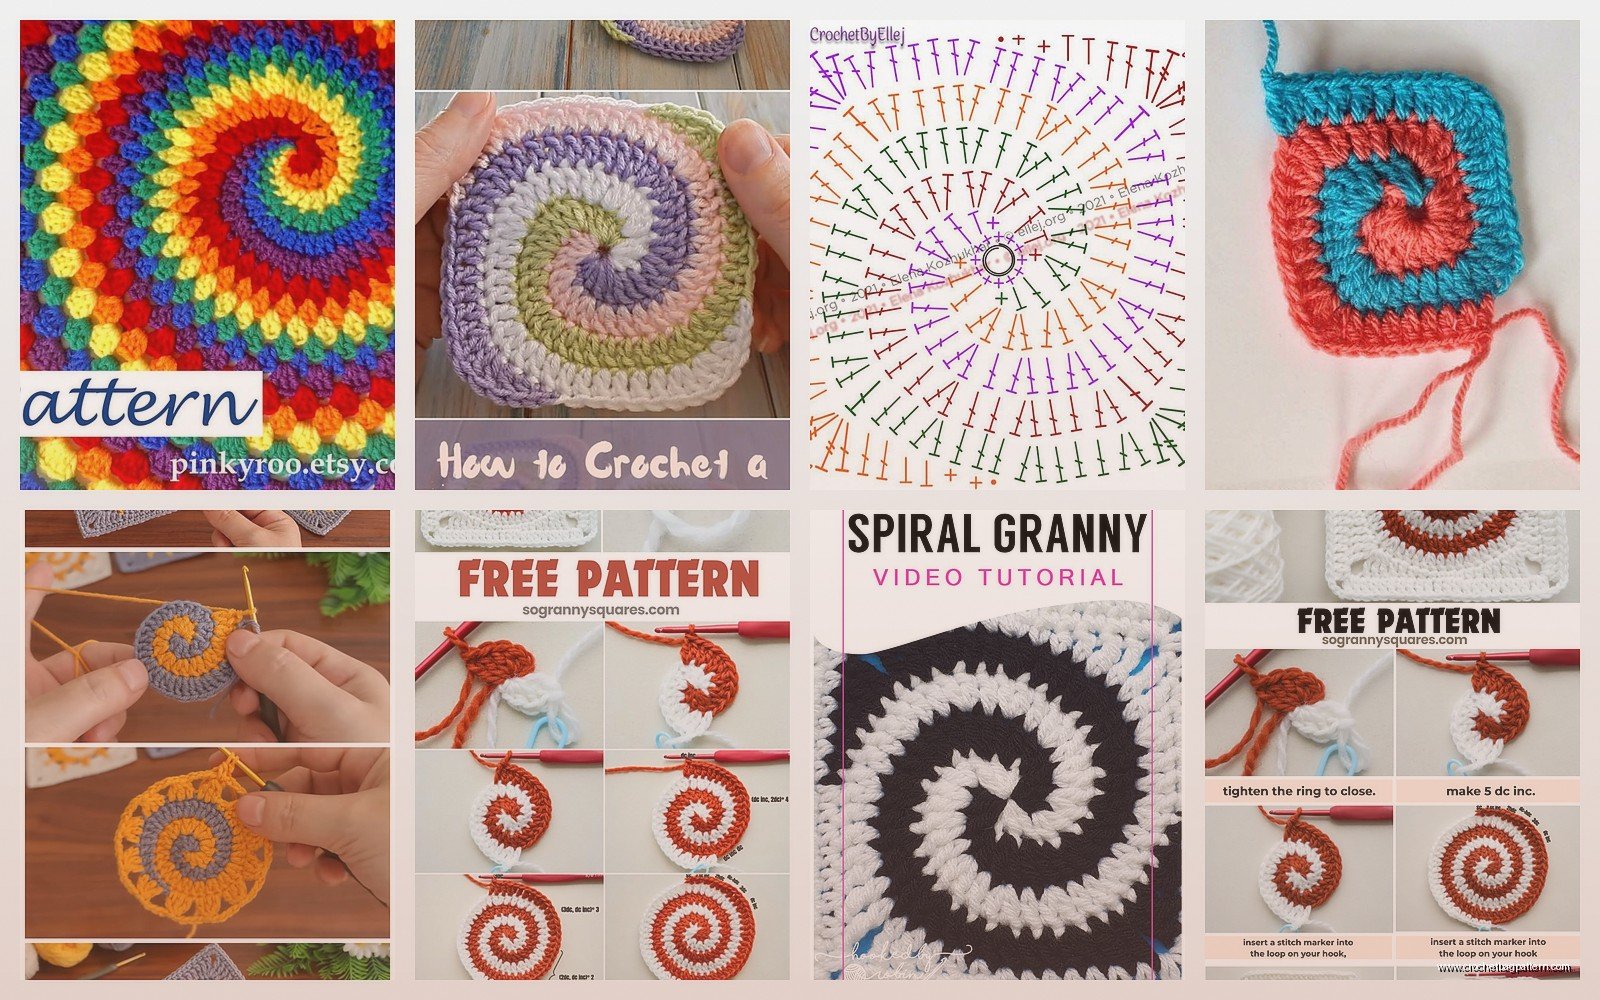
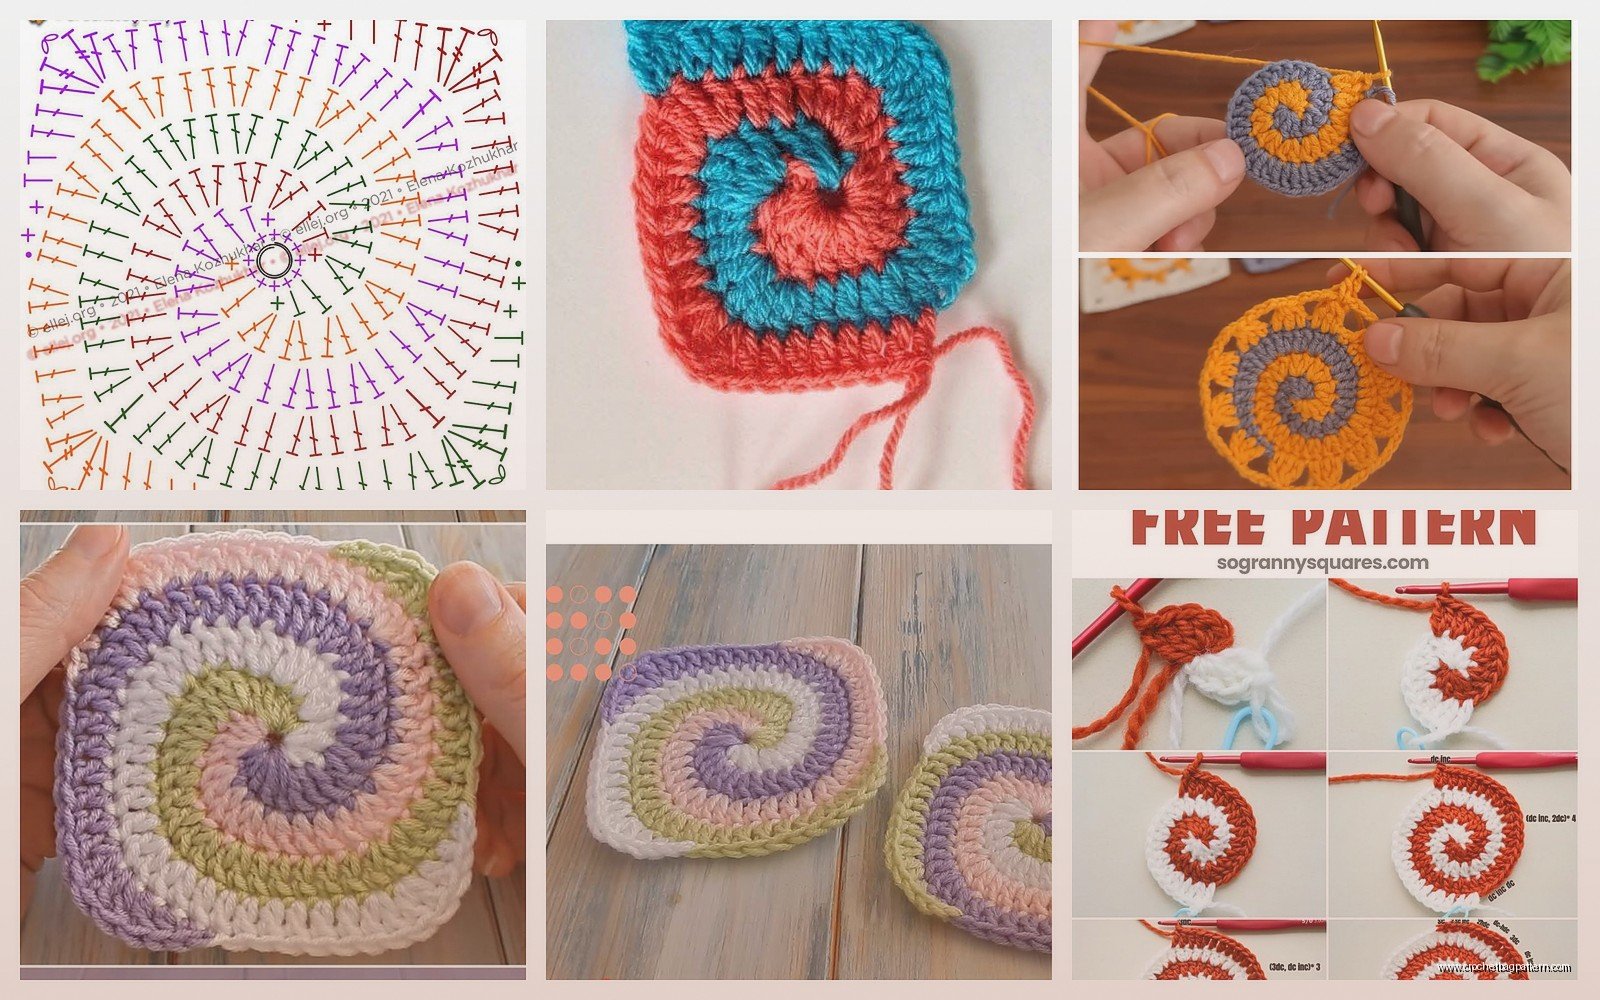
Round 1 is just: chain 3 (counts as first double crochet), then work 2 dc into the ring, chain 2, then *3 dc, chain 2* three more times. So you end up with four groups of 3 dc with chain-2 spaces between them. Those chain-2 spaces are your corners.
Here’s where it’s different from regular granny squares though. You do NOT slip stitch to join. You do NOT chain 3 to start the next round. You literally just keep going. Put your stitch marker in the top of that last dc you made (or in the first dc of the round, some people do it that way) so you know where round 1 ended.
the continuous spiral part
For round 2, you’re just gonna work directly into the next stitch. Do 3 dc in the corner chain-2 space, then chain 2, then 3 dc in the same corner space. That’s your corner made. Then 3 dc between the next two clusters (so in the space between the groups from round 1), then work another corner in the next chain-2 space. Keep going around.
The thing that annoyed me SO MUCH when I first learned this was figuring out where each round actually ended. Like you’re spiraling up so the “rounds” aren’t really rounds anymore? They’re more like a continuous spiral and it messes with your brain if you’re used to regular granny squares. I kept counting wrong and ending up with weird lopsided squares that had like 5 corners instead of 4.
What helped me was moving my stitch marker up every time I completed what would’ve been a full round. So after you work all four corners and all the spaces between them, that’s one “round” even though you didn’t join anything. Move your marker to the last stitch you made and keep going.
keeping track of corners
Each round you add one more cluster between corners. So round 1 has just corners with nothing between them. Round 2 has corners plus one cluster on each side. Round 3 has corners plus two clusters on each side. Round 4 has three clusters between corners, etc.
The corner itself is always the same: 3 dc, chain 2, 3 dc, all in that corner space from the previous round. Well technically in the spiral you’re working into the chain-2 space that’s sort of migrating upward but you get what I mean.
I usually count as I go: “okay this side needs 3 clusters between corners now” and then I make sure I do exactly that. If you lose count you can look at the previous round below where you’re working and count how many clusters it had, then add one.
color changes in spiral
This is where spiral granny squares actually shine. When you change colors, you just drop the old color and pick up the new one. No fastening off, no weaving in ends in the middle of the project. I was watching some true crime documentary when I figured this out, probably something on Netflix, and it was like a lightbulb moment.
You can carry the unused color up the inside of the work if you’re switching back and forth between two colors. Just crochet over the unused strand as you go so it gets hidden inside the stitches. Works best with similar weight yarns so you don’t get lumpy spots.
Or you can do the thing where you change colors every round or every few rounds for stripes. The stripe effect looks really cool in spiral because it actually spirals around instead of making horizontal lines. I made one with like 5 different colors from my scrap stash, including some Bernat Blanket yarn which was way thicker than the other stuff so that round looked kinda wonky but whatever.
the sides staying straight problem
Okay so one issue with spiral granny squares is sometimes the sides start looking curved or weird instead of straight. This happens when your tension is off or when you’re not placing stitches consistently.
The clusters between corners need to go in the spaces between clusters from the previous round, not into the actual stitches. Like you’re working in the gap between two cluster groups. If you accidentally work into the top of a dc instead of the space, things start shifting and your square gets wonky.
Also make sure you’re always doing 3 dc per cluster. I’ve definitely done 2 by accident or 4 by accident and then that whole side ends up shorter or longer than the others. Counting is your friend here even though it’s boring.
ending the square without a weird step
This is the tricky part. Since you’ve been spiraling up, when you decide you’re done, you’re gonna be like halfway through a round or in some random spot. You can’t just fasten off or you’ll have this weird step where the height suddenly drops.
What I do is plan ahead a little. When I’m getting close to the size I want, I make sure to work until I’m right before a corner. Then I do a modified corner that’s more like a regular granny square corner: slip stitch into the corner space, chain 3, do 2 dc in the corner space, chain 2, 3 dc in same space. Then slip stitch to the top of the chain 3. This creates a little join that helps even out the height.
Or honestly sometimes I just fasten off wherever and use the starting tail to kind of sew down that last section so it blends better. Not the “proper” way but it works.
Some people do this whole complicated thing where they work partial stitches to gradually decrease the height but that seems like too much effort for something that’s gonna be sewn into a blanket or whatever anyway.
actually using these squares
I’ve made probably like 20 of these at this point for different projects. They work great for blankets if you’re doing a scrappy multicolor thing. The spiral effect adds visual interest without you having to actually plan out a complicated color pattern.
You can also make them in different sizes for the same project which looks cool. Like make some that are 5 rounds and some that are 8 rounds, then piece them together with some rectangles or half-squares to fill gaps. I saw someone do this on Instagram and it looked really modern and deliberate even though I bet they just ran out of yarn partway through.
For joining them, I usually do the join-as-you-go method on the last round, or I sew them together with mattress stitch after. The spiral edge actually makes it easier to see where to put your needle when sewing because the stitches are all at slightly different heights so there’s less guessing.
Pillows are another good use. Make two squares the same size and sew them together around three sides, stuff with polyfill, sew the fourth side closed. The spiral pattern looks especially good if you do thick stripes with high contrast colors.
yarn weight mixing
I mentioned this earlier but you can actually mix yarn weights in these if you’re careful. Like start with worsted weight for a few rounds then switch to bulky for a round or two then back to worsted. It creates this cool textured effect where some rounds puff out more than others.
You gotta adjust your hook size though or at least your tension. When I used that Bernat Blanket round I mentioned, I held the hook looser so the stitches would be bigger and kinda match the scale of the other rounds. It wasn’t perfect but it worked okay.
Lion Brand Wool-Ease is good for mixing because it comes in both worsted and bulky weights with matching colors, so you can do the same color in different textures. I used their Fisherman color in both weights for a winter-themed square thing I made, it turned out pretty decent.
tension and gauge stuff
Honestly gauge doesn’t matter that much for spiral granny squares unless you’re trying to make them all identical for a specific project. Since you’re just going in circles, the square will be whatever size it ends up being based on how many rounds you do.
But tension does matter for keeping the shape square-ish. If you crochet really tight, your corners might pucker. If you crochet really loose, the whole thing gets floppy and the sides bow out. You want that middle ground where the fabric has structure but still drapes a little.
I tend to crochet pretty tight naturally so I sometimes go up a hook size to compensate. Like I’ll use a 5.5mm instead of 5mm with worsted weight. Experiment with what works for your hands.
the math of squares
Each round adds about the same amount to each side. So if your first round makes like a 2-inch square center, round 2 might make it 3.5 inches, round 3 makes it 5 inches, etc. The growth isn’t perfectly linear because of how the corners work but it’s close enough.
If you need a specific size square, make one round and measure it, then do rough math to figure out how many more rounds you need. Or just keep making rounds until it’s the right size and then stop, that’s what I usually do.
For a blanket you’re gonna want all the squares the same size obviously, so count your rounds and make sure every square has the same number. Write it down because you will forget, trust me.
troubleshooting common issues
If your square is turning into a hexagon or circle instead of staying square, you’re probably not doing the corners right. Make sure you’re doing the full corner (3 dc, ch 2, 3 dc) in each corner space every single round. It’s easy to accidentally skip or do a partial corner when you’re in the spiral zone.
If one corner is tighter than the others, check that you’re chaining 2 consistently. Sometimes I accidentally chain 1 or chain 3 and don’t notice until later. Also make sure you’re working into the actual chain space and not into the chains themselves.
If the whole thing is ruffling, you’re probably working too many stitches somehow. Recount your clusters and make sure you’re putting them in the right spots. Ruffling usually means extra stitches that shouldn’t be there.
If it’s cupping (edges curling up), you might not be doing enough stitches or your tension is too tight. Try going up a hook size or really making sure you have the right number of clusters on each side.
blocking these things
Spiral granny squares usually benefit from blocking, especially if you’re joining multiple ones together. The spiral can make the edges a little wavy so pinning them out square and steaming or wet blocking helps a lot.
I just pin mine to a foam mat or my ironing board, spritz with water, and let them dry. If you used acrylic yarn you can carefully steam block with an iron on low, just don’t touch the iron directly to the yarn or you’ll melt it. Learned that the hard way with a square I made in—I think it was spring 2022? Yeah because I was making stuff to keep busy during a rough patch and I ruined like three squares by melting them before I figured out the hovering technique.
Natural fibers like wool or cotton block really well and hold their shape better after blocking. But they’re also more expensive so for practice squares or blankets that’ll just live on the couch, acrylic is fine.
anyway that’s basically it, you just keep spiraling around until you have a square that’s the size you want, then figure out how to end it without it looking too weird, and you’re done