
Feb
Getting Your Materials Together
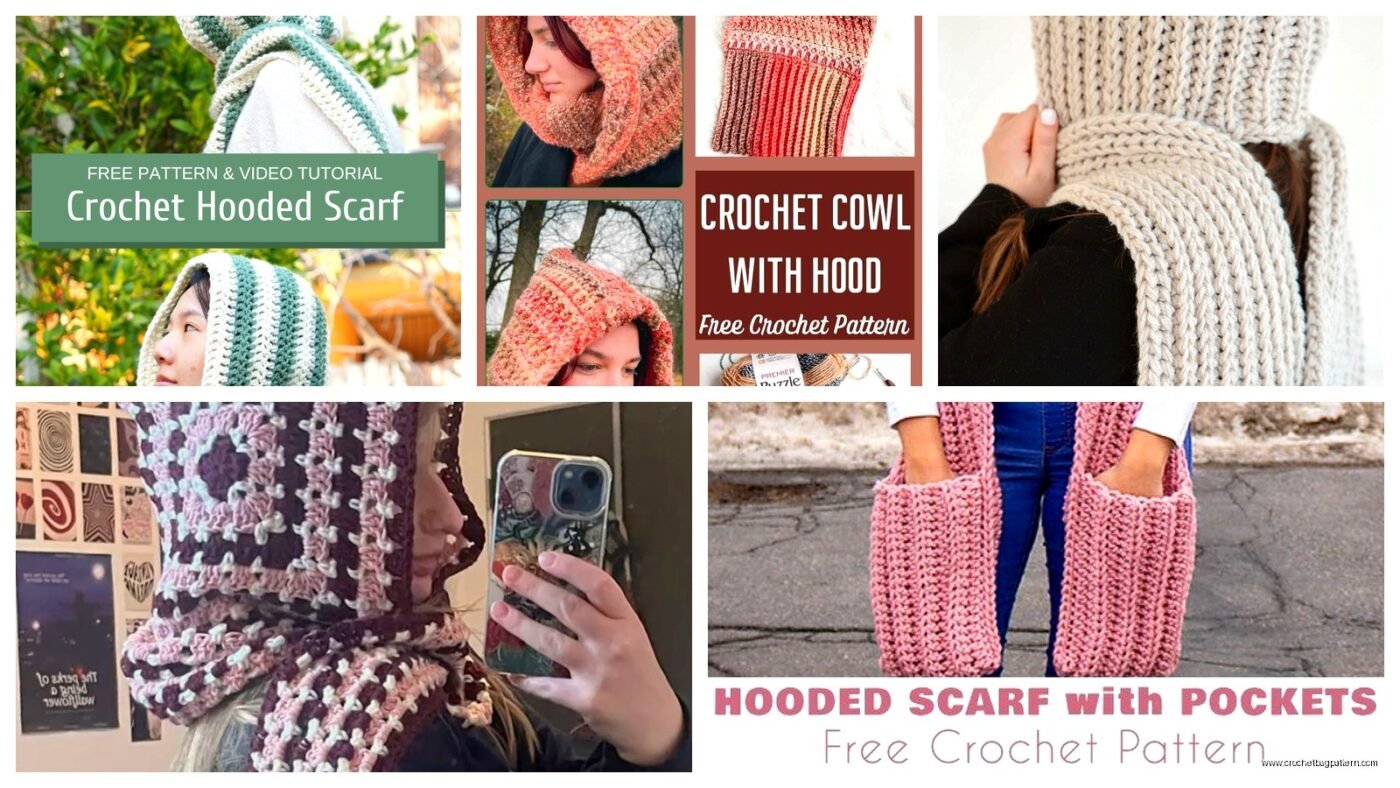
So I made my first scoodie back in January 2023 when my heating bill was insane and I just needed something that would actually keep my neck and head warm without dealing with separate pieces. I used Red Heart Super Saver in that grey heather color because honestly it was on sale at Michaels and I had a coupon. You’re gonna need about 600-800 yards depending on how long you want the scarf part, and I’d say go with a bulky or worsted weight yarn because anything thinner takes forever.
For the hook I used a 6mm but if you crochet really tight maybe go up to 6.5mm. I crochet pretty loose naturally so the 6mm worked fine for me.
Starting With The Hood Part
This is where most patterns get all complicated but I just made a big rectangle and seamed it. Chain about 60 stitches or whatever gets you roughly 20 inches across. The hood needs to be wide enough to go around your face comfortably but not so big it looks ridiculous.
Work in half double crochet for like 13-14 inches. I know that sounds imprecise but you can literally just hold it up to your head as you go. When I made mine I was watching that show Beef on Netflix and kept losing count of my rows so I had to measure instead of counting which honestly worked out better anyway.
Once you’ve got your rectangle, fold it in half so the short ends meet. Seam across the top using a whip stitch or just single crochet the edges together. Some people get really particular about invisible seaming but I just used the same yarn and a tapestry needle and it looks fine.
The Part That Annoyed Me
Okay so the neckline of the hood is where I messed up the first time. You need to add some ribbing or edging here or it just gaps weird and cold air gets in which defeats the whole purpose. I initially skipped this step because I thought it would be fine and then wore it outside exactly once before I had to go back and fix it. What worked was doing a row of single crochet around the entire neck opening, then another row of ribbing using back loop only stitches. It tightens things up enough that it actually sits against your neck.
Adding The Scarf Sections
This is where you have options and it depends on what you want. I did two separate scarf panels that attach to either side of the hood at the front.
For each panel, chain about 15-20 stitches depending on how wide you want your scarf. I think I did 18? Then just work in half double crochet until you reach whatever length you want. I made mine about 40 inches each so they’d be long enough to wrap or tuck into a coat.

The thing is you can also do one continuous scarf that goes all the way around the hood opening if you want, which might actually be easier than my method because then you don’t have to attach two separate pieces. But I liked having the two panels because it felt more like a traditional scarf somehow.
Attaching Everything
So you’ve got your hood and your scarf panel(s) and now you gotta connect them. I positioned the scarf panels at the front bottom edges of the hood, like where the hood opening starts on each side. Pin them if you’re the type of person who pins things (I’m not usually but I did here because my cat kept sitting on the pieces and moving them around).
Seam them on using the same whip stitch method or single crochet them together. Make sure you’re going through both layers securely because this junction gets a lot of stress when you’re actually wearing it and pulling the scarf part around.
Optional Border Work
I added a simple single crochet border around the entire edge of the scarf panels just to clean things up and make it look more finished. You don’t have to do this but it takes maybe 20 extra minutes and makes it look less homemade in that obvious way.
Some people do fancy shell stitches or picot edging but honestly for something you’re wrapping around your neck in freezing weather, simple is better.
Sizing Adjustments For Different Head Sizes
The measurements I gave are based on my head which is pretty average I think. If you’re making this for someone with a larger head or lots of hair, add another inch or two to the width of your initial rectangle. For kids you’d probably want to start with like 45-50 chains instead of 60 and make the height more like 11 inches.
I haven’t actually made one for a kid but my friend asked me to and those are the adjustments I’d probably… actually you know what, I’d probably just make the whole thing and then if it’s too big I’d take out rows because it’s easier than adding them later.
Yarn Choices That Actually Matter
So beyond the Red Heart I also tried making one with Bernat Blanket yarn which is that really chunky soft stuff. It worked up super fast, like maybe 4 hours total, but it was SO bulky that it felt weird to wear. It’s warm though if that’s your main priority and you don’t care about looking a bit puffy.
Lion Brand Wool-Ease is pretty good if you want something warmer than acrylic but not 100% wool because wool can be itchy against your face. The Wool-Ease blend is soft enough and it’s machine washable which matters for something you’re wearing outside in winter that’s gonna get dirty.
Avoid anything too slippery like some of those fancy alpaca blends unless you’re experienced because the stitches slide around and it’s harder to keep tension consistent.
Common Problems I Ran Into
The hood being too shallow was my first issue. If you make the rectangle too short in height, the hood sits weird on your head and doesn’t actually cover anything. Better to make it slightly too big and slouchy than too small.

Also the scarf panels twisting – this happens if your tension isn’t consistent or if you’re accidentally adding or dropping stitches. I had to frog one entire panel because it was twisting so bad it looked like a spiral and there’s no fixing that once you’ve done like 30 rows.
The seaming showing too much on the outside. This bothered me more than it probably should have but if you seam from the inside and really pay attention to keeping your stitches small and even, it’s less noticeable. Or just embrace it as part of the handmade look.
How Long This Actually Takes
If you’re working with worsted weight and you crochet at a normal pace, maybe 6-8 hours total? The bulky yarn version took me about 4 hours. I spread mine out over three evenings because I can’t sit and crochet for hours straight without my hands cramping up.
People who are faster could probably finish in an afternoon but I’m not one of those people who cranks out projects super quick.
Variations You Could Try
You could add pockets to the scarf ends which would be cool for keeping your hands warm. Just crochet small rectangles and seam them onto the ends of the scarf panels.
Or do stripes with different colors which is pretty straightforward, you just switch yarns at the end of a row. I thought about doing grey and cream stripes but didn’t wanna deal with weaving in all those ends.
Some people add buttons or toggles to the scarf part so you can button it closed but that seems like overkill to me. Just wrap it or tuck it.
The pattern is flexible enough that you can really adjust based on what you need. Make it longer, shorter, wider, add cables if you know how to do those (I don’t really), whatever works for you and your skill level.