
Apr
okay so granny square sweaters
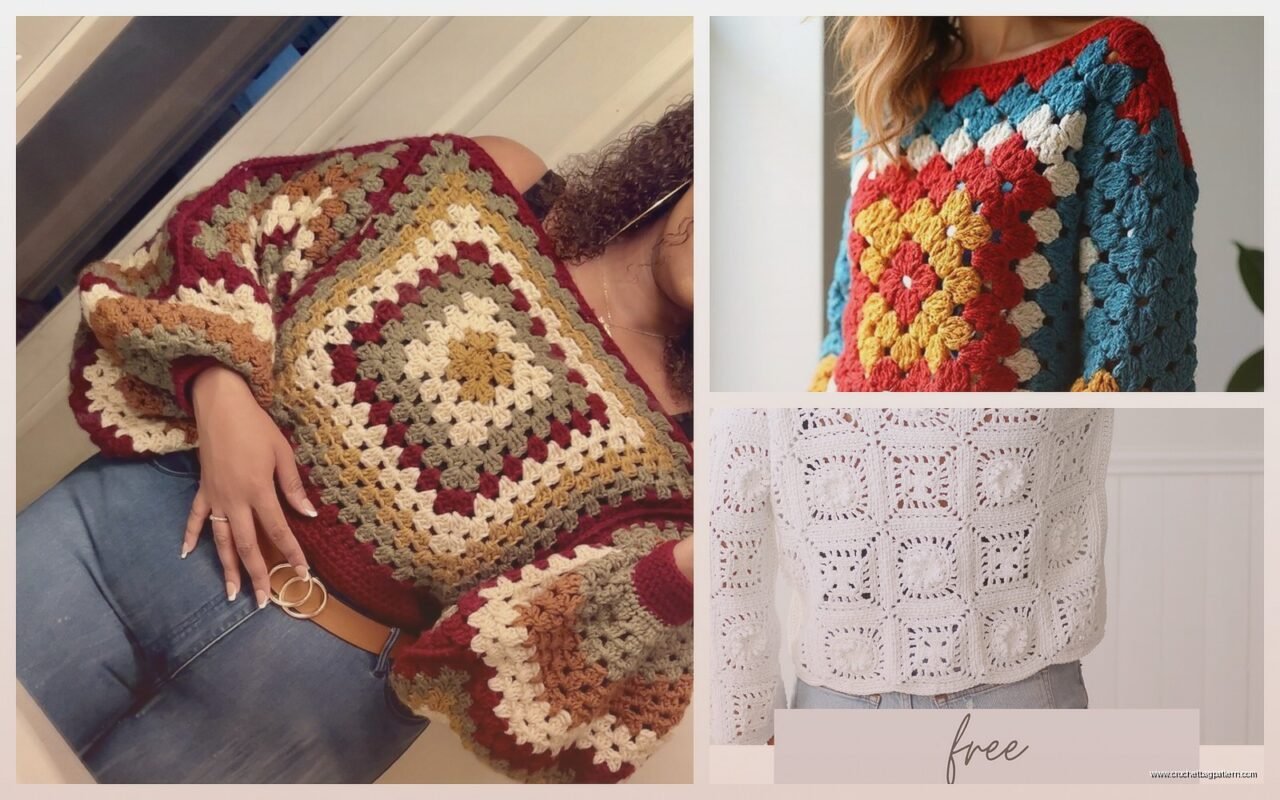
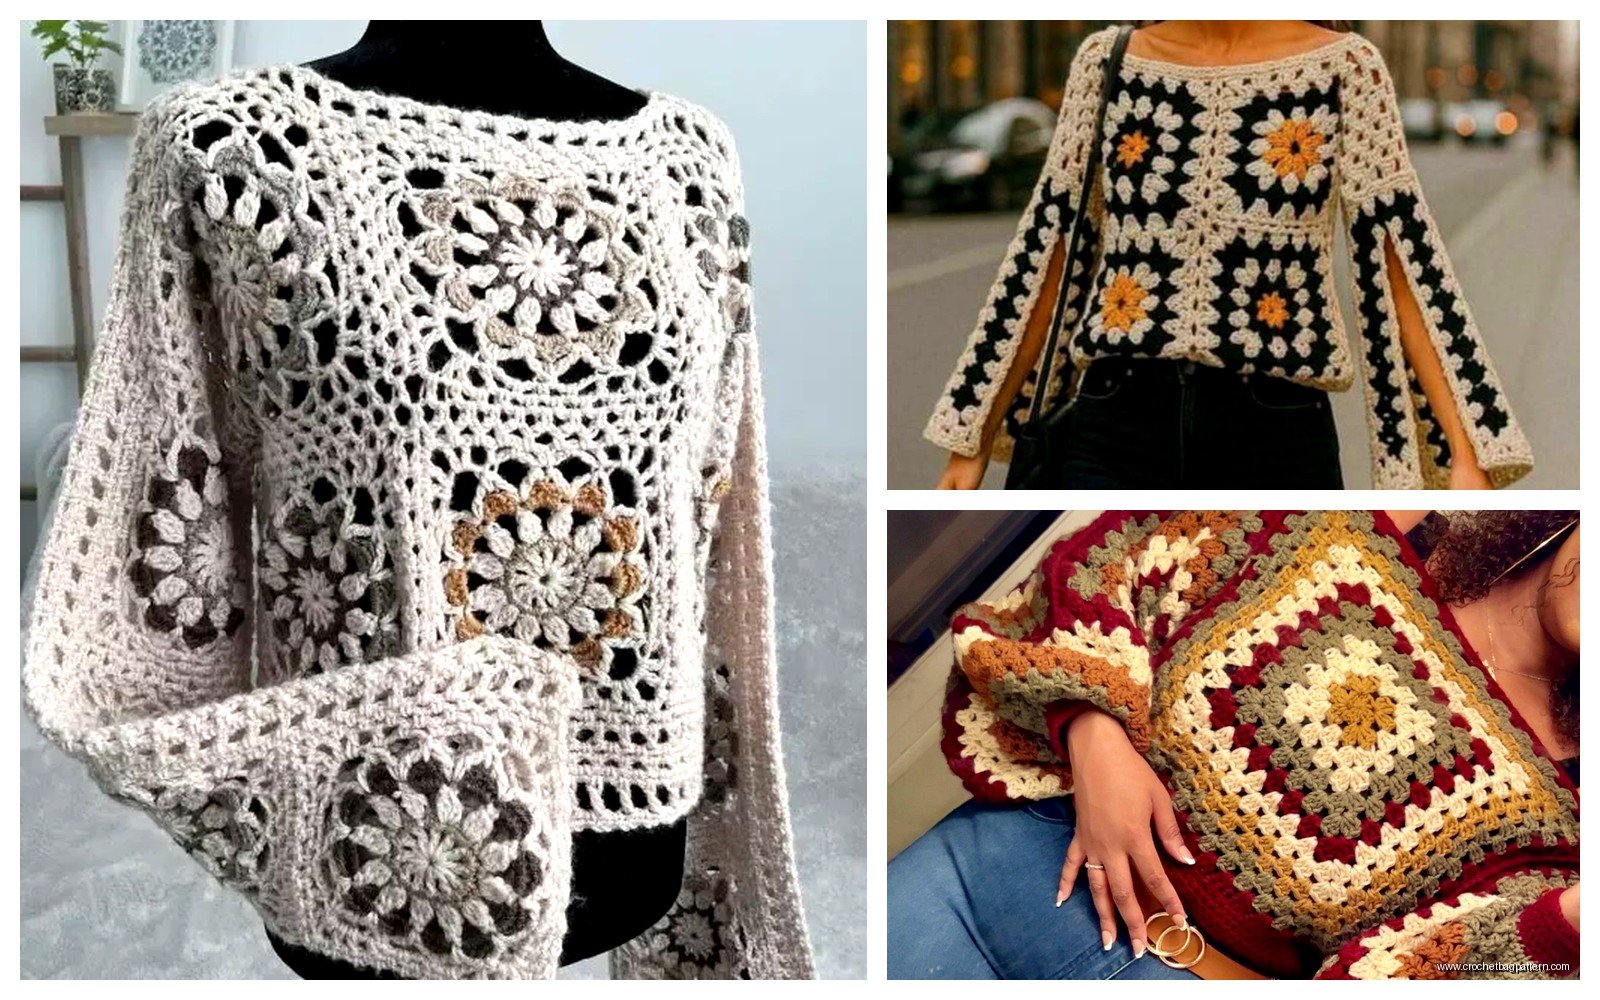
I made my first actual wearable granny square sweater in spring 2022 when I was between jobs and had way too much time on my hands. Been making the squares themselves forever but never actually assembled them into something I’d wear outside the house until then. The pattern I used wasn’t even really a pattern, more like a general idea I saw on Instagram and then just kinda winged it.
the basic concept
You’re gonna make a bunch of granny squares and then seam them together into a sweater shape. That’s literally it. The tricky part is figuring out how many squares you need and what size they should be. I used 5 inch squares for mine because that seemed manageable and I didn’t want to be crocheting individual squares for the rest of my life.
For gauge you need to actually check this even though I hate doing it. Make one square and measure it. If you’re using a different yarn weight than what I used, your squares will be different sizes. I used Red Heart Super Saver in that burgundy color (Wine I think?) and some cream colored Caron Simply Soft because I had it lying around. The texture difference bugged me later but whatever, it added character or something.
how many squares you actually need
This depends on your size obviously. I’m a medium/large depending on the brand and I made:
- Front panel: 24 squares (4 wide x 6 long)
- Back panel: 24 squares (same)
- Sleeves: 16 squares each (32 total)
That’s 80 squares total which sounds insane when I write it out. Took me about three weeks watching The Office for the millionth time. My cat kept sitting on the squares I’d already finished which was annoying but also she looked cute so I allowed it.
the actual granny square pattern
I’m assuming you know how to make a basic granny square but here’s what I did for each one:
Round 1: Magic ring, chain 3 (counts as dc), 2 dc in ring, chain 2, then *3 dc, chain 2* three more times. Slip stitch to top of beginning chain 3. You’ve got four corners now.
Round 2: Slip stitch to first chain-2 space, chain 3, 2 dc in same space, chain 1, then in same corner space do 3 dc, chain 2, 3 dc. That’s your first corner done. Chain 1, then in next corner space do 3 dc, chain 2, 3 dc, chain 1. Repeat around.
Round 3: Same idea but now you’re working into both corner spaces and the chain-1 spaces on the sides. Each side should have two clusters of 3 dc with a chain-1 between them, and corners still get the 3 dc, chain 2, 3 dc treatment.
I stopped at round 3 because that gave me 5 inch squares. If you want bigger squares just keep going with the same pattern until they’re the size you want.
the yarn situation
Like I said I used Red Heart Super Saver and Caron Simply Soft which probably wasn’t the best choice because they have different weights technically. Red Heart is that classic acrylic that lasts forever and Caron is softer but I think slightly thinner? I dunno, it worked out fine. You could also use Bernat Blanket yarn if you want a chunky sweater but then you’d need way fewer squares which might actually be smarter now that I think about it.
I’ve also seen people use Lion Brand Wool-Ease for these and it looks really nice but I’m too cheap for that usually. Hobby Lobby’s I Love This Yarn works fine too if you have one near you.
assembling the panels
This is the part that annoyed me SO MUCH because I thought it would be quick and it wasn’t. I tried whipstitching the squares together first and it looked terrible, all lumpy and weird. Then I tried slip stitching them which was better but still kinda bulky.
What actually worked: the join-as-you-go method where you crochet the squares together during the last round. But I’d already made like 40 squares before I figured this out so I had to seam those the regular way and then switched methods halfway through like a disaster person.
For regular seaming, lay two squares right sides together and slip stitch through both back loops only. This creates a ridge on the right side which some people like for the aesthetic. I was neutral about it. Use the same yarn you made the squares with or it’ll show and look weird.
the actual sweater construction
Make your front and back panels first. These should be rectangles. Mine were 4 squares wide and 6 squares long which gave me a sweater that hit right at my hips. If you want it longer add more rows of squares. If you want it cropped… why are you making a granny square sweater cropped but okay, do fewer rows.
For the shoulders I didn’t seam the top 2 squares on each side of the front and back panels together. That left a neck opening. You could do a deeper neckline by leaving more squares open but then you’re getting into territory where you need to add a collar or something and honestly that’s too much planning for me.
Sleeves are where it gets weird. You need to make two rectangular panels of squares that will wrap around your arm. I did 4 squares wide and 4 squares long for each sleeve. Then you seam them into tubes and attach them to the armholes you created when you joined the front and back panels.
The armhole depth matters here. I left the top 3 squares on each side of the front and back unseamed before attaching sleeves. So when you’re making your body panels, you seam them together at the shoulders but leave the sides open for like 15 inches or whatever three squares measures for you.
attaching the sleeves
This part I definitely messed up the first time. You want to find the center top of your sleeve panel and match it to the shoulder seam. Pin it if you’re fancy (I’m not). Then slip stitch or whipstitch the sleeve to the armhole opening, easing it around the curves. There will be curves even though everything is squares, it’s weird but it works.
After the sleeves are attached, seam up the sides of the body and the underarms in one continuous line. I used slip stitch for this because whipstitching that long of a seam made my hand cramp.
finishing touches that you might skip
Technically you’re supposed to add edging around the bottom, cuffs, and neckline. I did single crochet around everything just to clean it up but you could do something fancier. I’ve seen people do shell stitches or picot edges but that seemed like… a lot.
For the neckline I just did two rounds of single crochet to keep it from stretching out weird when I wore it. The cuffs got the same treatment. The bottom hem I left alone because the edge of the granny squares already looked finished enough to me.
things I would do differently
Use the join-as-you-go method from the start instead of making all the squares separately. Seriously this would’ve saved me hours of seaming time and my fingertips wouldn’t have hurt from pulling the yarn needle through so many stitches.
Also maybe plan the color arrangement better? I just used whatever squares I’d made in whatever order and it looks kinda random. Some people do ombre effects or plan out color blocking and it looks way more intentional. Mine looks like a scrappy quilt which is fine but wasn’t really the vibe I was going for initially.
I would probably use a lighter weight yarn too. The Super Saver made the whole thing kinda heavy and it sags a bit now after wearing it a few times. Something like Caron Simply Soft throughout would’ve been better or even a cotton blend for a different drape.
sizing adjustments
If you’re bigger or smaller than me you’ll need to adjust the number of squares. The math is annoying but basically you need to measure yourself and divide by the size of your squares.
Bust measurement: Measure around the fullest part and add like 4 inches for ease because you don’t want this skin tight. Divide that number by your square size. That’s how many squares wide your front and back panels should be.
Length: Measure from your shoulder to wherever you want the sweater to end. Divide by square size. That’s how many squares long.
Sleeve length: Measure from your shoulder to your wrist or wherever you want the sleeve to end. Same division thing.
Sleeve width: This one’s trickier because you need it to fit around your upper arm but also not be huge at the wrist. I just made mine straight tubes and they’re a bit loose at the wrist but I don’t care enough to fix it. You could taper them by using fewer squares toward the bottom but that requires actually planning the decreases and—
honestly I didn’t have the brain space for that in spring 2022.
the actual wearing of it
It’s warm. Like really warm. Don’t make this for summer unless you live somewhere cold. The squares trap air between them so it’s basically like wearing a blanket. I wear mine in fall and winter over long sleeve shirts usually.
It’s also heavy like I mentioned before. Not uncomfortably heavy but you definitely know you’re wearing it. And it stretches over time especially at the shoulders and elbows so you might need to reshape it occasionally by wetting it and laying it flat to dry.
Washing: I just throw mine in the washer on delicate and lay it flat to dry. The acrylic holds up fine. If you used wool or cotton you’d need to be more careful but acrylic is basically indestructible which is why I use it for everything.
variations I’ve seen
Some people make these with hexagons instead of squares which looks cool but seems like a nightmare to figure out the construction. There’s also the version where you make one giant granny square for the back, one for the front, and two smaller ones for sleeves but that doesn’t give you the same patchwork look.
You can also do different square sizes mixed together for a more scrappy look. I saw someone on Pinterest who used 3 inch, 4 inch, and 5 inch squares all in one sweater and it actually looked intentional somehow.
Color blocking is another option where you do all one color for the body and different colors for the sleeves. Or stripes. Or random scraps like mine but on purpose.
time investment reality check
Each square took me about 15-20 minutes once I got into a rhythm. Times 80 squares that’s… I don’t wanna do that math but it’s a lot of hours. Spread over three weeks it was fine because I was unemployed and depressed so I needed something to do with my hands anyway.
If you’re working a normal job and have a life, this is gonna take you way longer. Maybe a couple months if you do a few squares a week? Don’t start this project thinking you’ll finish it in a weekend unless you’re some kind of crochet machine.
The assembly took me another full day, maybe 6-8 hours total including all the seaming and edging and weaving in ends. I did not weave in ends as I went which was stupid. Learn from my mistakes and weave them in after each square or you’ll have like 160 ends to deal with at once and want to die.
yarn amounts
I used about 6 skeins total of the Super Saver and 3 of the Caron Simply Soft. That’s for a size medium/large with 5 inch squares. If you’re doing all one yarn you’d need probably 8-10 skeins depending on the weight and your size.
Buy extra. Seriously just buy more than you think you need because dye lots are a thing and if you run out halfway through you’re gonna be mad when you can’t find the same color batch.
I didn’t because I’m cheap and figured I could just use whatever I had but then I ran out of the burgundy and had to substitute with a slightly different red for like 5 squares and it bugs me every time I look at it even though literally no one else notices.
tools you need
Hook size depends on your yarn. I used a 5.5mm (I) hook for the Super Saver and it worked fine. Check your yarn label for recommended hook size.
You’ll also need a yarn needle for seaming, scissors, and probably stitch markers if you’re the kind of person who uses those. I’m not but they’d be helpful for marking where to attach sleeves and stuff.
Pins maybe for holding squares in place while you seam them. I used safety pins from my junk drawer because I don’t own proper blocking pins.
That’s basically it. Not a lot of special equipment needed which is one reason I like granny square projects.