
Feb
Getting Your Yarn and Supplies Together
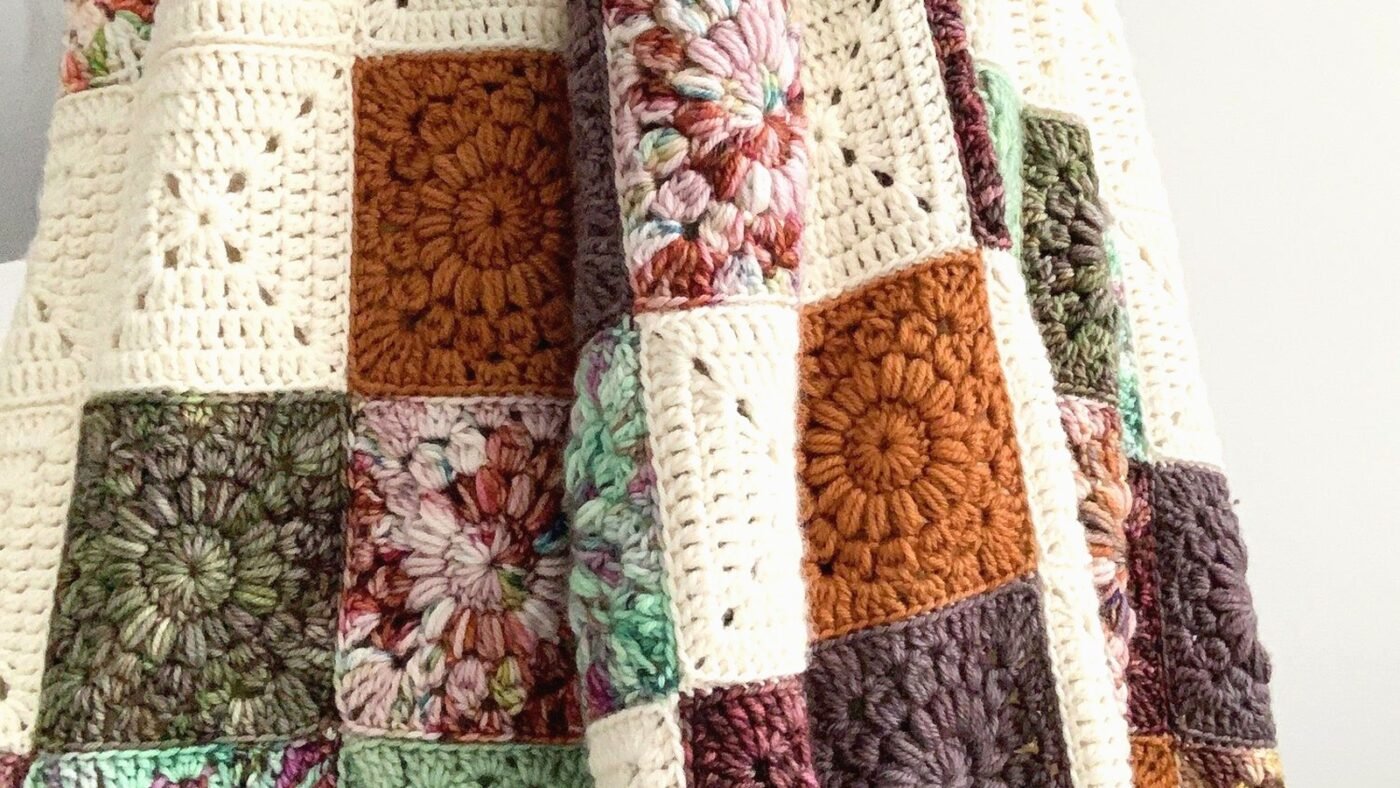
Okay so first thing you gotta do is pick your yarn. I used Red Heart Super Saver for my first real granny square afghan back in winter 2023 because it was cheap and I was broke after moving apartments. Got like eight skeins in different colors—I think it was that “Cherry Red” and “Soft White” and some gray color they call “Heather Grey” or something. Caron Simply Soft is also decent if you want something less scratchy but honestly when you’re making a whole blanket the cost adds up fast.
You need a hook size that matches your yarn weight. For worsted weight yarn like Red Heart Super Saver I used a 5.5mm hook (size I-9 in US terms). Some people go up to 6mm for a looser look but I don’t like when you can see through the stitches too much.
Here’s what you actually need:
- Yarn in however many colors you want (I’d say at least 3-4 for visual interest)
- Crochet hook appropriate for your yarn weight
- Scissors
- Yarn needle for weaving in ends later (this part is hell, I’ll get to that)
- Maybe some stitch markers if you lose track easily
Making the Basic Granny Square
The traditional granny square starts with a magic ring or you can just chain 4 and slip stitch to form a ring if you never learned the magic ring thing. I still sometimes do the chain method because my magic rings come undone if I don’t—wait actually you need to really pull that tail tight or the whole center gets loose.
Round 1: Chain 3 (counts as first double crochet), then make 2 more double crochets into the ring. Chain 2. That’s your first corner. Then make 3 double crochets, chain 2, and repeat two more times. You should have four groups of 3 double crochets with chain-2 spaces between them. Slip stitch to the top of your starting chain-3.
Round 2: Slip stitch over to the first chain-2 corner space. Chain 3, make 2 double crochets in that same corner space, then chain 2, then 3 more double crochets in that same corner. Now chain 1 and move to the next corner space. In that corner: 3 double crochets, chain 2, 3 double crochets. Keep going around.

Each round after that you’re basically doing the same thing but adding more groups of 3 double crochets along the sides. The corners always get that (3 dc, chain 2, 3 dc) cluster and the sides get 3 dc in each chain-1 space from the previous round.
Changing Colors
This is where it gets fun but also messy. I usually change colors every 1-2 rounds. When you’re finishing a round and want to switch colors, don’t fasten off completely—do your last slip stitch with the old color but leave the last pull-through for the new color. Or just cut the old color and join the new one in any corner space, that works too.
You’re gonna have SO many ends to weave in. I made probably 48 squares for my afghan and each square had like 4-5 color changes so that’s… I don’t even want to do the math. I sat there watching The Office for the millionth time just weaving in ends for hours. My cat kept attacking the yarn tail too which didn’t help.
How Many Squares Do You Actually Need
Depends on how big you want it obviously. For a throw blanket that fits on a couch I did 6 squares by 8 squares. Each of my squares was about 6 inches across after blocking (kinda—I didn’t really block them properly just stretched them a bit). That made a blanket around 36 inches by 48 inches which is decent.
If you want a bed-size afghan you’re looking at way more squares. Like for a twin bed maybe 8×10 squares, for queen or king you’d need 10×12 or more. Honestly I wouldn’t recommend going that big for your first one because the assembly is awful.
Keeping Your Squares Consistent
This annoyed me SO much—my first few squares were different sizes than my later ones because my tension changed as I got more comfortable. Try to keep your stitches the same tightness throughout. I had to redo like 6 squares because they were noticeably smaller and it looked weird when I laid them all out.
Count your stitches on each side to make sure every square has the same number of rounds. I did 5 rounds per square but you can do more or less.
Joining Your Squares Together
There are like a million methods for this. Whipstitch, slip stitch, single crochet, join-as-you-go methods… I used the slip stitch method because it seemed flattest.
Basically you line up two squares with wrong sides together (so the right sides are facing out). Using a yarn needle or your hook, slip stitch through both loops of both squares along one edge. It creates a little ridge on the right side which some people like for the “quilted” look.
The whipstitch method is also common—you use a yarn needle and just sew the squares together with a basic overcast stitch. This one’s flatter but takes longer and my hands cramped up doing it.
Join-As-You-Go Method
Some people swear by this where you actually connect squares as you’re making the last round of each new square. I tried this once and honestly it confused me too much keeping track of which squares connected to what. But if you’re more organized than me (likely) it saves time since you don’t have a separate joining phase.
The basic idea is on your last round when you get to the side that needs to connect to an existing square, instead of chaining between stitch groups you slip stitch into the corresponding space on the other square.
Layout and Color Planning
Before you join anything, lay out all your squares on the floor or bed and figure out the arrangement. I spent like an hour moving squares around trying to get the colors distributed evenly. You don’t want all your red squares clumped together in one corner or whatever.
Take a picture of your layout with your phone so you don’t forget the arrangement when you’re joining them. I didn’t do this at first and had to keep getting up to check which square went where.
Some people do a planned color pattern like rainbow order or alternating colors, but I just made each square with random color combos and then arranged them in a way that looked balanced. More scrappy-looking but that’s kinda the vibe anyway.
Border Options
After all your squares are joined you probably want to add a border around the whole thing to clean up the edges. I did a simple single crochet border in one of the main colors (the Soft White I think). Just single crochet around the entire perimeter, putting 3 single crochets in each corner to keep it flat.
You can get fancier with shell stitches or picot edges or whatever but honestly after making like 50 squares and joining them all I was so done. Simple border works fine.
Some people do multiple rounds of border in different colors which does look nice—like 2 rounds of single crochet then a round of shells or something.
Dealing With the Frustrating Parts
The ends. Oh my god the ends. Every square has at least 2 ends from starting and finishing, plus 2 more for every color change. That’s minimum 100 ends to weave in for a 48-square blanket, probably more like 200+ if you did lots of color changes like I did.
I found it less awful to weave in ends as I finished each square instead of saving them all for the end, but I didn’t do that because I’m bad at making good choices apparently. Spent an entire weekend just on ends after I’d already joined everything.
Also your hands will hurt. Take breaks. I got really into it during that winter 2023 project because I needed something to distract myself from the whole breakup situation and I’d crochet for like 4 hours straight and then my right hand would ache for days.
Yarn Amount Estimates
Hard to say exactly because it depends on your square size and how many rounds, but for my throw blanket with 48 squares (5 rounds each) I used about 8 skeins of Red Heart Super Saver. Each skein is 364 yards. So roughly 2,900 yards total? Maybe a bit less.
If you’re doing a bigger blanket or larger squares, plan for more. It’s better to overbuy because dye lots can vary and if you run out of a color halfway through it might not match perfectly when you buy more.
Caron Simply Soft skeins are smaller—only 288 yards I think—so you’d need more skeins of that.
Pattern Variations You Can Try
Once you get the basic granny square down you can mess with it. Solid color squares mixed with multicolor ones looks cool. Or do all your centers one color and vary the outer rounds.
There’s also the continuous granny square where you don’t join each round but spiral up, though that changes the look significantly and you don’t get those defined rounds.
Sunburst granny squares have a different center—more of a flower shape instead of the basic cluster. Circle granny squares are also a thing where you work in continuous rounds to make circles then join them, though they’re not technically squares anymore so…
You can also make rectangles instead of squares if you want the blanket to come together with fewer seams. Just keep working back and forth or continue adding rounds but only on two opposite sides.
Blocking Your Finished Afghan
Technically you’re supposed to block the whole thing when you’re done to even everything out. I just washed mine in cold water on delicate cycle, laid it flat on my bed to dry, and kinda smoothed it out with my hands. Actual blocking would involve pinning it to specific measurements but I couldn’t be bothered.
If your squares are really uneven or the whole blanket is wonky, proper blocking might be worth it. Get some foam mats and a ton of rust-proof pins and pin it out to the dimensions you want, then spritz with water or steam it.
Red Heart Super Saver is acrylic so it doesn’t block as dramatically as wool would but it still helps a little.