
Feb
What You Actually Need
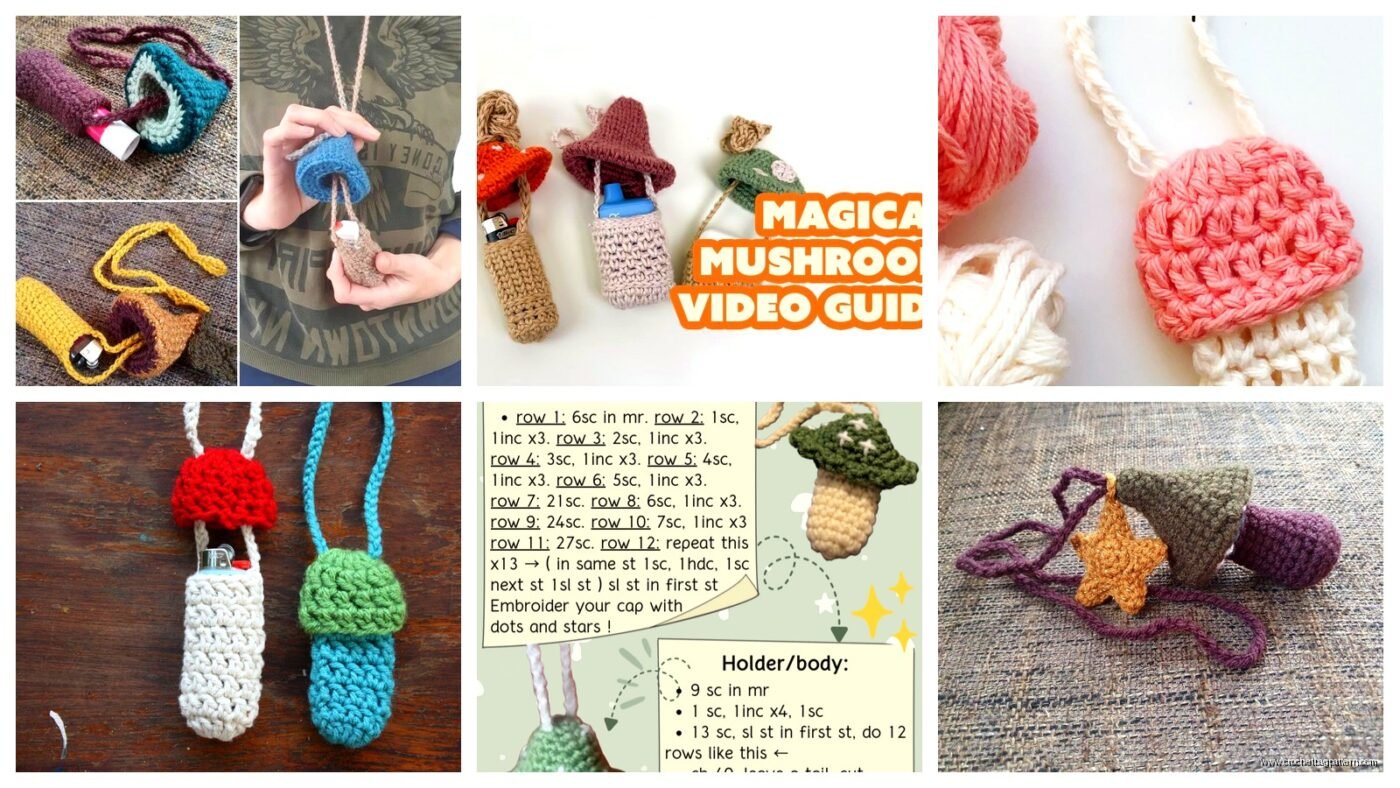
So I made one of these back in winter 2023 when my friend Sarah kept losing her lighter at parties and I thought it would be funny to make her something ridiculous. Cotton yarn works best because it’s not gonna melt if someone accidentally gets the flame too close. I used Lily Sugar’n Cream in that brick red color for the cap and ecru for the stem, but honestly any worsted weight cotton works fine.
You need a size G hook, maybe H if you crochet really tight. Stuffing if you want it to stand up on its own, but I’ve made them without stuffing too and they’re more like a cozy that just slides over the lighter. Oh and a lighter obviously, to check sizing as you go. The standard Bic lighters are what I base the sizing on.
The Base Holder Part
Start with your stem color. Chain 12 and slip stitch to form a ring, or you can do magic ring but I never do that for this project because it needs to be sturdy at the bottom. Single crochet around, you want like 18-20 stitches in your first round depending on how tight you work.
Then just keep going in a spiral, single crochet in each stitch. Don’t join rounds, just keep spiraling up. This is where you gotta check your lighter frequently because if you make it too tight the lighter won’t fit and if it’s too loose it’ll just fall out and defeat the whole purpose.
Work about 2.5 inches straight up. The thing that really annoyed me about this project is that the holder would stretch out after a few uses, so I started doing mine in back loops only for a couple rounds in the middle to give it more grip. Like do regular single crochet for an inch, then 3-4 rounds in back loops only, then regular again.
The Mushroom Cap
This is the fun part. Switch to your cap color – red, brown, purple, whatever. You’re basically making a flat circle then curving it down into a dome shape.

Start with a magic circle or chain 4 and join. Round 1 is like 8 single crochets into the ring. Round 2 you increase every stitch so you have 16. Round 3 increase every other stitch for 24. Round 4 every third stitch, you get the pattern. Keep increasing until your circle is about 3.5 inches across, maybe a bit more if you want a really dramatic mushroom cap.
Then here’s where it gets weird – you need to stop increasing and actually start working even or slightly decreasing to make it curve down. I usually do 2 rounds with no increases at all, then start doing some decreases every 6 or 7 stitches. Not a lot though or it’ll—wait I need to explain the spots first.
Adding the Spots
If you want those classic white spots on your mushroom cap, you can either crochet them separately and sew them on (little circles in different sizes) or you can do surface crochet which is actually easier. Just take white yarn and a smaller hook, slip stitch in random spots on the cap in circle patterns. Make some big, some small. I was watching The Great British Baking Show while doing this part and honestly just zoned out, the spots don’t need to be perfect.
My cat knocked over my coffee right onto the red yarn during this project and I had to restart the cap completely, so maybe keep beverages away from your workspace.
Attaching the Cap to the Holder
This is where people mess up. You can’t just sew the cap flat onto the top of the holder or it looks stupid and pancaked. The cap needs to sit like a little roof over the lighter opening.
What I do is stuff the stem part lightly if you’re using stuffing – just enough to give it shape. Then position your cap so it overhangs the stem by about half an inch all around. Pin it in place with regular pins. The cap should angle down slightly from the center.
Sew around using the same color as your stem, going through the edge of the cap and catching the top round or two of the stem. You want it secure but the lighter still needs to slide in and out from underneath obviously.
Different Variations I’ve Tried
The basic pattern above is for a standard red mushroom cap style, but you can make it weird. I did one with a brown cap and didn’t add spots, just used a lighter brown to make gills on the underside with some lazy embroidery stitches. Looked more realistic but also kind of creepy.
You can make the stem thicker by starting with more stitches in your base chain – like 24 instead of 18. This works better if you’re making it for those long lighters, the fireplace ones or whatever they’re called. Adjust everything proportionally bigger.
Purple cap with yellow spots looks really trippy. Used Red Heart Super Saver in Bright Yellow and Perfect Purple for that one. Red Heart is cheaper than the Lily Sugar’n Cream but it’s also more plasticky feeling, so.
The Grip Problem
Like I mentioned earlier, these tend to stretch out. Cotton has some give to it and after sliding a lighter in and out a bunch of times it gets loose. Few things you can do about this:
- Work tighter than you normally would, even if it hurts your hands a bit
- Do those back loop only rounds I mentioned for built-in ribbing
- Add elastic thread – you can find it at craft stores, just hold it along with your yarn as you crochet the stem part
- Make it slightly smaller than you think and let it stretch to fit
- Line the inside with felt fabric, cut a rectangle and glue or stitch it in
The elastic thread thing works best honestly but it’s an extra material to buy.

Sizing for Different Lighters
Standard Bic lighter: 18 stitches base, 2.5 inches tall stem
Mini Bic: 14 stitches base, 2 inches tall
Long lighter: 24 stitches base, 4 inches tall, make your cap bigger too
Just measure your lighter before you start and adjust. The circumference of your base chain should be slightly smaller than the lighter’s circumference because the crochet will stretch.
Finishing Details That Actually Matter
Weave in your ends really well because these get handled a lot. I use a yarn needle and weave each end through like 6-7 stitches, then double back through a few more in the opposite direction. If an end comes loose the whole thing can start unraveling.
Some people add a bottom to their holders, like crochet a circle and sew it to close off the base. I don’t because then you can’t push the lighter up from the bottom if it gets stuck, but it does look more finished that way. Your choice.
You can do a hanging loop too. Just chain 15 or so and attach it to the back of the cap before you sew the cap onto the stem. Then people can hang it wherever. I did this for the one I made Sarah and she hung it by her back door for the patio lighter.
Common Problems
If your mushroom cap is floppy and won’t hold its shape, you probably increased too much or your tension was too loose. You can stuff the cap very lightly or use fabric stiffener spray.
If the lighter won’t fit in the holder at all, well, you gotta frog it and start over with more stitches. There’s no real fix for too-small crochet besides remaking it.
If the cap keeps falling off, you didn’t sew it securely enough. Just go back and add more stitches connecting it to the stem.
Time and Skill Level
The whole thing takes maybe 2-3 hours if you’re not constantly checking your phone or getting distracted. It’s a good TV project. You need to know single crochet, increasing, and decreasing. That’s basically it. If you can make a basic amigurumi you can definitely make this.
I taught my friend how to crochet last year and this was actually the second thing she made after a practice swatch. It’s really forgiving because it doesn’t need to be perfect – mushrooms in nature aren’t symmetrical anyway.
Why Even Make This
It’s a funny gift honestly. Everyone has lighters around and they’re boring looking. Takes up scrap yarn. You can make a bunch in different colors for a craft fair if you do that sort of thing. They sell okay, people think they’re quirky.
Also if you smoke or know people who do, it makes the lighter easier to find in a bag or on a cluttered table. The mushroom cap sticks up and catches your eye.
I’ve made probably 15 of these at this point in different color combinations. Once you get the pattern down you don’t even need to think about it, your hands just know what to do. That’s when it becomes actually relaxing instead of frustrating.