
Feb
Getting Your Materials Together
So I made my first mandala wall hanging in January 2023 and honestly it was because I needed something to do with my hands while binge-watching The Last of Us. I used Red Heart Super Saver in this cream color called Aran and some teal shade I can’t remember the exact name of. The thing about mandala wall hangings is you don’t need fancy yarn but you DO need enough of it because running out halfway through sucks.
You’re gonna want a hook that’s bigger than what the yarn label says. I used a 6mm hook with worsted weight yarn even though it recommended 5mm. The looser tension makes it hang better and look more flowy which is kinda the whole boho point. Also grab scissors, a yarn needle for weaving in ends, and some kind of stick or dowel for hanging it. I used a piece of driftwood I found at the beach but a wooden dowel from the craft store works fine.
Starting the Center Circle
The center is just a magic ring. If you don’t know how to do a magic ring you can YouTube it in like 30 seconds. Start with 12 double crochets into the ring. Pull it tight. Then you’re building out in rounds and this is where it gets repetitive but also meditative? I guess?
Round 2 is usually 2 double crochets in each stitch so you end up with 24 stitches. Round 3 depends on what pattern you’re following but generally you’re increasing evenly. The annoying thing about mandalas is counting. I hate counting stitches. I always lose track around stitch 40-something and have to start over.
Color Changes and Pattern Stuff
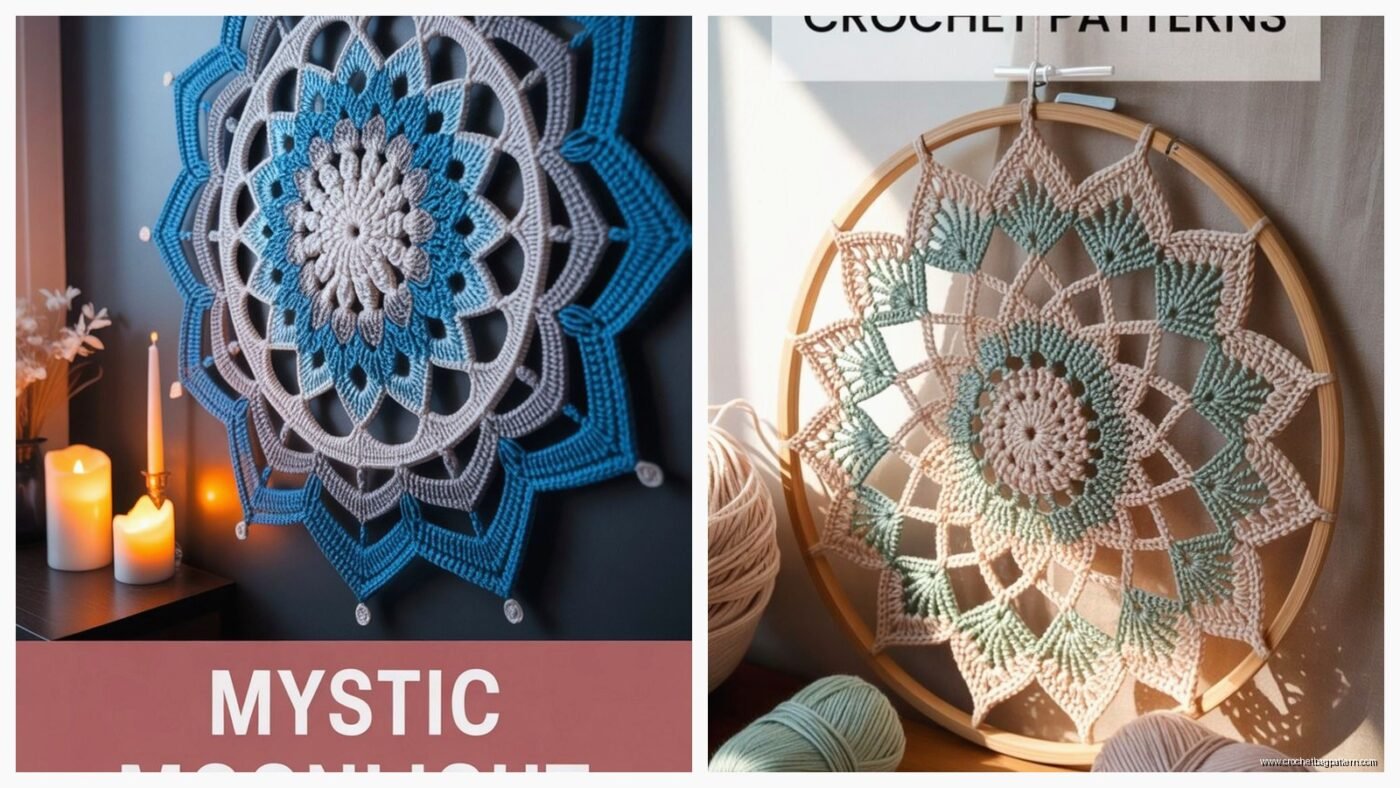
For the boho look you want at least 3-4 colors. I did cream, teal, mustard yellow, and this weird rust orange. The color changes happen at the end of rounds which is easy enough – just finish your last stitch with the new color pulled through. Don’t cut the old color if you’re gonna use it again soon, just carry it up the side.
Some patterns I’ve used or messed around with:
- Basic granny stitch mandala – this is clusters of 3 double crochets with chain spaces between
- Puff stitch rounds – these add texture but take forever
- Popcorn stitch accents – fun but your hands will hurt
- V-stitch rounds for a lacey look
Honestly you can just make up your own pattern once you get the hang of increasing evenly. I never follow patterns exactly because I learned crochet from watching my roommate in college and just figuring it out as I went.
How Big Should It Be
Mine ended up being about 18 inches across but I’ve seen people make them smaller like 12 inches or huge like 3 feet. The bigger it gets the more your arms hurt from holding it. Also bigger means way more yarn. That first one I made took probably 4 skeins of the Red Heart and I didn’t even use all of each color.
You’ll know it’s big enough when it looks balanced. That’s not helpful advice but it’s true. If the center looks too small compared to the outer rounds, add another round or two in a darker color to frame it.
Blocking Because Apparently That Matters
So blocking is when you get the finished mandala wet and pin it out flat to dry. I thought this was unnecessary until I tried it and wow it actually makes a difference. My mandala was all wonky and the stitches looked uneven but after blocking it laid flat and looked professional.
Soak it in lukewarm water for like 10 minutes. Squeeze out the water – don’t wring it because that stretches it weird. Lay it on a towel or blocking mat and pin it out with straight pins. I used a foam board and regular sewing pins. Pin it so it’s stretched into a perfect circle. Let it dry completely which takes like a day or two depending on humidity.
This was the most annoying part for me because I had to keep the cat away from it. She thought the pins were toys and kept trying to attack them.
Adding Fringe and Tassels
The fringe is what makes it look boho instead of just like a doily. Cut a bunch of yarn pieces – I did mine about 16 inches long but you can go longer or shorter. You need probably 30-50 pieces depending on how full you want it.
Fold each piece in half and use your hook to pull the loop through a stitch on the bottom edge of the mandala. Then pull the ends through the loop and tighten. Do this across the whole bottom. Some people do fringe all the way around but I think that looks too busy.
For tassels you can make them separate and attach them. Wrap yarn around a piece of cardboard like 30 times, tie it at the top, cut the bottom, then tie another piece around it about an inch down from the top. Trim the ends even. I made three tassels in different colors and attached them to the fringe.
Attaching to the Dowel or Branch
If your mandala has a solid edge you gotta add loops or something to hang it from. I just used the same yarn and made chain stitches attached to the top edge at intervals. Like every 2 inches or so. Then thread your dowel through those loops.
Another option is to single crochet directly around the dowel which looks cleaner but means you can’t change out the dowel later if you want to. I didn’t do that because I wasn’t sure about… wait I think I did do that on my second one actually.
Yarn Suggestions That Worked For Me
Red Heart Super Saver is cheap and comes in a million colors. It’s acrylic so it’s not soft but for wall hangings who cares. Lion Brand Wool-Ease is nicer if you want some wool blend. I used that in a gray color once and it looked more expensive.
Caron Simply Soft is actually really good for this. It has a nice drape and comes in good boho colors like sage green and mauve and stuff. It’s still acrylic but it doesn’t feel as plastic-y as Red Heart.
If you wanna get fancy, try some cotton yarn. Lily Sugar’n Cream works but it’s thin so you’d need a smaller hook. I haven’t tried this much because cotton is harder to work with in my opinion – it doesn’t have stretch so your tension has to be perfect.
Pattern Ideas Without Following Actual Patterns
Start with 12 dc in magic ring. Round 2 is 2 dc in each. Round 3 is *2 dc in next stitch, 1 dc in next stitch* repeated around. Round 4 is *2 dc in next, 1 dc in next 2 stitches* repeated. See the pattern? You’re adding one more stitch between increases each round.
Every few rounds add something different. Maybe a round of front post double crochets for texture. Or a round of (dc, ch 2, dc) for a lacey effect. Or puff stitches which are like 4 half-finished double crochets all pulled through together.
Color changes every 2-3 rounds look good. Or do a gradient with similar colors. I saw someone do a sunset mandala with pink, orange, yellow, and cream and it was gorgeous.
What I Wish I Knew Before Starting
Weaving in ends takes longer than the actual crocheting sometimes. I had like 15 yarn ends to weave in and it was so tedious. Now I try to work over the ends as I go when possible.
Your first mandala will probably be lopsided or have weird tight spots. That’s normal. Just keep going and block it aggressively.
You don’t need to buy a pattern. There are free ones all over Ravelry and Pinterest. Or just wing it like I do most of the time. The beauty of boho style is it’s supposed to look handmade and imperfect.
Tension matters more than you think. If you crochet too tight the mandala will curl up like a bowl. Too loose and it’ll be floppy and have holes. Try to keep it consistent which is easier said than done.
Troubleshooting Common Problems
If your mandala is curling up, you’re not increasing enough. Add more stitches in the next round. If it’s ruffling or making waves, you’re increasing too much. Skip some increases.
If your circle is turning into a hexagon or octagon shape, you’re stacking your increases on top of each other. Offset them so they’re in different spots each round.
Running out of yarn in the middle of a round is the worst. Just tie on a new piece and keep going. You can hide the knot when you weave in ends.
If you lose count of your stitches just fudge it. Add or skip a stitch to make it work. No one will notice once it’s hanging on the wall.