
Feb
What You Actually Need
So I made this frog hat back in February last year when my sister kept bugging me about making something for her kid’s birthday and honestly it turned out way cuter than I expected. You’re gonna need worsted weight yarn in green obviously, and I used Red Heart Super Saver in Spring Green because it was cheap and I had like three skeins already sitting in my closet from another project I never finished. For the eyes you need white and black yarn, and I grabbed some Lily Sugar’n Cream in white because that’s what was at Target that day.
The hook size matters more than people think. I used a 5.5mm hook for the main hat part because it creates a tighter stitch that actually keeps your head warm, but then switched to a 4mm for the eyes and mouth details. You also need a yarn needle for sewing everything together at the end, and honestly this is the part that annoyed me so much because my needle kept bending and I had to stop mid-project to find another one in my junk drawer.
Starting With The Basic Hat Shape
The base is just a standard beanie pattern worked in rounds from the top down. Start with a magic ring if you know how to do that, or just chain 4 and slip stitch to form a ring if you don’t care about having a tiny hole at the top. Into the ring, you’re working 10 double crochets for the first round.
Round 2 is where you increase by putting 2 double crochets in each stitch around, so you end up with 20 stitches. Round 3 you do the whole *1 dc in next stitch, 2 dc in next stitch* pattern repeated around to get 30 stitches. Keep increasing like this every round, adding one more regular stitch between increases until you hit about 60-70 stitches depending on the head size you’re making.
I was watching that baking show with the British tent while doing this part and I kept losing count of my stitches because I’d get distracted by someone’s collapsing cake or whatever.

When To Stop Increasing
Measure the circle against the person’s head (or just guess if it’s a surprise). For a kid around 4-5 years old, you want about 6.5 inches across. For adults it’s closer to 8-9 inches. Once you hit that diameter, stop increasing and just work even rounds of double crochet in each stitch until the hat is deep enough to cover the ears. That’s usually like 6-7 inches of straight rows for kids, maybe 8-9 for adults.
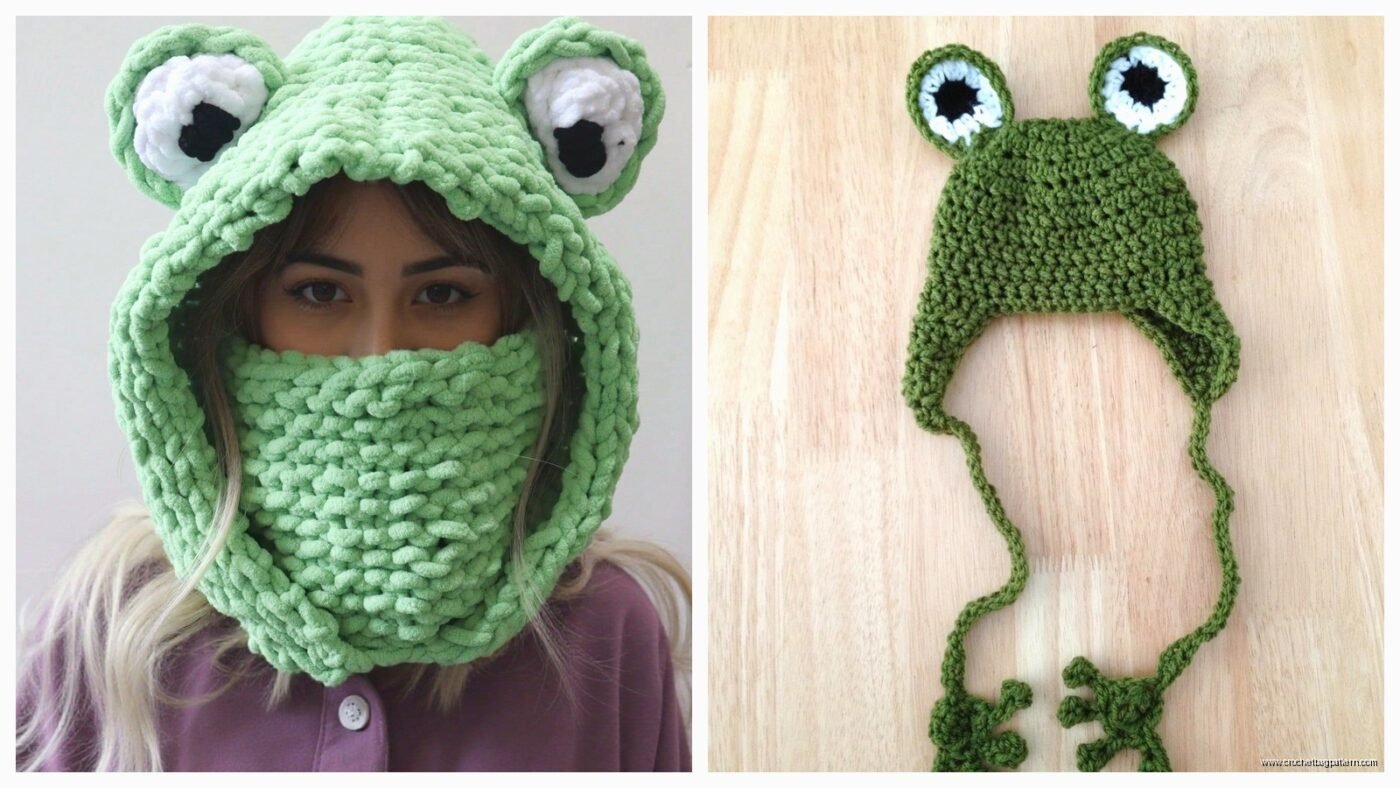
The Frog Eyes Are Actually The Main Thing
This is what makes it actually look like a frog and not just a green hat. You need to make two big bumpy circles that sit on top of the hat. With white yarn and your smaller hook, start with a magic ring again and work 6 single crochets into it.
Round 2: increase in every stitch for 12 stitches. Round 3: *sc in next stitch, 2 sc in next* around for 18 stitches. Round 4: *sc in next 2 stitches, 2 sc in next* around for 24 stitches. You want these to be kind of dome-shaped so they stick up, which happens naturally if you’re crocheting tight enough.
For the black pupils, make tiny circles with black yarn – just do a magic ring with 6 sc, then one round of increases to get 12 stitches and tie off. Sew these onto the white eye bases before you attach them to the hat, it’s way easier that way trust me.
Attaching The Eyes Without It Looking Weird
Position the eyes on top of the hat slightly toward the front, not dead center. I made that mistake on my first attempt and it looked like the frog was balancing them on its head instead of them being actual eyes. Space them a few stitches apart – like maybe 3 or 4 stitches between them.
Sew around the entire edge of each eye dome using the yarn needle and matching white yarn. The thing that really annoyed me here was that the eyes kept shifting while I was sewing and I had to redo one of them twice because it ended up crooked and my sister would’ve definitely noticed and said something.
Making The Mouth Bit
You can skip this if you want but it adds personality. With your green yarn, chain about 15-20 stitches depending on how wide you want the mouth smile. Then work back across with slip stitches or single crochets, doesn’t really matter. Make it slightly curved if you can by adding an extra stitch or two in the middle section.
Sew this onto the front of the hat below where the eyes sit, curving it into a smile shape. I used black embroidery floss to add little stitch details at the ends to make it look more mouth-like but regular black yarn works too.
Optional Stuff That Makes It Better
If you wanna get fancy, add little nostril holes with black yarn – just make a couple French knots or wrap the yarn around a few times and secure it. Position these above the mouth between the eyes.
Some patterns include little legs that dangle down by your ears but honestly that seemed like too much work when I was making mine and the hat looked complete without them. But if you want to make them, just crochet two small tubes – chain 3, sc in second chain from hook and next chain, then work in rounds of 3 sc for like 15-20 rounds until you have a little leg. Make four of them and sew them wherever makes sense, probably two on each side of the hat near the bottom edge.
The Ribbed Edge Thing
I added a ribbed edge to the bottom of the hat by switching to half double crochets in the back loop only for the last 3-4 rounds. This creates that stretchy ribbed texture that helps the hat stay on better and also looks more finished. You could also do single crochets in the back loop if you want tighter ribs.
My cat kept trying to steal the yarn ball while I was working on this edge part and I had to shut her out of the room because she was being so annoying about it.
Fixing Common Problems
If your hat turns out too floppy, you probably used too big of a hook or your tension is loose. You can either remake it with a smaller hook or just embrace the floppy look because honestly some people like that better anyway.
When the eyes won’t stay positioned right, use more pins before you sew them down. Like way more pins than you think you need. I probably used 8 pins per eye to keep them exactly where I wanted while I sewed.
If the hat is too shallow and doesn’t cover the ears, just add more rounds of straight double crochet until it’s deep enough. You can always add more rounds but you can’t really take them away easily so—wait actually you can frog it but that’s annoying so just measure as you go.
Yarn Amounts You’ll Actually Use
For the main green hat I used almost a full skein of that Red Heart Super Saver, like maybe 200-250 yards total for a kid-sized hat. Adult sizes probably need closer to 300-350 yards. The white for the eyes barely made a dent in the Sugar’n Cream skein, maybe used like 30 yards total for both eyes. Black yarn for pupils and details was even less, probably 10 yards.
I always buy more than I think I’ll need because running out of yarn mid-project when you can’t find the same dye lot is literally the worst thing that can happen. Well not the worst thing but you know what I mean.
Sizing For Different Ages
For babies under 1 year do like 50-55 stitches around and 5 inches deep. Toddlers need 55-60 stitches and 6 inches deep. Kids 3-10 years old need 60-65 stitches and 7 inches deep. Teens and adults need 65-75 stitches and 8-9 inches deep depending on head size.
These are approximate obviously because everyone’s head is different and also tension varies person to person. I crochet pretty tight so my stitch counts might be different from yours.
The Assembly Is Where It Either Works Or Doesn’t
Take your time with the sewing part even though it’s tedious. Use matching yarn colors for sewing so your stitches don’t show through. Weave in all your ends as you go instead of saving them for the end, I learned this the hard way after having like 15 yarn tails to deal with all at once.
The hat I made ended up being a huge hit at the birthday party and now my sister’s kid wears it constantly even though it’s kinda too warm for indoor wear. She asked me to make another one in blue for her friend’s kid but I haven’t gotten around to it yet because gotta be in the right mood for these projects you know.