
Feb
The Basic Beanie That Actually Works
Okay so I made my first real beanie in January 2023 when my apartment heater broke and the landlord took forever to fix it. I was freezing and figured I might as well make something useful instead of just scrolling through my phone wrapped in blankets. The pattern I used was super simple and I’ve made like eight of them since then because people keep asking for them.
You’re gonna start with a magic ring. I know some patterns say to chain 4 and slip stitch but honestly the magic ring looks cleaner and you don’t get that weird hole at the top of your hat. Make the magic ring, then crochet 10 double crochets into it. Pull it tight. That’s your first round.
Building the Crown Part
For round 2, you do 2 double crochets in each stitch around. That gives you 20 stitches total. Round 3 is where you alternate – one double crochet in the first stitch, then 2 double crochets in the next stitch, repeat that pattern all the way around. You end up with 30 stitches.
Round 4 you do 1 DC, 1 DC, then 2 DC in the next stitch – so basically you’re adding the increase every third stitch now. That gets you to 40 stitches. Keep going with this pattern, spacing out the increases more each round until you hit about 60-65 stitches depending on how big the person’s head is.
I used Red Heart Super Saver for that first one because it’s cheap and I wasn’t sure if I’d mess it up. The color was called Charcoal I think? It worked fine but it’s a bit scratchy. Later I switched to Lion Brand Wool-Ease which is way softer and people actually want to wear the hats I make with that.
The Sides of the Beanie
Once your circle is big enough – and you can measure it against your head or the person you’re making it for – you just stop increasing and crochet straight. No increases, no decreases, just one double crochet in each stitch around and around and around. This part is honestly boring and that’s the thing that annoyed me most about making beanies. It’s just the same thing over and over for like 15 rounds or however tall you want the hat.
I usually do about 6-7 inches of straight crocheting after the crown is done. Some people like slouchy beanies so you’d do more, but I think those look weird on me so I keep mine fitted.
Different Stitch Patterns You Can Use
The basic one is all double crochet but you can switch it up. I made one with half double crochet for the sides and it was a bit denser and warmer. Good for actual cold weather instead of just looking cute.
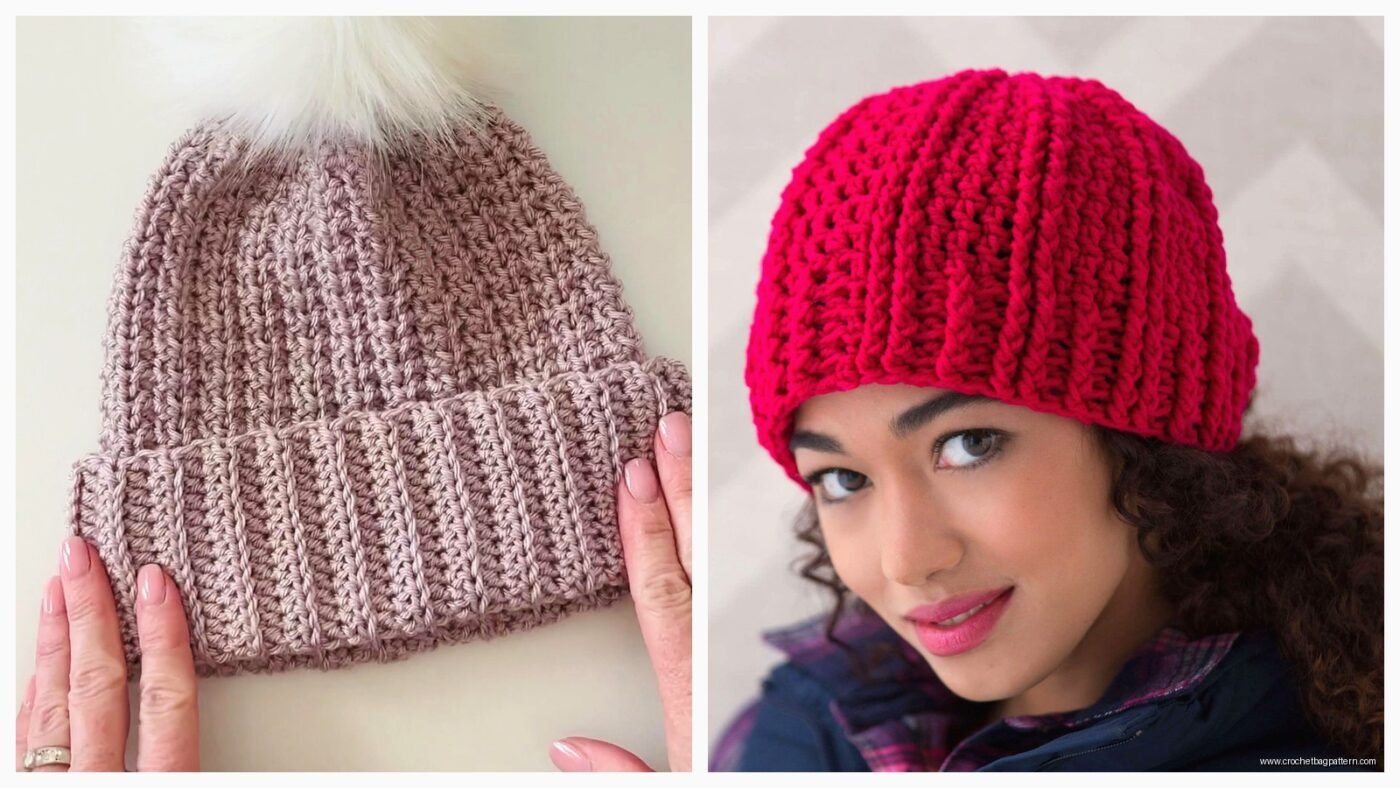
There’s also this ribbed edge thing you can do where you – wait let me think how to explain this. You work in the back loops only for the brim part. So like the last 2 inches of the hat, you only put your hook through the back loop of each stitch instead of under both loops like normal. It creates these horizontal ridges that look more professional.
The Brim Situation
Some patterns tell you to make a folded brim but I think that’s extra work for not much payoff. The back loop ribbing I just mentioned works better. Or you can just do regular double crochet all the way down and fold up the bottom inch or so when you wear it.
If you DO want a folded brim though, you’d make the sides of your beanie longer – like 8 or 9 inches total – then fold up the bottom 2-3 inches. You can tack it in place with a few stitches if you want it to stay folded.
Yarn Weight and Hook Size
I use worsted weight yarn (that’s the number 4 on the label) with a 5.5mm hook. Some people use 6mm but I think that makes the stitches too loose and you can see through the hat. Nobody wants a see-through winter hat.
If you use bulky yarn you can make a beanie way faster. Like I made one with Lion Brand Hometown USA which is a size 5 bulky weight, and it only took me like 2 hours total while watching The Bear – that show stressed me out but I couldn’t stop watching.
The thinner the yarn, the longer it takes obviously. I tried making one with DK weight once and gave up halfway through because it was taking forever and my hands were cramping.
How Much Yarn You Actually Need
One skein of worsted weight is usually enough. Red Heart Super Saver comes in 364 yard skeins and I’ve never used a full one for a single beanie. You’ll probably use like 200-250 yards depending on size. So you can get multiple hats out of one skein if you’re doing different colors or whatever.
With bulky yarn you need less yardage but the skeins are smaller anyway so it’s about the same – one skein per hat.
Sizing for Different People
Adult medium is usually that 60-65 stitch count I mentioned earlier. For kids you’d do fewer stitches in the crown – maybe stop at 50 or 55. For someone with a really big head or if you want it slouchy, go up to 70 stitches.
The height changes too obviously. Kids beanies are shorter, maybe 5 inches of straight sides instead of 7. You kinda have to guess or measure an existing hat they wear.
My cat kept trying to sit on the first beanie I made while I was working on it which was annoying because her fur was getting stuck in the yarn. I had to pick out little orange hairs from the black yarn.
Joining Rounds vs Spiral
Most beginner patterns have you join each round with a slip stitch and then chain 2 to start the next round. That’s fine and it’s easier to count your rounds that way. But it creates this visible seam line that spirals up the hat.

I learned to do continuous spiral rounds instead where you don’t join, you just keep going around and around. You need a stitch marker to mark the beginning of each round or you’ll lose track. The advantage is no visible seam and it looks cleaner. The disadvantage is you gotta pay attention to where your rounds start and end.
Free Pattern Variations I’ve Tried
There’s a messy bun beanie pattern where you leave a hole at the top for a ponytail. I made one of those and honestly it’s not that practical because the hole has to be pretty big and then cold air gets in. But people seem to like them anyway.
Ear flap beanies are another option. After you finish the regular beanie you add flaps on the sides with braids or ties. I made one for my nephew and he loved it. You basically just chain down from where the ears would be, then work back and forth in rows to make a triangle flap shape. Do the same on the other side, trying to get them symmetrical which is harder than it sounds.
Color Stripes and Patterns
Switching colors is straightforward – you just start crocheting with the new color when you want to change. I usually do stripes every 2 or 3 rounds. The color changes show up as a little jog in the spiral which bugs some people but I think it’s fine.
You can also do fair isle or tapestry crochet designs where you carry yarn colors and switch within a round to make pictures or patterns. That’s more advanced though and I’ve only done it once successfully – made a beanie with little hearts for Valentine’s day but the tension was weird and it came out lopsided.
Common Mistakes I Made
First few beanies I made were too shallow because I didn’t do enough straight rounds after the crown. They sat on top of my head like a yarmulke instead of actually covering my ears. Measure as you go.
Also I used to make the crown too flat, not increasing enough in the early rounds. That makes the whole hat too tight and gives you a weird pointy top. If your crown doesn’t lay flat in a nice circle, you messed up the increases.
Losing count of stitches happens all the time especially if you’re watching TV or talking to someone. Use stitch markers every 10 or 20 stitches so you can count more easily. Or just count at the end of each round before you move on.
Finishing the Hat
When your beanie is tall enough, just cut the yarn leaving like a 6 inch tail, pull it through the last loop, and weave in the end with a yarn needle. Weave it through several stitches in different directions so it doesn’t come loose.
You also have that starting tail from the magic ring to weave in. Don’t be lazy about weaving in ends because they will work their way out if you don’t secure them properly and then your hat will start unraveling which is the worst.
Some people add pompoms or other decorations but I usually don’t bother. Takes extra time and materials and honestly a simple beanie looks better on most people anyway.