
May
Reading Japanese Crochet Symbols Is Actually Not That Hard
So Japanese crochet patterns are basically just symbol charts and once you get past the initial panic of “wait this isn’t in English” you realize it’s actually easier than written patterns sometimes. I made this little octopus thing in summer 2022 when I was binge-watching The Bear and honestly the symbol charts made way more sense than trying to follow those patterns that say “sc in next 2 st, 2 sc in next st, repeat around” like just SHOW me what you mean you know?
The symbols look like little drawings of what the actual stitch looks like. An X is a single crochet. A T shape is a double crochet. Once you learn like 5 or 6 basic symbols you can read pretty much any Japanese amigurumi pattern.
The Basic Symbols You Actually Need
Start with these and you’re gonna be fine:
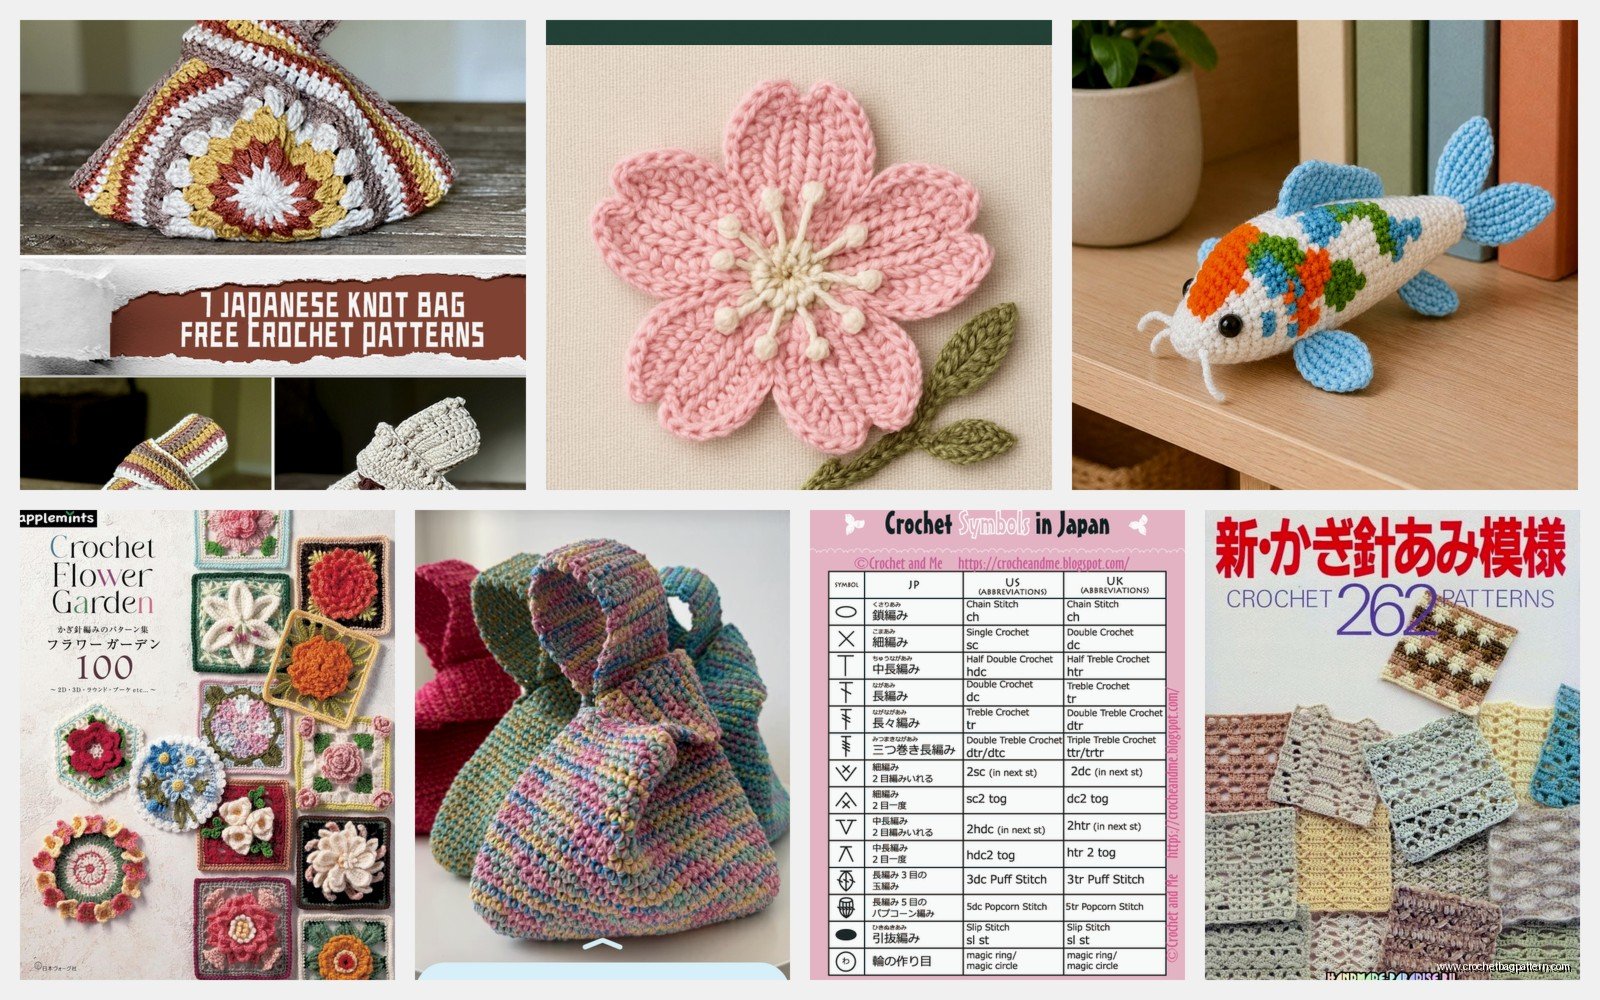
- X or + = single crochet (sc)
- T = double crochet (dc)
- O or oval = chain stitch (ch)
- • or small dot = slip stitch (sl st)
- V shape = increase (2 sc in same stitch)
- Something that looks like an upside down V or A = decrease (sc2tog)
The thing that annoyed me SO MUCH when I first started was that different publishers use slightly different symbols. Like some books use a filled dot for slip stitch and some use an empty circle and you’re just sitting there like “is this a chain or a slip stitch I NEED TO KNOW” but honestly after you make one or two things you can usually figure it out from context.
How to Read the Charts
Japanese charts read from right to left for flat crochet and in spirals for amigurumi. For amigurumi specifically you start at the center of the chart (that’s your magic ring or however you start) and work outward in a spiral. The rounds are usually numbered which helps.
They’ll show you exactly where to put increases and decreases. Like if you see two X symbols coming out of one stitch at the bottom that means you’re putting 2 sc in that stitch. If you see two X symbols going INTO one point at the bottom that’s a decrease.
I was making this little bear head pattern from a Japanese book I got off Etsy and the chart made it so obvious where the decreases needed to go to shape the snout. With written patterns I always lost track of where I was in the round but with the chart I could literally see the shape forming.
Amigurumi Basics From Japanese Patterns
Most Japanese amigurumi patterns follow the same basic construction. You’re making spheres and cylinders and ovals and then sewing them together. The body is usually a sphere or egg shape. Arms and legs are cylinders. The head is a sphere.
They typically work in continuous spirals without joining rounds which I actually prefer because you don’t get that visible seam. You’ll need a stitch marker though or you’ll lose track of where your round starts. I use those little plastic ones from Clover, they’re like $3 for a pack.
Yarn and Hook Sizes
Japanese patterns usually call for pretty thin yarn and small hooks. They use a different numbering system for hooks – a 2/0 hook is 2.0mm, 3/0 is 2.3mm, 4/0 is 2.5mm etc. Most amigurumi patterns use somewhere between 2.0mm and 3.5mm hooks.
For yarn they often specify things in terms of weight and meterage rather than the US weight system. But honestly for amigurumi you want something around sport weight or DK weight. I’ve used Paintbox Cotton DK a lot because it comes in a million colors and it’s cheap. Red Heart Super Saver works too if you want something bigger and faster but your stitches need to be tight enough that the stuffing doesn’t show through.
I made a whole set of little vegetables in spring 2024 using Scheepjes Catona which is a really nice cotton yarn, comes in these 10g balls so you can get tons of colors without spending a fortune. My cat kept stealing the little tomato I made though, she’d bat it under the couch and I’d find it weeks later covered in dust.
Understanding Japanese Pattern Books
Even though the charts are universal the instructions around them are in Japanese obviously. But here’s what you actually need to know:
They usually have a materials list at the beginning with little icons. A ball of yarn with a number means that’s color A or color B etc. The hook size will have a picture of a crochet hook with the size next to it. Stuffing is usually shown as a little cloud icon.
Most books have a techniques section at the back with photos showing how to do basic stitches, how to make a magic ring, how to sew parts together, how to attach safety eyes. The photos are actually super helpful even if you can’t read the text.
Numbers and Rounds
Japanese numbers are pretty easy to recognize once you learn them:
- 1 = 一
- 2 = 二
- 3 = 三
- 4 = 四
- 5 = 五
But honestly they usually also include Arabic numerals (1, 2, 3) so you don’t even need to memorize the Japanese numbers most of the time.
Working With the Charts Step by Step
Let me walk through how you’d actually use one of these patterns. Say you’re making a basic ball shape for an amigurumi head.
Round 1 is gonna be your magic ring with 6 sc. The chart shows a circle in the middle with 6 X symbols around it. Work those 6 sc into your magic ring.
Round 2 might show 12 X symbols with each one coming out of the previous round in a V shape – that means increase in each stitch around (12 stitches total).
Round 3 might show a pattern like X-V-X-V repeated – that’s sc, inc, sc, inc around (18 stitches total).
You keep increasing until you get to the widest part of the sphere. Then you’ll have some rounds with no increases or decreases – just straight sc around. Then you’ll start decreasing in the same pattern to close up the sphere.
The chart shows you exactly where every single stitch goes. You can count the symbols in each round to know your stitch count which is way easier than trying to count while you’re actually crocheting.
Common Amigurumi Techniques
Japanese patterns really emphasize clean finishing. They’re big on invisible decreases where you go through the front loops only so the decrease doesn’t look lumpy. The symbol might look slightly different – like an A shape but with little marks showing you’re going through front loops.
For color changes they typically want you to change on the last yarn over of the previous stitch not at the beginning of the new stitch. This makes the color change look cleaner.
Safety eyes are usually placed before you finish stuffing and closing up the piece. The pattern will show you exactly which round and which stitches to place them between. Japanese patterns are really specific about this stuff – they’ll say like “between rounds 8 and 9, with 6 stitches between eyes” or whatever and the diagram makes it crystal clear.
Sewing and Assembly
The assembly diagrams are honestly the best part of Japanese patterns. They show you exactly where each piece attaches with little dotted lines and measurements. Like “attach arm 2 rounds below neck” with a clear picture showing the exact placement.
Most patterns use a whip stitch or ladder stitch to attach pieces. The photos usually show this really clearly. I use the same color yarn I crocheted with and a yarn needle. Sometimes I use regular sewing thread if I want the seam to be really invisible but that’s probably overkill.
Sourcing Japanese Patterns
You can find Japanese crochet books on Etsy as PDFs, on Amazon Japan (they ship internationally), or on sites like YesAsia. Some popular designers and publishers to look for are Ami Ami Knitlabo, Sachiyo Ishii, Ana Paula Rimoli (though she’s not Japanese she uses similar style charts).
There are also free patterns on Japanese blogs and websites. If you search for “あみぐるみ 編み図” (amigurumi pattern chart) you’ll find tons of stuff. Google Translate can help with any written instructions though honestly the charts are the important part.
Tension and Gauge
Japanese amigurumi is typically worked really tight. Your stitches should be tight enough that you can’t see the stuffing through the gaps. This is different from garment crochet where you want drape and flow – with amigurumi you want stiff and dense.
I usually go down a hook size or two from what the yarn recommends. Like if the yarn says 4.0mm I’ll use a 3.0mm or 3.5mm. Your hand might hurt at first if you’re not used to working this tight but you get used to it.
The stitch count is really important with amigurumi because it determines the shape. If you’re off by even a few stitches your sphere might look wonky. This is where the charts really help because you can count the symbols to double-check your count.
Troubleshooting Japanese Patterns
Sometimes you’ll run into a symbol you don’t recognize. Usually there’s a key somewhere in the book – look for a page with a bunch of symbols and the Japanese names next to them. Even if you can’t read Japanese you can often figure it out from the shape of the symbol.
If the symbol looks like two T shapes connected that’s probably a double crochet cluster or puff stitch. If it’s got a loop around it that might be working in back loop only or front loop only.
When I was making a bunny pattern in like fall 2023 there was this weird symbol that looked like a T with an extra line and I could NOT figure it out. Turned out it was a treble crochet which I never use but once I tried it the piece actually laid flat like it was supposed to instead of curling up.
Adapting Patterns
One nice thing about charts is you can easily modify them. Want bigger ears? Add a few more increase rounds. Want a fatter body? Add more increase rounds before you start the straight sections. The visual nature of the chart makes it really obvious where and how to make changes.
You can also use charts as inspiration and kind of freestyle based on the construction method. Once you understand how the increases and decreases create different shapes you can kind of design your own stuff or at least modify patterns to be more what you want.
Actual Practical Tips
Keep your working yarn end on the inside of the piece as you crochet in the round so you don’t have to weave in as many ends later. Just crochet over it for the first few stitches.
Stuff firmly but not so tight that the fabric stretches and shows gaps. I use poly-fil stuffing from Fairfield which you can get at any craft store. Some people use wool roving or cotton stuffing but poly-fil is cheap and works fine.
If your amigurumi is lumpy you probably need to stuff more evenly or your tension might be inconsistent. The Japanese patterns really do expect very even tension throughout.
For tiny pieces like ears or tails you might not need stuffing at all – the piece will hold its shape just from the tight stitching. The pattern will usually indicate this somehow or you can tell from the photo.
Take breaks because working at tight tension for hours will cramp your hand. I usually watch TV while I crochet – something I’ve seen before so I don’t have to pay close attention but honestly once you get the rhythm going you don’t really need to look at the chart constantly.
Mark your completed rounds on the chart with a pencil so you don’t lose track. Or take a photo of the chart and mark it up on your phone. Whatever works.