
May
okay so flower granny squares
Right so I made like a million of these back in summer 2023 when I was basically living on my couch watching Love Island and needed something to do with my hands. The flower granny square is honestly one of those patterns that sounds way more complicated than it actually is but there’s this one part that always made me want to throw the whole thing across the room and I’ll get to that.
The basic idea is you’re making a flower in the center and then building a granny square frame around it. Most patterns start with a magic circle which, if you’ve never done one before, is just this adjustable loop thing. You wrap the yarn around your fingers twice, pull through, chain a bit, and then you can cinch it tight later so there’s no hole in the middle of your flower.
starting the flower part
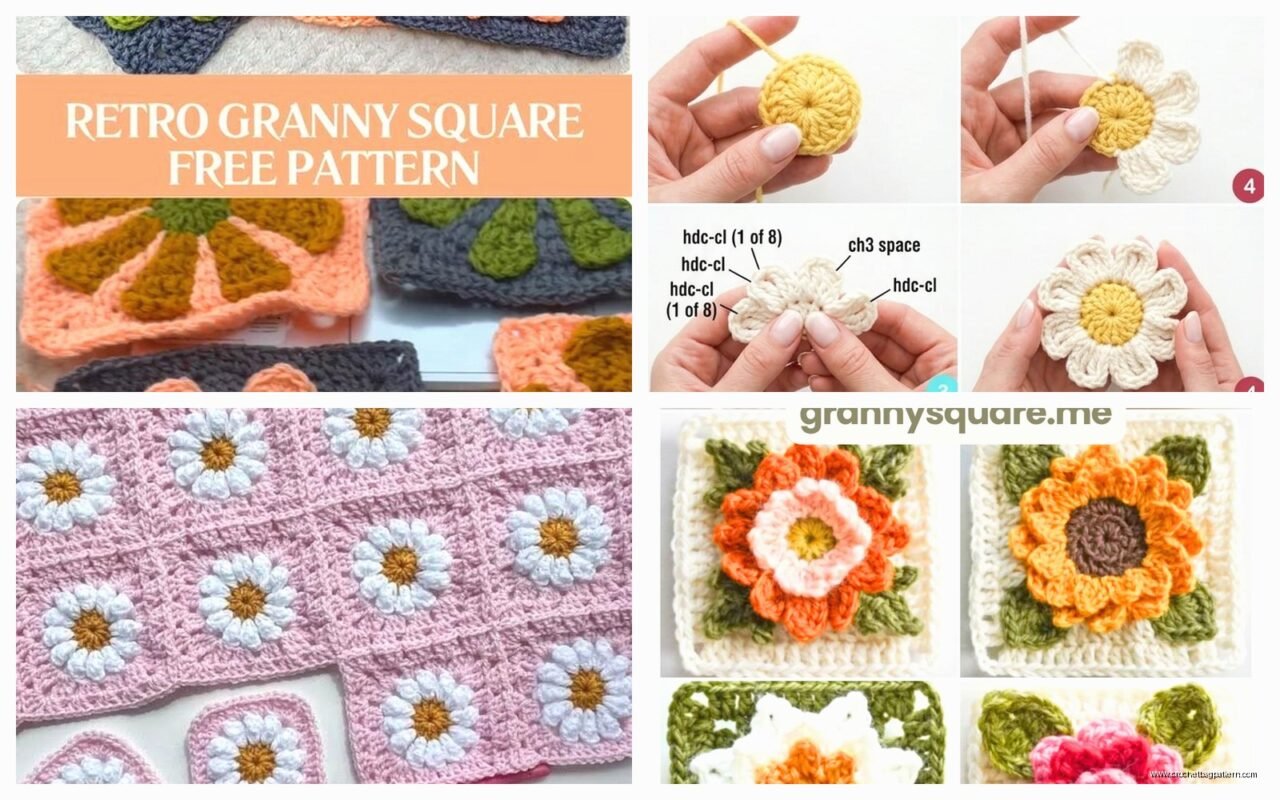
So you make your magic circle and then chain 3 (this counts as your first double crochet, which is annoying because I always forget and make an extra stitch). Then you’re gonna work like 11 or 12 double crochets into that ring. I usually do 12 because it feels more even but honestly some patterns say 11 and it doesn’t matter that much. Pull your magic circle tight and slip stitch to join.
Now here’s where it gets fun – the petals. You chain 3, then work 2 double crochets into the same stitch. That’s one half of a petal. Skip the next stitch, then slip stitch into the following stitch. That anchors your petal. Then you chain 3 again and work 2 more double crochets into that same anchor stitch to finish the petal. You keep going around doing this and you’ll end up with 6 petals if you did 12 double crochets in your center ring.
I was using Red Heart Super Saver for most of these because it’s cheap and I was making like a blanket that required 47 squares or something ridiculous. The colors were called Soft White for the flower part and then I used Perfect Pink for the petals which sounds cutesy but actually just looked like regular pink.
the part that annoyed me
Okay so the thing that drove me absolutely insane was joining the last petal. Because you’ve been going around in a circle and when you get to that last petal, you have to connect it properly to the first one and it never looks as clean as the others? Like there’s always this little jog where the rounds meet and I’ve tried like fifteen different methods people swear by on YouTube and none of them actually make it invisible. I just learned to live with it but ugh. Every single square had this one slightly wonky spot.

building the granny square part
After your flower is done you’re basically switching to standard granny square construction. This is where you change colors usually – I’d switch to like a green or whatever background color. You join your new yarn in any space between petals (doesn’t really matter where you start).
Chain 3 (counts as first dc again), then work 2 more double crochets in that same space. That’s your first cluster. Chain 1, then work 3 double crochets in the next space between petals. Keep going around. When you get to where you want a corner – and this is important – you do 3 double crochets, chain 2, then 3 more double crochets all in the same space. That chain-2 space is what makes it square instead of like… a weird hexagon situation.
The tricky bit is figuring out where your corners should go. Most flower granny squares have the corners positioned between certain petals so the flower sits straight in the square. I usually put corners in the spaces that are sort of diagonal from each other? It’s hard to explain without showing you but basically you want four evenly-spaced corners and the flower centered.
My cat kept trying to attack the yarn while I was working on these which made everything take twice as long but also was kind of hilarious.
adding more rounds
After your first granny square round you can just keep adding rounds in the normal granny square way. In each chain-1 space from the previous round, you work 3 double crochets, chain 1. In each corner chain-2 space, you work 3 dc, chain 2, 3 dc. It’s pretty repetitive once you get the rhythm down.
I usually did like 2-3 rounds after the flower to make decent-sized squares. If you’re making a blanket they need to be big enough to not take 900 squares but small enough that you don’t lose your mind making each one. I settled on squares that were about 6 inches.
For the background rounds I switched between different colors – used some Caron Simply Soft in like Sage and Bone and a couple others. That yarn is weirdly squeaky when you work with it but it’s softer than Red Heart so there’s that trade-off.
the actual stitch details if you need them
Okay so if you’re not super familiar with the stitches I’m talking about, here’s the breakdown. A double crochet (dc) is: yarn over, insert hook, yarn over and pull through (3 loops on hook), yarn over and pull through 2 loops, yarn over and pull through last 2 loops. In UK terms this is called a treble but I learned American terminology so that’s what I use.
Slip stitch is just insert hook, yarn over, pull through everything. It’s mainly for joining and moving your yarn around without adding height.
Chain is literally just yarn over and pull through the loop on your hook. Super basic.
The magic circle thing – you can also just chain 4 and join it into a ring if the magic circle feels too confusing. You’ll have a tiny hole in the middle but honestly with flower patterns it usually gets covered by all the petals anyway.
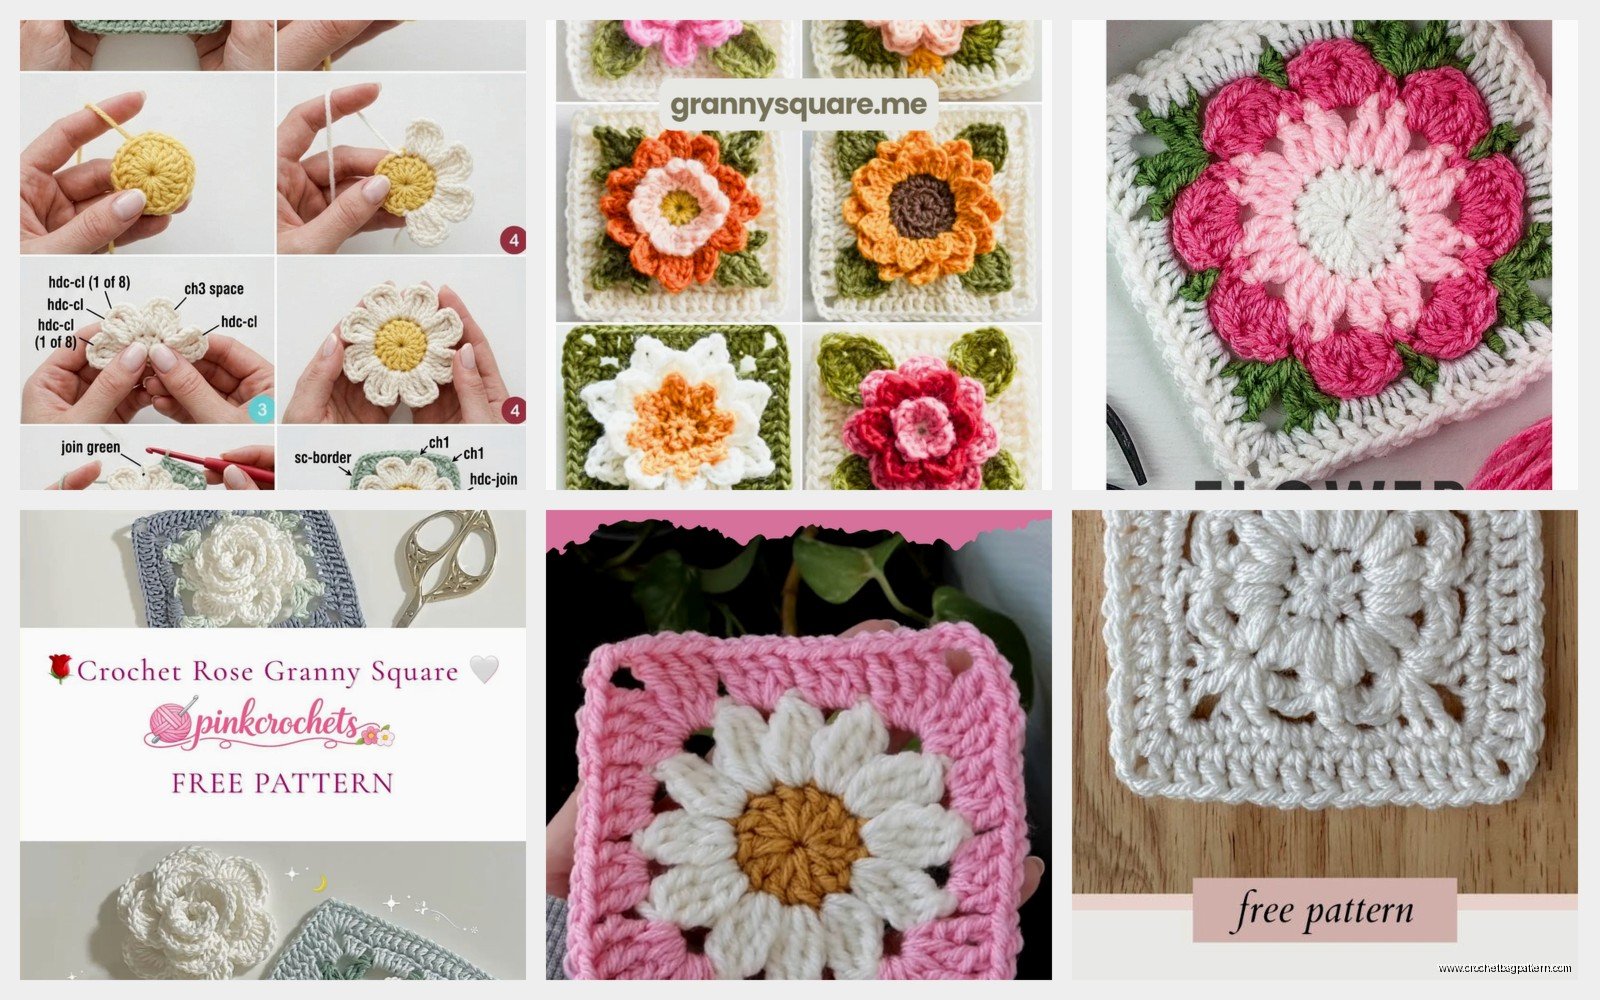
color combinations that actually worked
I tried a bunch of different color combos because I got bored making the same thing over and over. White flowers with yellow centers and green backgrounds looked nice and spring-y. I also did some with purple petals and cream backgrounds that turned out pretty good. There was this one attempt with like neon orange and bright blue that looked absolutely horrible though so maybe don’t do that unless you’re going for like an 80s vibe or something.
The thing about flower granny squares is they look more impressive than they actually are to make? Like people see them and think you’re some kind of crochet expert but really you’re just doing the same basic stitches in a specific order. It’s more about patience than skill which is probably why I could do it while half-watching TV.
tension stuff
Your tension matters more than you’d think with these. If you crochet really tight the petals won’t lay flat and they’ll cup up weird. If you crochet too loose everything looks sloppy and the holes between stitches get too big. I naturally crochet pretty tight so I had to consciously try to relax my grip on the yarn.
Sometimes I’d make a square and the flower would be all puckered and weird and I’d have to decide if I cared enough to frog it (rip it out) and start over. Usually I didn’t because life’s too short to be perfectionist about a blanket square but occasionally it would bother me enough that I’d redo it.
joining squares later
Oh yeah so once you make all your squares you gotta join them together somehow. I used the join-as-you-go method for some of them where you connect each new square to the previous ones as you’re working the last round. But I also did some where I just made all the squares separately and then whip stitched them together at the end.
The whip stitch method is easier if you’re not sure about your layout yet because you can arrange and rearrange the squares before committing. Join-as-you-go is faster overall but you need to know exactly where each square is going.
For whip stitching you basically line up two squares with wrong sides together (or right sides, depending on if you want the seam to show or not) and just sew through both edges with yarn and a tapestry needle. I’m not great at keeping my tension even when I seam so some of my joins were tighter than others which made the whole blanket a bit wavy but whatever, it still functioned as a blanket.
yarn amounts and planning
If you’re making multiple squares you need to actually do math which is the worst part of any crochet project. Each flower took me like maybe 15 yards of the petal color and 10 yards of the center color? The background rounds depended on how many you do but probably another 25-30 yards per square total.
I definitely ran out of colors partway through and had to go buy more which is why some of my squares are slightly different shades of “green” because they discontinued the exact color I was using and I had to substitute. If you’re buying yarn for a big project get MORE than you think you need because dye lots are a real thing and colors can vary between batches.
variations you can try
Once you get the basic flower granny square down you can mess with it in different ways. Some patterns have you do a different number of petals – like 5 or 8 instead of 6. You can also vary the petal size by using taller or shorter stitches. I saw someone do one with like triple crochet petals that looked really dramatic and big.
You can also add extra rounds to just the flower part before you start the square frame. Like do the petals, then add another round of stitches around the flower in a different color before switching to the granny square portion. Makes it look more detailed.
Some people put little French knots or beads in the flower center to give it more texture but I never bothered because that seemed like too much work and also my cat would definitely try to eat the beads.
blocking or not blocking
Technically you’re supposed to block your squares to make them all exactly the same size and shape. Blocking is where you wet the piece, pin it to specific measurements on a board, and let it dry. This makes everything lay flat and even.
Did I block any of my squares? No. Did they turn out fine anyway? Mostly. Some were slightly different sizes which made joining them a bit annoying but I just stretched or scrunched as needed to make them fit. If you’re more of a perfectionist than me you should probably block them but I was making this blanket for my own couch so I didn’t care that much.
common mistakes I kept making
I kept forgetting to chain between the petal groups on that first round after the flower which made everything bunch up weird. You need that chain-1 space or the square won’t lay flat later.
Also I’d lose track of where I was supposed to put corners and end up with like 5 corners instead of 4 or corners in weird spots that made the square into a trapezoid shape. I started using stitch markers to mark my corner spaces which helped a lot.
Another thing – not weaving in ends as I went. I’d finish a square and there’d be like 6 different yarn tails hanging off it and I’d tell myself I’d weave them in later but then I’d have 30 squares with 180 ends to weave in all at once and it was horrible. Learn from my mistakes and just weave them in as you finish each square even though it’s boring.
Oh and I kept pulling my slip stitches too tight when joining rounds which made little bumps in the fabric. Slip stitches should be loose and just barely there, not strangling the work.
The whole project took me like two months of casual evening crocheting to finish enough squares for a throw blanket. Would I do it again? Maybe but probably in a different pattern because making the same square 40+ times gets really old even if you’re switching up colors. But it’s a good pattern to know because flower granny squares are pretty versatile and people seem to like them as gifts or whatever.
I think that covers most of the important stuff about actually making these things. The pattern itself isn’t hard once you make like 2-3 squares and get the hang of where everything goes, it’s more about staying motivated to make enough of them for whatever project you’re doing and not messing up your color changes or corner placement.