
May
okay so picot edges
Right so you want to know about picot edges because they actually do make a huge difference when you’re finishing something. I was working on this baby blanket back in spring 2022 and the whole thing looked so plain and I was like…maybe I should just add something to the edge? That’s when I tried my first real picot border and honestly it transformed the whole project.
The basic idea is you’re adding these little decorative bumps or loops along the edge of whatever you’re making. They’re not complicated but they do require you to pay attention because if you space them wrong the whole thing looks weird and uneven.
the most basic picot
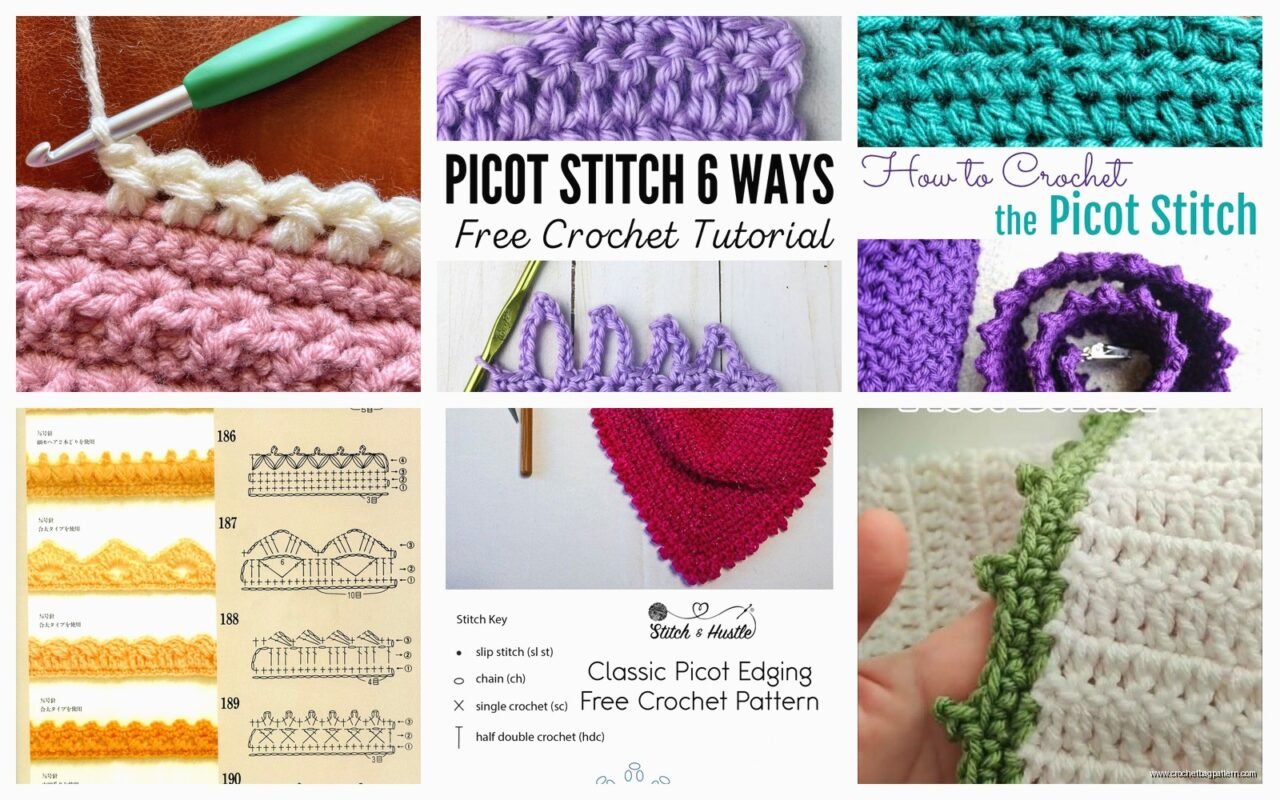
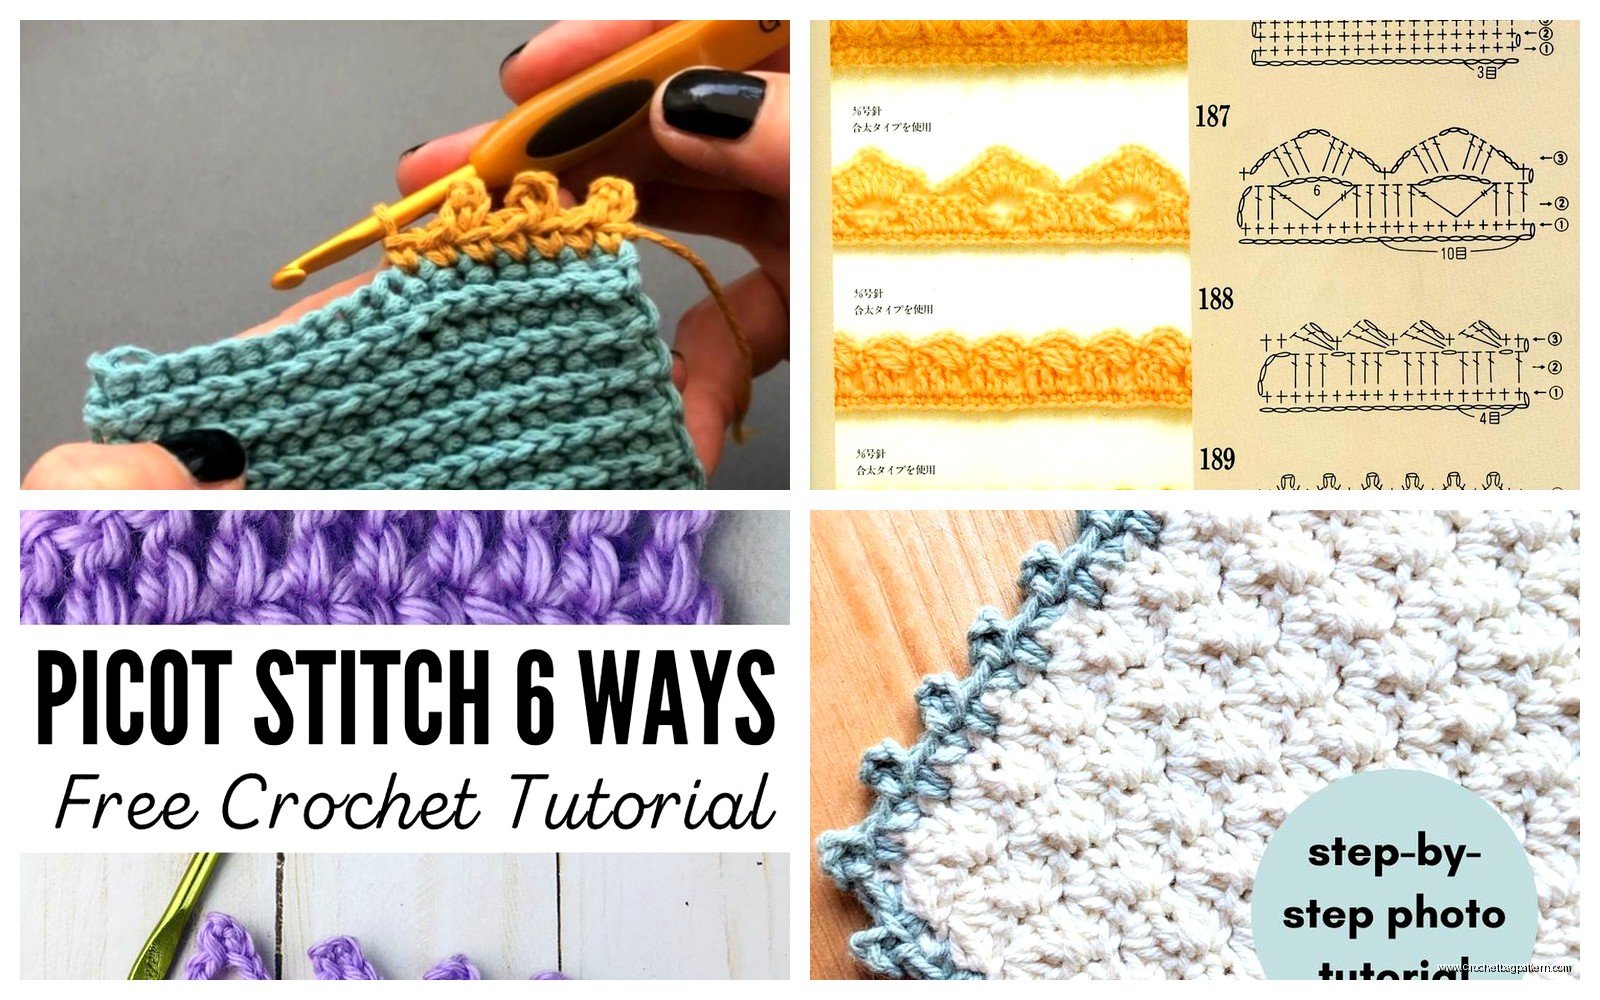
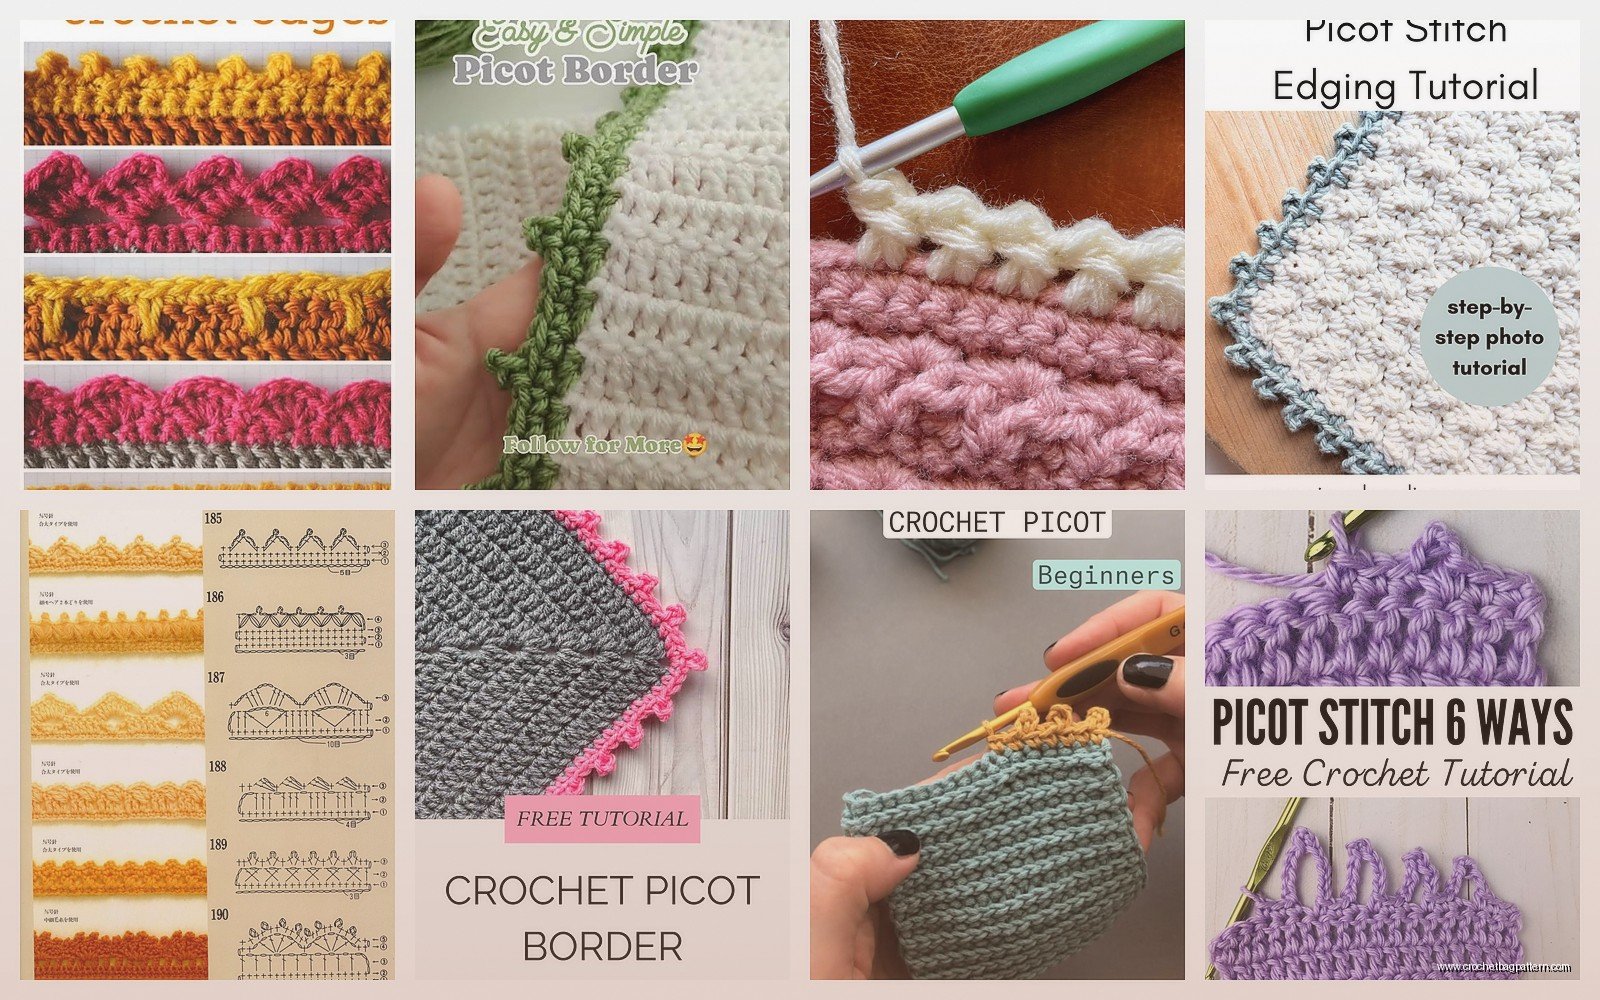
So the simplest version is the chain-3 picot. You’re working along an edge right, doing single crochet or whatever, and then you chain 3 and slip stitch back into the same stitch you just came from. That creates a little bump. Then you continue with your regular edging stitches.
Like if you’re doing a single crochet edge you’d do: sc, sc, sc, then chain 3, slip stitch into the base of that chain (where you started the chain from), then continue with more sc stitches. The spacing depends on what look you want but I usually do a picot every 3-4 stitches.
The thing that really annoyed me when I was learning this was that my chains would be too loose or too tight and the picots would either flop around looking sad or they’d be so tight they pulled the fabric. You gotta find that middle ground with your tension which is easier said than done honestly.
different picot sizes
You can change how big the picot is by changing the number of chains. Chain-3 is standard but I’ve done chain-5 picots for a more dramatic look. On that spring 2022 blanket I used chain-4 picots with Red Heart Super Saver in that soft navy color because I wanted something noticeable but not over the top.
Chain-5 or chain-6 picots work really well on shawls or scarves where you want more elegance. Smaller chain-2 picots are cute for dishcloths or when you want just a hint of texture without it being obvious.
the slip stitch thing
So where you put that slip stitch matters. Most basic picots you slip stitch back into the base stitch where the chain started. But sometimes patterns will tell you to slip stitch into the first chain of the picot instead which creates a slightly different look—more of a closed loop versus an open one.
I prefer slip stitching into the base because it feels more secure and the picot stands up better. When you slip stitch into the first chain it can look a bit floppy depending on your yarn weight.
working picots into corners
Corners are where it gets tricky because you need to decide if you want a picot right at the corner point or if you want regular stitches there. I usually put a picot directly in the corner stitch because it emphasizes the corner and looks intentional.
So if I’m working around a square blanket I’ll do something like: work to the corner, do 3 sc in the corner stitch, then immediately do a picot (chain 3, slip stitch back), then continue along the next side. This puts the decorative element right where your eye naturally goes.
different picot variations
the three-stitch picot
This one’s a bit sturdier. Instead of just chaining and slip stitching you actually chain 3, then work a single crochet into the first chain you made. It creates a little triangle shape that sticks out more than a regular picot.
I used this on a summer 2024 market bag I made with Lily Sugar’n Cream cotton yarn—the hot pink one because why not. The three-stitch picots held up better with the cotton yarn which doesn’t have as much give as acrylic. Cotton can make regular chain picots look limp but these worked great.
the double crochet picot
Okay so this is when you want something really pronounced. You chain 3 or 4, then work a double crochet into the base stitch (or into the first chain, patterns vary). This creates a taller picot that really stands out.
I don’t use this one as much because it can overwhelm smaller projects but on a chunky blanket or a large shawl it looks amazing. Just be aware it uses more yarn than simple chain picots.
beaded picots
If you’re feeling fancy you can thread beads onto your yarn before you start and then slide a bead up into the picot as you make it. So you’d chain 2, slide a bead up, chain 1 more, then slip stitch back to the base. The bead sits right in the middle of the picot.
I tried this once on a bookmark and it was fiddly as hell but looked really pretty. You have to pre-thread ALL your beads before you start which means you need to know exactly how many picots you’re gonna make. I definitely didn’t calculate right and ran out of beads halfway through and had to just finish without them which looked stupid.
spacing your picots
This is where people mess up the most including me. If you space them too close together they crowd each other and you can’t see the individual picots. Too far apart and they look random and unplanned.
For most projects I do a picot every 3 stitches when I’m working with worsted weight yarn. So it’s like: sc in next 3 stitches, make a picot, sc in next 3 stitches, make a picot, repeat forever until you want to scream.
For fingering weight or lace weight yarn you might do every 5-7 stitches because the scale is different. With bulky yarn maybe every 2 stitches? It really depends on the visual effect you want and the yarn thickness.
One thing I learned is to actually count and stay consistent. The first time I did a picot edge I just eyeballed it and some sections had picots really close together and others were spread out and it looked messy. Now I literally count out loud like a crazy person. My cat judges me but whatever.
marking your spacing
If you’re bad at keeping track—and I am—you can use stitch markers to mark where each picot should go before you start actually making them. Work one round of sc around your whole project and place a marker every X stitches where you want a picot. Then on the next round you just make your picots where the markers are.
This takes longer but prevents you from getting halfway around and realizing your spacing is all wrong.
joining yarn for picot edges
If you’re adding a picot edge in a different color than your main project you need to join your new yarn. I usually join with a slip stitch in any stitch along the edge then chain 1 and start my edging round.
With picot edges you really don’t want visible knots or weird joins so I join in a corner if possible where it’ll be less noticeable. Or if the pattern has a specific starting point I use that.
The ends are gonna be annoying to weave in later but that’s just life with crochet honestly.
actual practical tips from doing this a bunch
Your tension needs to be consistent or the picots will be different sizes. I know everyone says this about everything in crochet but with picots it’s really obvious when one is tight and perky and the next one is loose and droopy.
When you’re doing the slip stitch to complete the picot don’t pull too tight. Let it have a little bit of ease so the picot can stand up properly. If you yank that slip stitch the whole picot collapses down flat against the edge.
If your picots are twisting or curling it usually means your foundation edge isn’t stable enough. Like if you’re adding a picot edge directly to the edge of your fabric and you didn’t do a round of single crochet first to stabilize it, the picots will pull and twist. I always do at least one round of plain sc before I add picots now.
Also some yarns just work better for this than others. I used Caron Simply Soft once for a picot edge and the yarn was so slippery and splitty that the picots didn’t hold their shape well. Red Heart Super Saver is actually great for picot edges because it has more structure. Wool yarn makes beautiful picots that hold their shape really well but obviously costs more.
fixing mistakes
If you mess up a picot you can just pull it out and redo it without usually having to frog your whole edge. Like if you’re working along and realize you skipped a picot or put one in the wrong place, you can carefully undo just that section.
The annoying thing is when you don’t notice until you’re like three rows past it…then yeah you might have to rip back further which sucks.
patterns that use picot edges
Pretty much any pattern can have a picot edge added even if it’s not in the original instructions. Baby blankets look really nice with simple chain-3 picots. Dishcloths get a little upgrade with tiny chain-2 picots. Shawls and scarves look elegant with longer chain-5 or chain-6 picots.
I’ve put picot edges on coasters, placemats, the edge of a cardigan, a summer tank top, even a bookmark. It’s one of those techniques that’s versatile enough to use on basically anything where you want a decorative edge.
Some lace patterns incorporate picots into the main fabric design not just the edge and those look really intricate but they’re using the same basic technique just in different places.
blocking picot edges
If you’re using natural fiber yarn you can block your finished piece to make the picots really stand out and look crisp. I don’t usually bother with acrylic since it doesn’t block well but when I made a wool shawl with a picot edge I pinned out each individual picot while blocking and it looked SO much better after.
You just pin your piece to a blocking board or foam mats, and you can use pins to shape each picot so they all point outward evenly. Spray with water or use steam depending on your yarn type and let it dry completely.
I was watching some true crime documentary while I was pinning out that shawl and it took forever but was kind of meditative I guess? Or maybe I was just distracted by the murder story, hard to say.
when not to use picot edges
Honestly sometimes a clean edge is better. If your project already has a lot of texture or color changes happening, adding picots might be too much visual noise. I made a granny square blanket once with like eight different colors and I tried adding a picot edge and it just looked chaotic. Sometimes simple is better.
Also if you’re making something that needs to lay completely flat—like a rug or a potholder that needs to sit flush against a surface—picots will make it bumpy and it won’t lay right.
And for baby stuff you have to think about safety. Those little picot loops could potentially catch on things or be a choking hazard if they come loose though honestly I think that’s pretty unlikely with secure crochet but some people worry about it.
combining picots with other edging
You can do a round of shell stitches and then add tiny picots at the top of each shell which looks really fancy. Or do a round of picots and then a round of reverse single crochet over them for extra texture.
I’ve seen patterns that alternate picots with clusters or puff stitches along an edge and those look really professional and complicated even though they’re just combining simple techniques.
The main thing is not to overthink it. Picots are just chains and slip stitches arranged in a way that creates a decorative bump. Once you’ve done a few you’ll get the feel for it and can experiment with spacing and size and all that stuff. My first attempts looked pretty rough but now I can do them without really thinking about it which is the goal I guess.