
May
Okay so cactus amigurumi patterns are actually way easier than they look
I made my first one back in spring 2022 when I was stuck in my apartment for like two weeks straight and needed something mindless to do while rewatching The Office for the millionth time. The basic shape is literally just a tube that you stuff, which sounds boring but honestly that’s what makes it so perfect for when you’re still figuring out amigurumi.
Most free patterns you’ll find online follow the same general structure. You start with a magic ring, work in continuous rounds to create the body, then close it off at the top. The fancy looking ones with multiple arms or specific shapes are just variations on that basic tube concept.
What you actually need
For yarn I usually grab whatever worsted weight cotton I have around. I’ve used Lily Sugar’n Cream which is like $2 at Walmart and works fine. Hobby Lobby’s I Love This Cotton is good too if you want more color options. Some people swear by using only 100% cotton but I’ve definitely made cacti with Red Heart Super Saver acrylic and nobody could tell the difference.
The hook size depends on how tight you crochet but most patterns call for a 3.5mm or 4mm hook. I use a 3.5mm because I crochet pretty loose naturally and you don’t want gaps where the stuffing shows through. That’s like the main thing with amigurumi actually, keeping your tension tight enough that the fiberfill doesn’t peek out.
You need fiberfill stuffing obviously. The cheap stuff from any craft store works. I bought a giant bag from Amazon like three years ago and I’m still using it.
Oh and a yarn needle for weaving in ends and sewing pieces together if you’re making one with multiple parts.
The basic cactus body
Most patterns start with a magic ring with 6 single crochets. If you don’t know how to do a magic ring just chain 2 and work 6 sc in the first chain, it’s not that different for something this small.
Round 2 you increase in every stitch so you end up with 12 stitches. Round 3 you do the *sc, inc* repeat to get 18 stitches. Some patterns keep increasing to 24 or even 30 depending on how fat you want your cactus but I usually stop at 18 because I like them kinda skinny.
Then you just work even for like 15-20 rounds or however tall you want it. This is the part where you’re literally just going around and around doing single crochet in every stitch. Super repetitive but also you can do it without thinking which is why it’s good for watching TV or whatever.
When you get to the height you want you start decreasing the same way you increased. If you went up to 18 stitches you’d do *sc, dec* around to get back down to 12, then dec in every stitch to get to 6. Before you close it completely you gotta stuff it.
Stuffing is annoying actually
This is the part that drove me crazy when I made a bunch of these as gifts last summer. You want it firm enough to hold shape but not so stuffed that the stitches stretch out and look weird. I always end up either under-stuffing or over-stuffing on the first try and having to pull some out or add more.
Use small pieces of fiberfill and really pack it down with the back of your hook or a chopstick or something. If you just shove big clumps in there it gets lumpy and looks bad. My cat kept trying to steal the fiberfill while I was working which didn’t help.
Once it’s stuffed you finish decreasing and either fasten off and weave the end in really tight to close the hole, or some people do an invisible decrease finish which looks cleaner but takes practice.
Adding the cactus arms
The arms are what make it actually look like a cactus instead of just a green tube. For the classic saguaro cactus look you make smaller tubes the same way as the body but shorter and with fewer stitches.
I usually make arms that start with 4 sc in a magic ring, then work even for like 6-8 rounds. Don’t increase at all because you want them narrow. Stuff them lightly – they don’t need to be as firm as the body because they’re small.
You can make them bent by strategically under-stuffing certain sections or by the way you attach them but honestly I usually just make them straight because it’s easier. Sew them onto the body wherever looks good. I eyeball the placement but generally you want them in the upper half of the cactus, not right at the bottom.
Some patterns have you make like 6 or 8 arms and it starts looking really complicated but you don’t need that many. Two or three looks fine.
Making it look more realistic I guess
The spines are what make people think these are harder than they are. You can do them a few different ways and honestly all of them work fine.
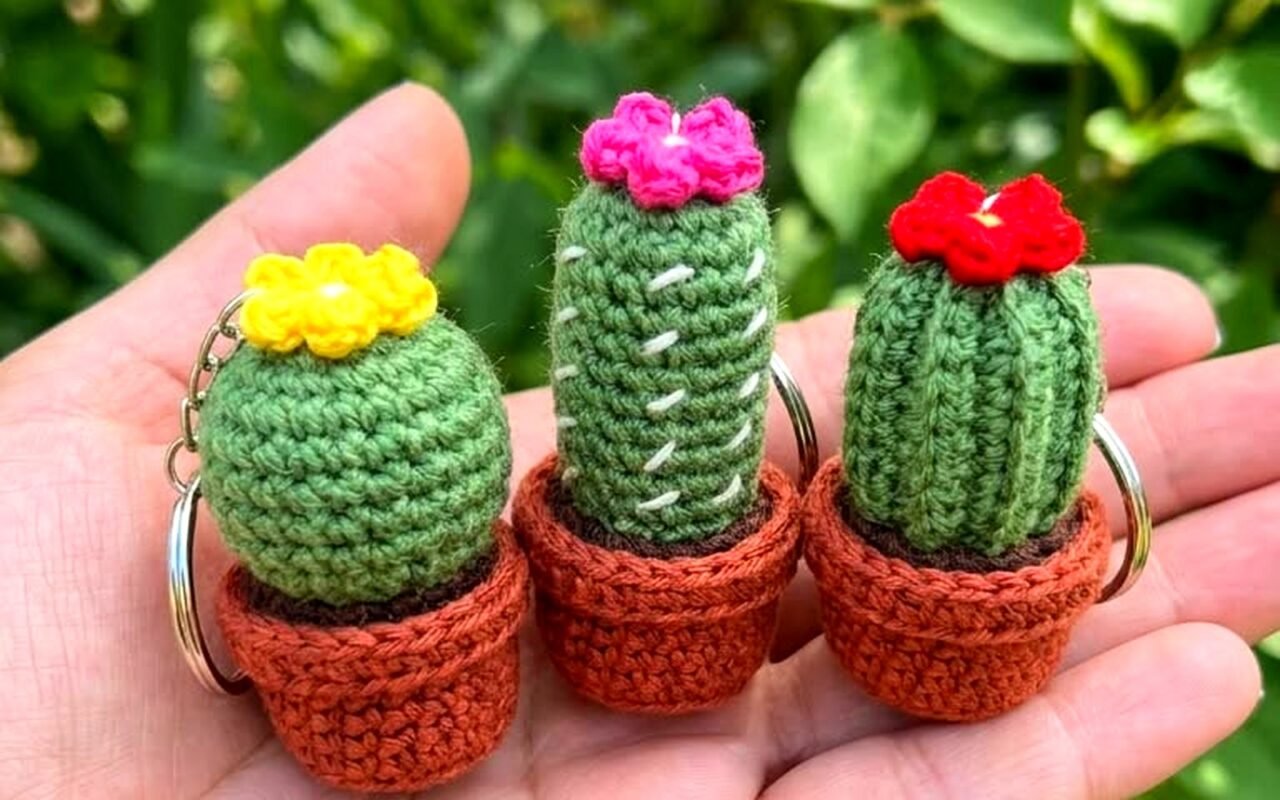
The easiest way is to use straight pins with the colored ball heads. Just stick them in where you want spines. This looks cute but isn’t great if you’re giving it to someone with kids because pins can come out. I made one for my friend’s birthday in like June 2024 and used pins and she loved it but she doesn’t have kids so whatever.
You can embroider spines with white or cream colored yarn using straight stitches in little clusters. This takes forever though and my patience for embroidery is pretty limited. I did this on one cactus and it looked good but I’m never doing it again.
Some people use those seed beads sewn on in groups which actually looks really nice and realistic but that’s even more tedious than embroidery.
Or you can just leave it smooth. Minimalist cacti are totally a thing.
Different cactus shapes because why not
The tube method works for saguaro style but you can do other types pretty easily.
For a round barrel cactus you increase more at the beginning to get a wider base, maybe going up to 30 or 36 stitches, then work even for fewer rounds so it’s short and fat instead of tall and skinny. Then decrease back down the same way.
Prickly pear cacti are just flat ovals. Make two oval pieces by chaining like 6, then working increases and single crochets around the chain in an oval shape for several rounds. Make two identical pieces, sew them together around the edge leaving a gap for stuffing, stuff it flat, then close it up. You can stack multiple ovals connected to each other for the classic prickly pear look.
I tried making a prickly pear set once and it was fine but the ovals are actually harder to get even than the tubes in my opinion.
Color variations and yarn choices
Obviously you think green for cacti but there’s actually a lot of variation you can do. I’ve used everything from bright lime green to dark forest green to even blue-green.
That Caron Simply Soft yarn has a good color called Sage that looks really natural for certain cactus types. Not cotton but it works fine and it’s softer.
You can also do variegated yarns which gives it a more interesting texture without having to do anything special with your stitches. I used some variegated green yarn I got at a thrift store once and it actually looked pretty cool.
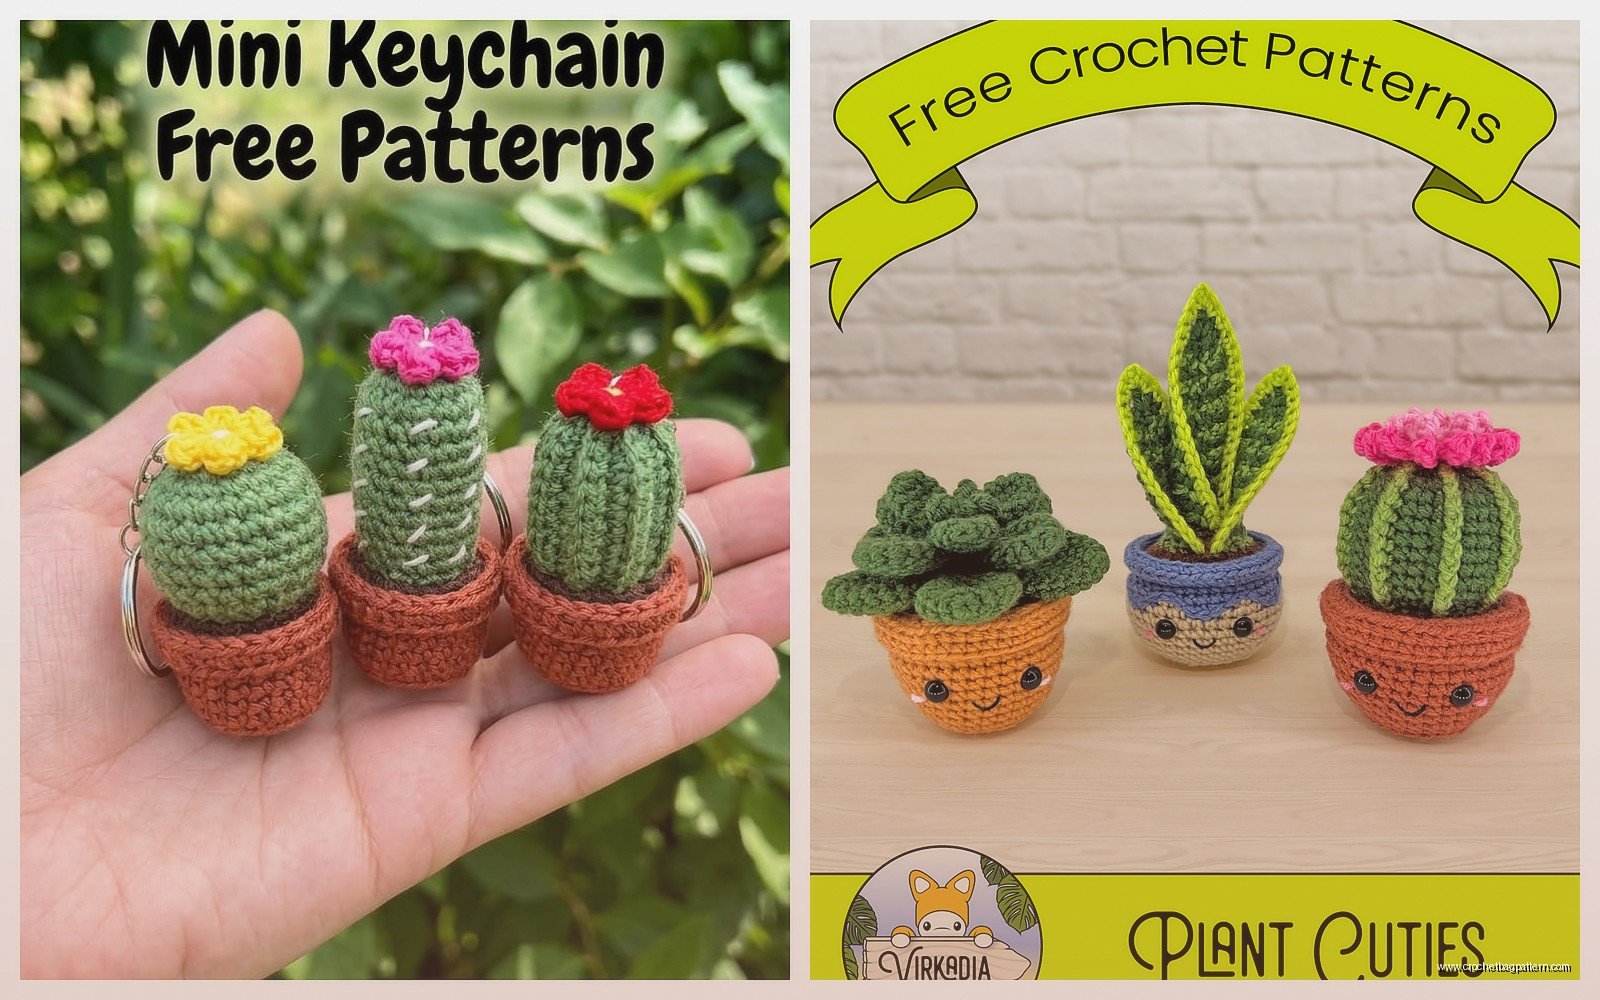
If you want to make a flowering cactus you can add little flowers on top. Just make tiny flowers with like 5 petals using the puff stitch or even just chain loops. Pink, yellow, red, orange all work. I usually use embroidery floss for flowers because yarn flowers end up too big and bulky on a small cactus.
Pattern reading vs winging it
Here’s the thing about following free patterns online – they’re all basically the same with slight variations in stitch count and round numbers. Once you’ve made one or two you can honestly just wing it.
I rarely follow a pattern exactly anymore. I just know I need to start with a magic ring and some increases, work even until it’s tall enough, then decrease and stuff. The exact numbers don’t matter that much as long as you’re consistent within each project.
If you’re someone who needs the security of having every round written out that’s fine but don’t stress about finding the “perfect” pattern because they’re all gonna get you to basically the same place.
Common problems and how to fix them
If your cactus is leaning or won’t stand up straight you didn’t stuff it firm enough or your base isn’t flat. The base needs to be really stuffed and you might need to add extra stitches in the base rounds to make it wider and more stable.
Some people put a cardboard circle in the bottom for stability which works but seems like overkill to me.
If you can see the stuffing through the stitches your tension is too loose. Use a smaller hook or practice keeping your stitches tighter. This was my problem when I first started making amigurumi and it just takes practice honestly.
If your arms won’t stay where you sew them and keep flopping around you need to use more yarn when sewing and really anchor them on there. I go through the body multiple times in different directions to make sure they’re secure.
If the top won’t close neatly and you have a weird hole showing, you’re probably not decreasing evenly or you’re trying to close it with too many stitches still remaining. Make sure you decrease all the way down to 6 stitches before you try to close it off completely.
Making them actually useful
Okay so you’ve made a crochet cactus, now what. They’re cute but they just sit there.
You can make them into pincushions which is actually practical if you sew. Just make sure you stuff it really really firm.
I’ve seen people make them into keychains by making tiny versions and attaching keychain hardware. Use thinner yarn and a smaller hook for that.
They’re good gifts for people who kill real plants. I’ve given away probably a dozen of these at this point and people always seem to like them or at least they’re polite about it.
You can make a whole succulent garden by making different types and arranging them in a shallow basket or box with some raffia or fake dirt. I did this for my mom and she has it on her kitchen windowsill.
Time and cost breakdown
A basic cactus with 2 arms takes me maybe an hour to an hour and a half now that I’ve made a bunch. Your first one will probably take longer because you’re figuring out the pattern and your tension and all that.
Cost wise you’re looking at maybe 50 cents worth of yarn if you’re using cheap acrylic, plus basically nothing for stuffing if you already have a bag of it. Even with cotton yarn you’re probably spending less than $2 per cactus.
So they’re good projects if you want something quick and cheap to make. Not like a blanket where you’re investing weeks of time and $50 in yarn.
Variations I’ve tried that worked
I made a really tiny one once using crochet thread and a 1.5mm hook. It was maybe 2 inches tall and took forever because the stitches were so small but it turned out super cute. Good if you want something for a dollhouse or whatever.
I also made a giant one using bulky weight yarn and a 6mm hook that ended up being like 12 inches tall. That one I actually did put a cardboard circle in the base because it was heavy and kept falling over. It used way more stuffing than I expected.
You can add faces to them with embroidery or felt pieces if you’re into that kawaii style crafting. I’m not really but I made one with a little smile for a friend who loves that aesthetic and she lost her mind over it so I guess it worked.
Christmas cacti are a thing too where you make them in red and green or add red flowers. I haven’t done this but I’ve seen patterns for it and it seems like the same basic process just with different colors and maybe some extra flower rounds.
Where to find patterns
Ravelry has tons of free cactus patterns if you search for “crochet cactus” or “amigurumi cactus”. Some are better written than others but they’re free so you can’t really complain.
YouTube is actually better for learning the basic shape because you can watch someone do it. I learned way more from watching videos than reading patterns when I was starting out with amigurumi.
Pinterest has a million patterns too but like half of them link to dead blogs or patterns that don’t exist anymore which is annoying.
Honestly once you understand the basic concept you don’t even need a pattern. Just start with a magic ring and increases and see what happens. The worst case is you frog it and start over which is like 30 minutes of work lost, not a big deal.
The one thing that really annoyed me when I was making these consistently was weaving in all the ends. Each arm is a separate piece which means more ends to weave in and I’m lazy about that stuff. I started using the Russian join method for adding new yarn which eliminates some ends but you still end up with a bunch.
Also picking out the stuffing bits from under my fingernails was gross but that’s just part of working with fiberfill I guess.