
Apr
Okay so Amigurumi to Go
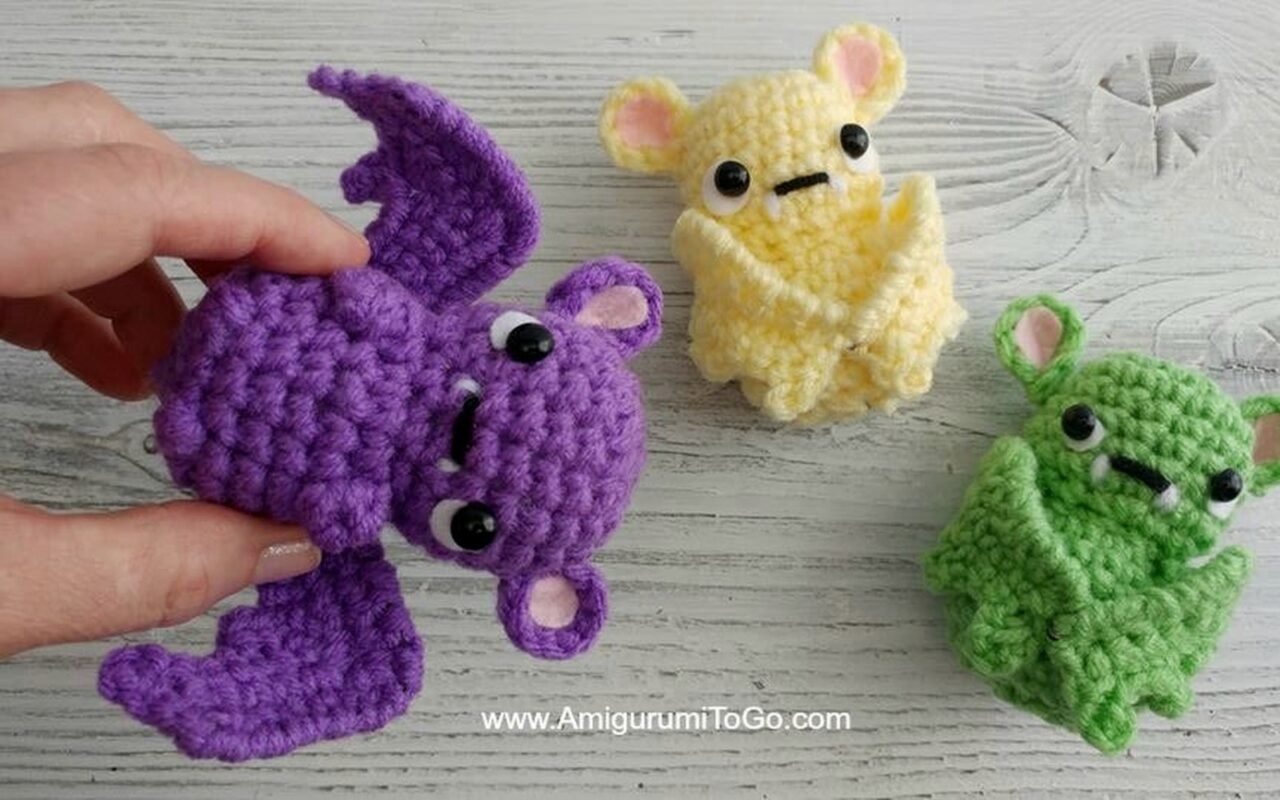
Right so you’ve probably seen Sharon Ojala’s stuff if you’re looking at amigurumi patterns at all. Amigurumi to Go is basically her whole collection of free patterns plus she has video tutorials for literally everything which is actually super helpful when you’re trying to figure out what the hell “invisible decrease” means for the hundredth time.
I made this little bear thing back in spring 2022 when I was basically living on my couch and binge-watching The Office for like the third time. Picked one of her easier patterns because I wasn’t trying to do anything fancy just wanted something to keep my hands busy honestly. The pattern was free on her site which is great because I wasn’t about to pay for a pattern when I wasn’t even sure I’d finish it.
How the whole thing works
So Sharon posts these patterns on her blog and they’re organized by category like animals, food, seasonal stuff, whatever. Each pattern has written instructions AND a video tutorial which is the actually useful part because reading “sc 6 in magic ring” is one thing but watching someone do it is completely different. You can find patterns through her categories or just search if you’re looking for something specific.
The video tutorials are on YouTube and they’re really detailed like she goes through every single round. Sometimes TOO detailed if I’m being honest because a 45 minute video for a small project feels excessive but I guess some people need that. I usually watch at 1.5x speed and pause when I need to catch up.
What you actually need
Yarn wise she usually recommends worsted weight which is like your standard medium yarn. I used Red Heart Super Saver for that bear because it was cheap and I had a bunch sitting around from when I thought I was gonna make a blanket (never finished that obviously). The Red Heart works fine for amigurumi even though people get all snobby about it. It’s acrylic so it holds its shape and you can wash it which matters if you’re making stuff for kids or whatever.
For the hook she typically suggests 3.5mm or 4mm depending on how tight you crochet. I use a 3.5mm Clover Amour hook because the grip is comfortable and I’m not trying to get hand cramps. You want your stitches pretty tight for amigurumi so the stuffing doesn’t show through. That’s actually really important because loose stitches look bad and you can see the polyfil poking out.
Speaking of stuffing you need polyfil or whatever fiber fill. I got the Poly-Fil brand from the craft store, the big bag because it’s cheaper per ounce. You’re gonna need safety eyes too if the pattern calls for them. Those little plastic eyes with the washers on the back. Different sizes depending on what you’re making but 9mm or 12mm are pretty standard.
Following her patterns specifically
Sharon writes her patterns in a pretty straightforward way. She uses standard abbreviations which you gotta know like sc for single crochet, inc for increase, dec for decrease. If you don’t know these you can find a chart on her site or like anywhere online really.
The format is usually round by round. So it’ll say Round 1: 6 sc in magic ring, Round 2: inc in each stitch around, that kind of thing. She also puts the stitch count in parentheses at the end of each round which is super helpful for making sure you didn’t mess up. If the pattern says you should have 24 stitches and you count 23 you know you missed an increase somewhere.
One thing that annoyed me and still does is that her patterns assume you know how to do a magic ring. Like she mentions it but doesn’t always explain it in the written pattern. You gotta watch the video to see how she does it. I personally hate magic rings and usually just chain 2 and work into the first chain instead because magic rings never look good when I do them. They’re always lopsided or the center doesn’t close properly or—anyway you can substitute that if you want.
Actually making something
Okay so let’s say you pick a pattern. I recommend starting with something simple like her little bear or maybe a ball or something geometric. Don’t start with like a complicated dragon with wings and scales. Trust me.
First you’re gonna make the magic ring or chain 2 whatever. Then you work in rounds which means you’re going in a spiral. You don’t join rounds with a slip stitch like you would for a flat circle. You just keep going around and around. This is why people use stitch markers to mark the beginning of each round otherwise you lose track of where you are.
I use those little plastic stitch markers that look like safety pins. Just move it up every round so you know where round starts. Some people use a piece of different color yarn which works too but I always lose those.
You’re basically increasing to make the piece bigger then working even to make the sides straight then decreasing to close it up. So like for a head you’d increase for several rounds to make a sphere shape work even for a bit then decrease to make the neck opening. Makes sense when you actually do it.
The assembly part
This is where it gets fiddly and honestly kind of annoying. You’ve made all these separate pieces like the head body arms legs ears whatever and now you gotta attach them. Sharon usually shows this in the videos which helps but it’s still tedious.
For sewing pieces together I use a yarn needle and the same yarn I crocheted with. You’re basically whip stitching around the edge to attach pieces. It takes forever and my cat kept trying to attack the yarn while I was doing this which was not helpful at all. Had to lock her out of the room.
The safety eyes need to go in before you stuff and close up the head. Figure out where you want them mark it with pins if you need to then push the post through and put the washer on the back. Push it down HARD because once it’s on you can’t remove it without destroying the piece. I’ve definitely put eyes in crooked before and had to just accept it or start over.
Stuffing is its own thing. You want it firm but not overstuffed. Overstuffed looks weird and lumpy. Understuffed looks sad and floppy. It’s a balance. I usually stuff as I go when I’m decreasing so I can feel how firm it is. Use the back of your hook or a chopstick to push stuffing into small areas like arms or ears.
Common problems you’ll probably run into
Your stitch count is gonna be wrong at some point. You’ll think you did everything right then you count and you’re off by 2 stitches. This happens to literally everyone. Just carefully count again and figure out where you messed up. Sometimes you gotta unravel a few rounds and redo them.
The piece might start to curve or get wonky especially if your tension isn’t consistent. Like if you crochet really tight in the morning then loose in the evening your piece will look weird. Try to keep your tension the same throughout. This takes practice honestly.
Seaming can look messy if you’re not careful. I still struggle with this. Sometimes the seams are visible and it looks homemade in a bad way not a charming way. Sharon’s videos show her seaming technique which helps but it’s one of those things you get better at with practice.
Yarn substitutions and modifications
You don’t have to use exactly what she recommends. I’ve used Caron Simply Soft which is nice and soft, Lion Brand Vanna’s Choice which comes in good colors, and I think Bernat Super Value for something once. As long as it’s worsted weight and you adjust your hook size if needed you’re fine.
Some people use cotton yarn like Lily Sugar’n Cream but I don’t love how stiff it makes the finished piece. It’s good for things that need structure I guess but for cuddly toys the acrylic is better in my opinion.
You can also change colors obviously. Like if the pattern uses pink and you want blue just use blue. Sometimes I combine colors from different patterns or add stripes or whatever. The construction is the same regardless of color.
Size wise if you use thicker yarn and a bigger hook you’ll get a bigger finished piece. Bulky yarn with a 6mm hook makes like a chunky version. Fingering weight with a tiny hook makes miniature versions but honestly that sounds terrible to me. Too small and fiddly.
The video tutorial situation
So the videos are really helpful but also they’re LONG. Like I mentioned before some of them are 45 minutes to an hour for a relatively simple project. Sharon talks through everything she’s doing which is good for beginners but if you already know how to crochet it can feel slow.
I usually watch the first couple rounds to understand the construction then just follow the written pattern and only go back to the video if I get confused. That works better for me than watching the whole thing start to finish.
The video quality is good and she does close-ups of her hands which you need to actually see what she’s doing. Some crochet videos are filmed from too far away and you can’t see anything. Hers are clear at least.
One thing is that she’s right-handed so if you’re left-handed you might need to mirror what she’s doing. I’ve heard left-handed crocheters say they just flip the video or watch in a mirror but that seems complicated.
Free vs paid patterns
Most of her stuff is free on the blog which is amazing honestly. She makes money from the YouTube ad revenue I guess and maybe some affiliate links. There are some paid patterns in her shop but you can make tons of things without spending money on patterns which is great when you’re just starting out or don’t wanna invest a lot.
The free patterns are complete patterns not like teasers or partial patterns. You get the whole thing. Some designers only give you part of it free and make you pay for the rest which is annoying but Sharon doesn’t do that.
What I actually made and how it went
So that bear I made in spring 2022 turned out okay. Not perfect but recognizable as a bear which felt like an accomplishment. The arms were a little uneven because I think I stuffed one more than the other but whatever. I gave it to my friend’s kid who immediately got it dirty so the fact that it was Red Heart and could go in the washing machine was good.
I made a little octopus thing in summer 2024 using one of her patterns. That one was easier because it’s basically just a ball with tentacles. The tentacles took forever though because you make like 8 of them and it’s repetitive. I used this teal Caron Simply Soft that I liked the color of but didn’t have another project for.
The octopus came out cute actually. I kept that one because it sits nicely on a shelf and looks pretty good. The eyes are positioned right and the tentacles are relatively even. I think I’m getting better at this stuff.
Time investment
These projects take longer than you think they will. That bear probably took me like 8 hours total including assembly. The octopus was maybe 6 hours but I’m faster now than I was in 2022. If you’re new to amigurumi or crochet in general add more time because you’ll be frogging and redoing stuff.
It’s not a quick craft. You can’t sit down and finish something in an afternoon unless it’s really tiny. But it’s good for doing while watching TV or listening to podcasts or whatever. I did most of the octopus while rewatching old episodes of Great British Bake Off.
Some people find the repetitive nature relaxing. Other people get bored. I’m somewhere in the middle like it’s fine but I need something else going on or my brain gets understimulated.
Tips that actually help
Use stitch markers seriously. Don’t think you’ll remember where the round starts because you won’t.
Count your stitches every round especially when you’re learning. It’s tedious but it saves you from having to unravel a bunch of rounds later when you realize something’s wrong.
Weave in ends as you go if you’re changing colors. Don’t leave them all for the end because you’ll have a million yarn tails and it’s overwhelming. Just weave them in when you switch colors and trim them.
Take breaks. Your hands will cramp if you crochet for too long especially if you’re doing tight stitches. I usually do like 30-45 minutes then take a break and stretch my hands.
Don’t stress about perfection. Amigurumi is supposed to be cute and a little handmade-looking. If the eyes are slightly uneven or the stuffing shows through a tiny bit it’s fine. Nobody’s gonna examine it that closely except you.
If you mess up really bad and it’s not salvageable just frog it and start over. I know it sucks to unravel work but sometimes it’s better than trying to force something that’s clearly wrong. I’ve definitely rage-frogged projects before.
Keep your yarn organized. I have a basket with different colors of worsted weight and it makes it easy to start a new project without having to go to the store. Red Heart and Caron go on sale pretty regularly so I stock up when they’re cheap.
Watch the video at whatever speed works for you. YouTube lets you change the playback speed so use that. There’s no award for watching at normal speed if it’s too slow.
Practice your tension. This is the biggest thing that affects how your finished piece looks. If your tension is all over the place your amigurumi will look wonky. Just keep making stuff and you’ll get more consistent.
Anyway that’s basically the deal with Amigurumi to Go. It’s a good resource especially because it’s free and the videos are thorough. Sharon’s been doing this forever so the patterns are tested and work if you follow them. Start with something simple get comfortable with the basic construction then try more complicated stuff if you want. Or just keep making simple stuff there’s no rule that you gotta do advanced patterns.