
Apr
Making the Granny Square Jumper Thing
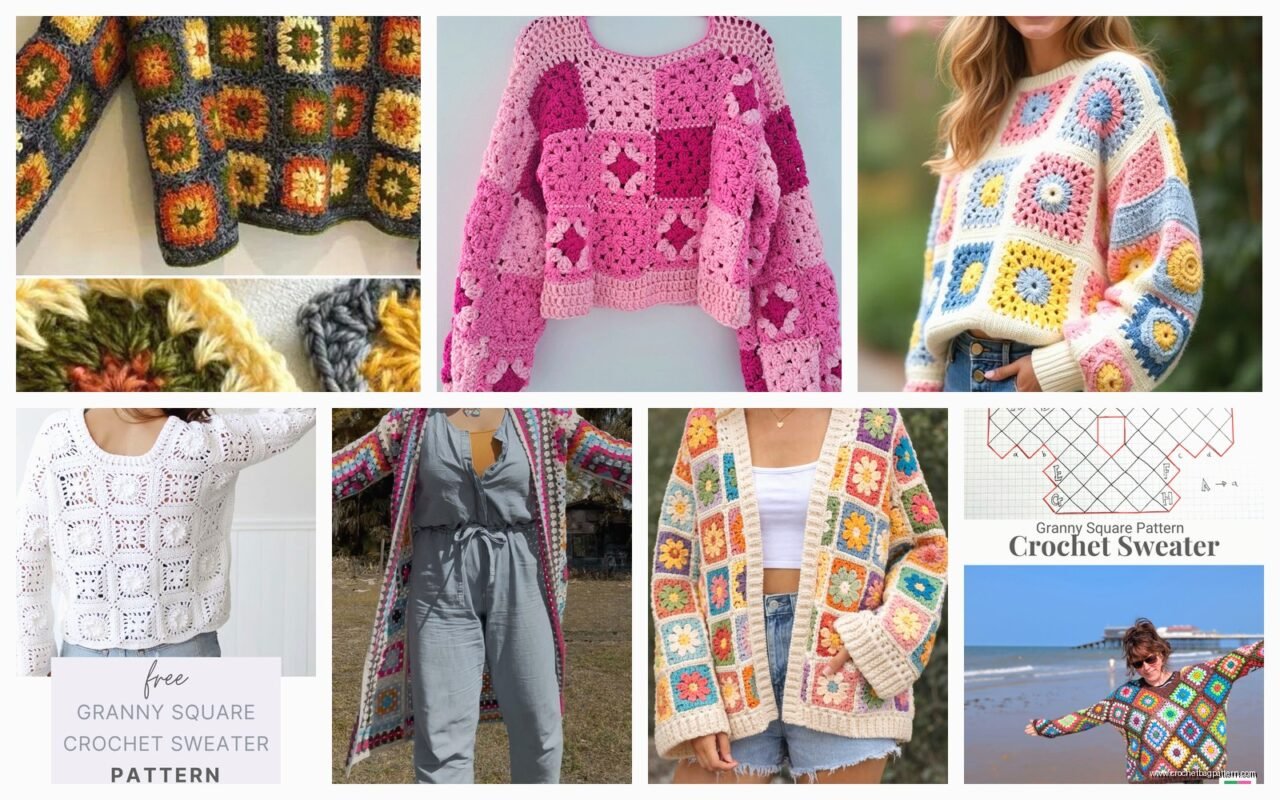
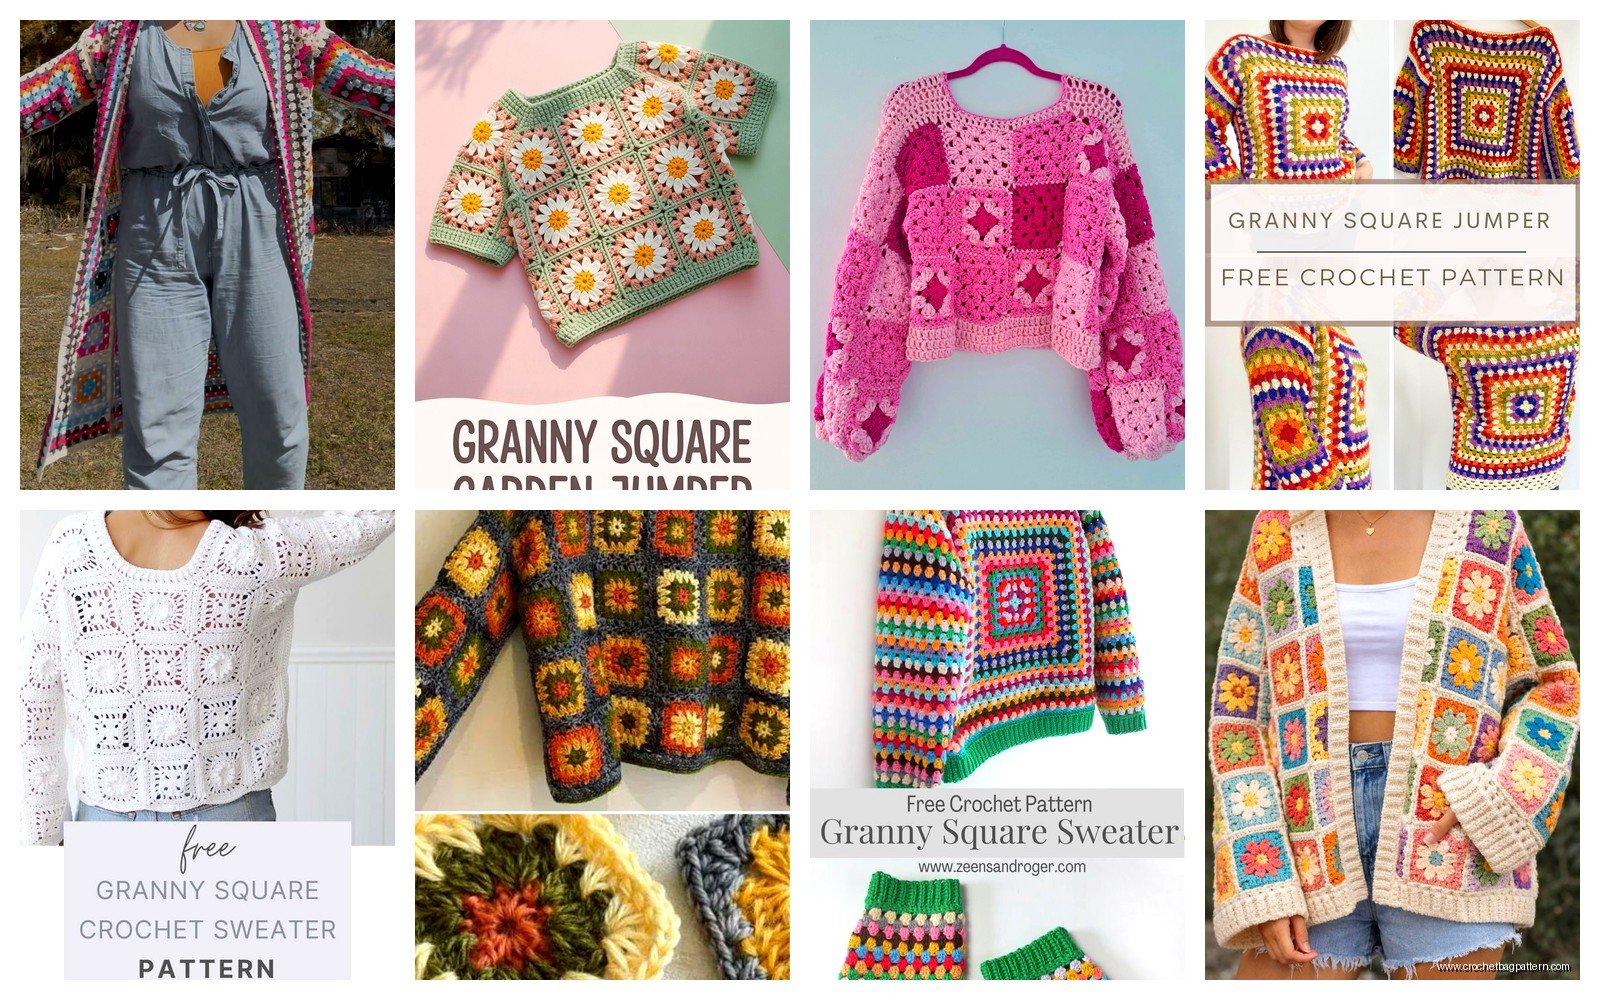
So I made this granny square jumper back in spring 2022 when I was basically living on my couch binge-watching The Crown and honestly it was one of those projects that sounds way more complicated than it actually is. Like you make a bunch of squares and sew them together and suddenly you have a sweater. The hardest part is honestly just committing to making like 30-40 squares depending on your size which is SO many but also kinda meditative once you get into it.
What You Actually Need
Okay so yarn first. I used Caron Simply Soft for most of mine because it was on sale at Michaels and I bought like 8 skeins in this burgundy color that I thought would be cute. You’re gonna need probably 1200-1500 yards total for a medium sized jumper, maybe more if you’re making something oversized. I’ve also used Red Heart Super Saver which is cheaper but a bit scratchier, and Bernat Blanket yarn once but that made HUGE squares so I had to adjust everything.
You need a hook obviously. I use a 5mm (H hook) for worsted weight yarn but honestly I sometimes grab whatever’s closest. The gauge doesn’t have to be perfect since you’re making individual squares and can just make more or fewer depending on how big they turn out.
Scissors, yarn needle for weaving in ends which there will be SO MANY and that’s the annoying part I’ll get to later.
Making the Actual Granny Squares
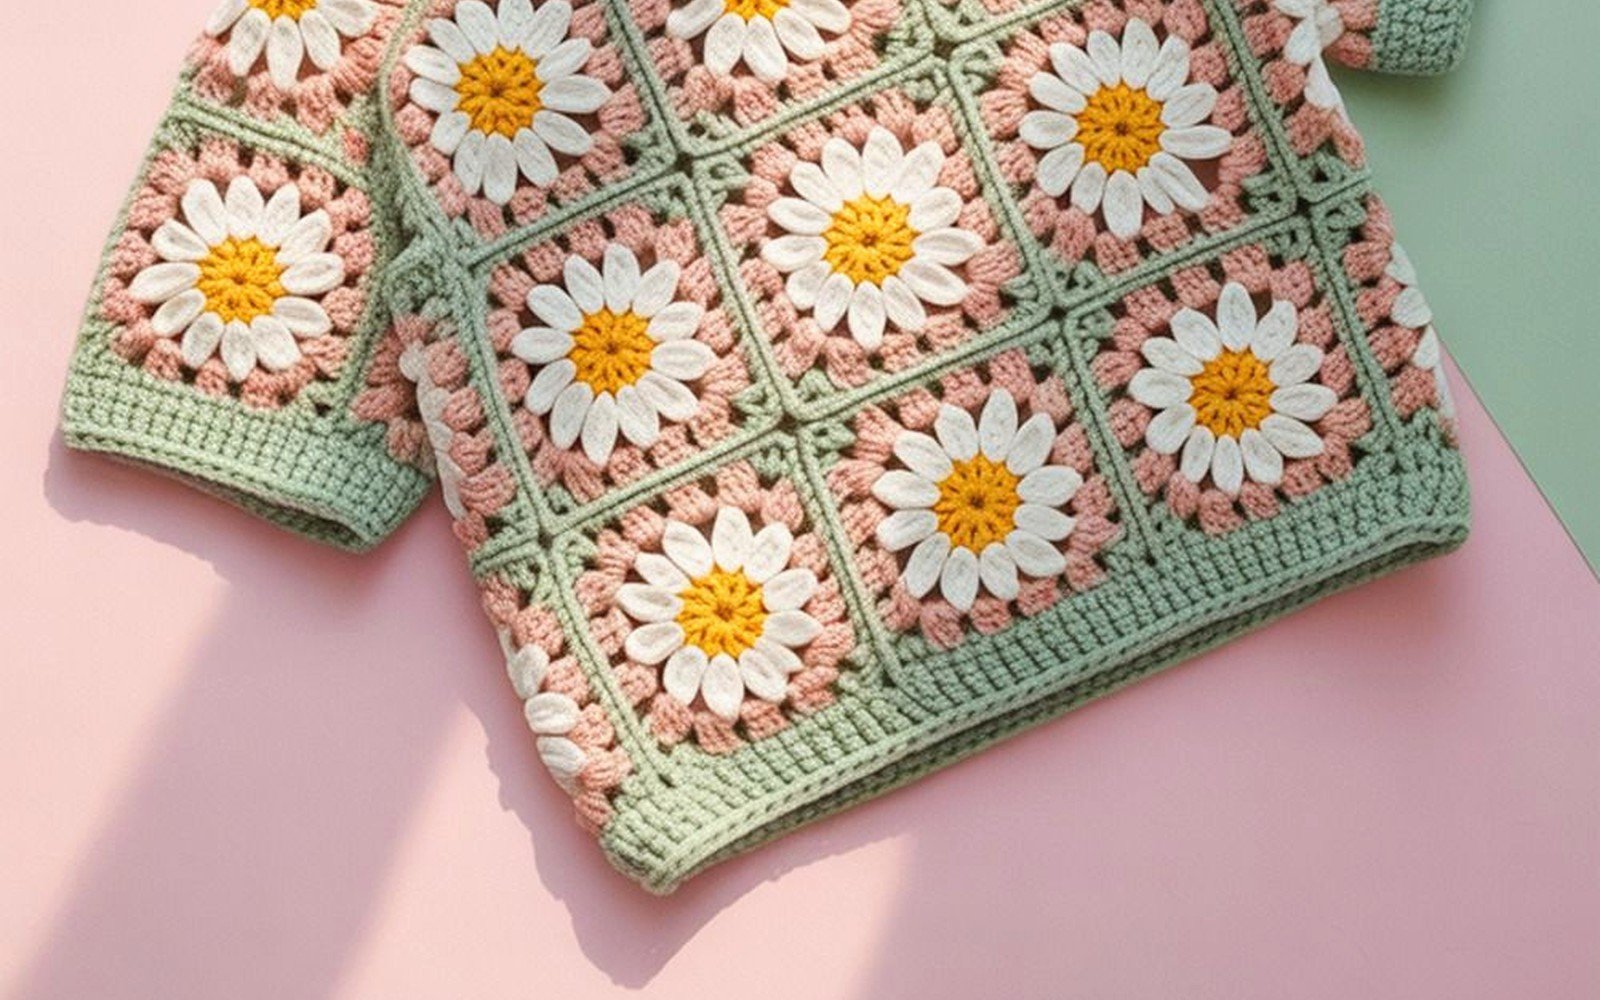
The basic granny square is like the most common crochet thing ever so you’ve probably seen it. You start with a magic ring or just chain 4 and slip stitch to form a ring. Then you chain 3 which counts as your first double crochet, make 2 more double crochets into the ring, chain 2, then repeat that whole cluster three more times. So you end up with 4 groups of 3 double crochets with chain-2 spaces between them making the corners.
Slip stitch to the top of your starting chain and that’s round 1.
For round 2 you slip stitch over to the first corner space, chain 3 again, then do 2 double crochet chain 2 and 3 more double crochet all in that same corner space. That makes your corner. Then chain 1 and move to the next corner space and repeat. Keep going around all 4 corners.
Round 3 is where you start getting the actual granny square look because now you have sides. In each corner you do the same thing – 3 dc, chain 2, 3 dc. But between corners you’ll see there’s a space from that chain-1 you made last round, so you put 3 dc there, then chain 1, then move to the next corner.
I made my squares 5 rounds each because that gave me about 5-inch squares with my yarn and hook. You want them all the same size obviously so maybe make one test square and measure it. You need squares that’ll work with your body measurements which is where the math gets weird.
How Many Squares and Planning the Layout
This is where I just kinda winged it honestly. I measured a sweater I already owned that fit how I wanted and laid it flat. The body was about 20 inches wide and 22 inches long. So with 5-inch squares that’s 4 squares across and 5 squares down for the front. Same for the back. That’s 40 squares just for the body.
For sleeves I did 3 squares around and 4 squares long which is 12 squares per sleeve but you have to kinda shape them so they’re not just tubes. Some people do tapered sleeves but I made mine pretty boxy because that’s the style I wanted and also it’s easier.
So total I made like 70 squares? I actually made 75 because I messed up counting and also my cat knocked over my pile of finished squares and I couldn’t remember… anyway you might need more or less.
The Layout Pattern
You arrange your squares in this configuration – imagine laying a sweater flat with the arms out to the sides like a T shape. The body is a rectangle, and the sleeves come out from the shoulders. You need to figure out where the neck opening goes which is usually the center top 2-3 squares on the front piece.
I laid all my squares out on my living room floor and took a picture so I wouldn’t forget the arrangement. You can do all one color or multiple colors in a pattern. I did mostly burgundy with a few cream colored squares scattered randomly which looked pretty good.
Joining the Squares
Okay so this is where people have different methods and honestly they all work fine. I used the whip stitch method where you line up two squares with wrong sides together and just sew through both loops along the edge. Some people do slip stitch joining or single crochet seams which look more decorative but take longer.
Start by joining all your squares into strips. Like if your front panel is 4 squares across and 5 down, join the 4 squares in each row first so you have 5 strips. Then join the strips together to make the full panel. Do the same for the back and sleeves.
The thing that annoyed me SO MUCH about this whole process is weaving in ends. Each square has 2 ends from starting and finishing, so with 70 squares that’s 140 ends to weave in. I did some as I went but mostly I had this huge pile of squares with dangly yarn bits everywhere and I spent like two entire evenings just weaving in ends while watching TV. It’s tedious and boring and you gotta do it or your sweater will fall apart.
Assembling the Sweater
Once you have your front panel, back panel, and two sleeve panels all assembled, you need to put them together. This is actually not as hard as it seems.
First attach the sleeves to the body. Lay your front and back panels on top of each other with right sides out. Position a sleeve panel perpendicular to the body at the shoulder area. You’re gonna sew the top edge of the sleeve to the shoulder area of both the front and back panels. The sleeve basically bridges across where the shoulder seam would be on a normal sweater.
Do this on both sides for both sleeves. Now you have this flat cross shape.
Next fold the whole thing so the front and back are together with right sides out still. Sew up the side seams starting from the bottom hem, going up the side of the body, and continuing down the underside of the sleeve all in one continuous seam. Do this on both sides.
And like that’s basically it. You have a sweater.
The Neck Opening
I left the neck opening raw at first because I wasn’t sure what I wanted. You can add a border by single crocheting around the entire neck opening, or do a ribbed collar, or just leave it. I ended up doing 2 rounds of single crochet around the neck, the bottom hem, and the sleeve cuffs just to clean up the edges and make it look more finished.
Some patterns have you shape the neck more by using half squares or leaving gaps but honestly for a casual granny square jumper the boxy neck looks fine. It’s supposed to look a bit handmade and chunky.
Sizing Adjustments
If you need a bigger sweater just add more squares. Like instead of 4 squares across make it 5 or 6. Add more length by adding rows of squares. The sleeves can be adjusted too – wider sleeves need more squares around, longer sleeves need more squares down the length.
You could also make bigger individual squares by doing more rounds. Like if you do 7 or 8 rounds per square instead of 5, you’ll need fewer total squares but they’ll be chunkier. I’ve seen people do granny square sweaters with just like 20 huge squares which works too.
Yarn Weight Stuff
I used worsted weight (size 4) yarn but you can use different weights. Chunky yarn (size 5 or 6) with a bigger hook will make a thicker cozier sweater that works up faster. Sport or DK weight (size 2 or 3) with a smaller hook makes a lighter sweater that’s better for layering but takes forever because the squares are smaller.
Just keep your yarn weight consistent throughout the project or the squares won’t match. I ran out of the burgundy Caron yarn halfway through and bought what I thought was the same color but it was slightly different and you can totally tell which squares are the different dye lot. Not enough that anyone else notices but I know.
Common Problems
Squares coming out different sizes is the main thing. This happens if your tension changes or you switch hook sizes accidentally. I keep all my in-progress squares in a ziplock bag with the hook I’m using so I don’t mix them up. If you end up with some wonky sized squares you can either block them to try to even them out or just remake them.
The sweater being too boxy is another thing people complain about but like that’s kind of the aesthetic? It’s not supposed to be fitted. If you want more shaping you’d need to do decreases on the side seams or use fewer squares at the waist which gets complicated. I just embraced the boxy oversized look.
Running out of yarn SUCKS. Buy more than you think you need. I thought 8 skeins would be plenty and ended up needing 10. Better to have extra than to be hunting for the right dye lot later.
Alternative Construction Methods
Some people make granny square sweaters using the join-as-you-go method where you connect each square to the previous one as you finish it instead of making them all separately first. This eliminates some of the sewing but I find it harder to visualize the final layout and you can’t rearrange squares if you change your mind about the color placement.
There’s also continuous granny square patterns where you make one giant piece in a granny square pattern instead of individual squares. That reduces seaming but doesn’t give you the same patchwork look.
Washing and Care
I throw mine in the washing machine on delicate and lay flat to dry. The Caron Simply Soft holds up pretty well. Red Heart can get a bit fuzzy after multiple washes. If you used wool or a delicate fiber you’d need to hand wash but with acrylic you’re fine.
The seams are the weak point so check them occasionally to make sure they’re not coming apart. I’ve had to reinforce a few spots where my whip stitching wasn’t tight enough.
Things I’d Do Differently
I would weave in ends as I go instead of saving them all for the end. Just do it after every square. Your future self will thank you.
I’d also make a few extra squares in each color just in case. I didn’t have any extras and when I wanted to add a little pocket later I had to make new squares and the yarn color didn’t match perfectly.
Maybe use a stitch marker to mark the right side of each square as you make them? I kept forgetting which side was which and had to figure it out later when joining which was annoying.
The pattern is really forgiving though which is why it’s good for beginners or people like me who just kinda make stuff up as they go. You can adjust literally everything – the size, the colors, the square dimensions, the overall shape. Make it cropped or oversized or with different sleeve lengths. Add stripes or do a rainbow gradient or use up scrap yarn in random colors.
I wore mine probably twice a week that whole spring and got a bunch of compliments from people who didn’t realize it was handmade. It goes with jeans and looks cute layered over a collared shirt. The granny square texture is chunky enough to be interesting but not so bold that it’s hard to style.