
Mar
Making the Mushroom Granny Square Thing
So I made one of these back in spring 2022 when I was basically watching way too much of The Office for the millionth time and needed something to do with my hands. The mushroom granny square is basically just a regular granny square but you’re doing it in a way that makes it look like a little toadstool which sounds complicated but honestly it’s not that bad once you get the color blocking figured out.
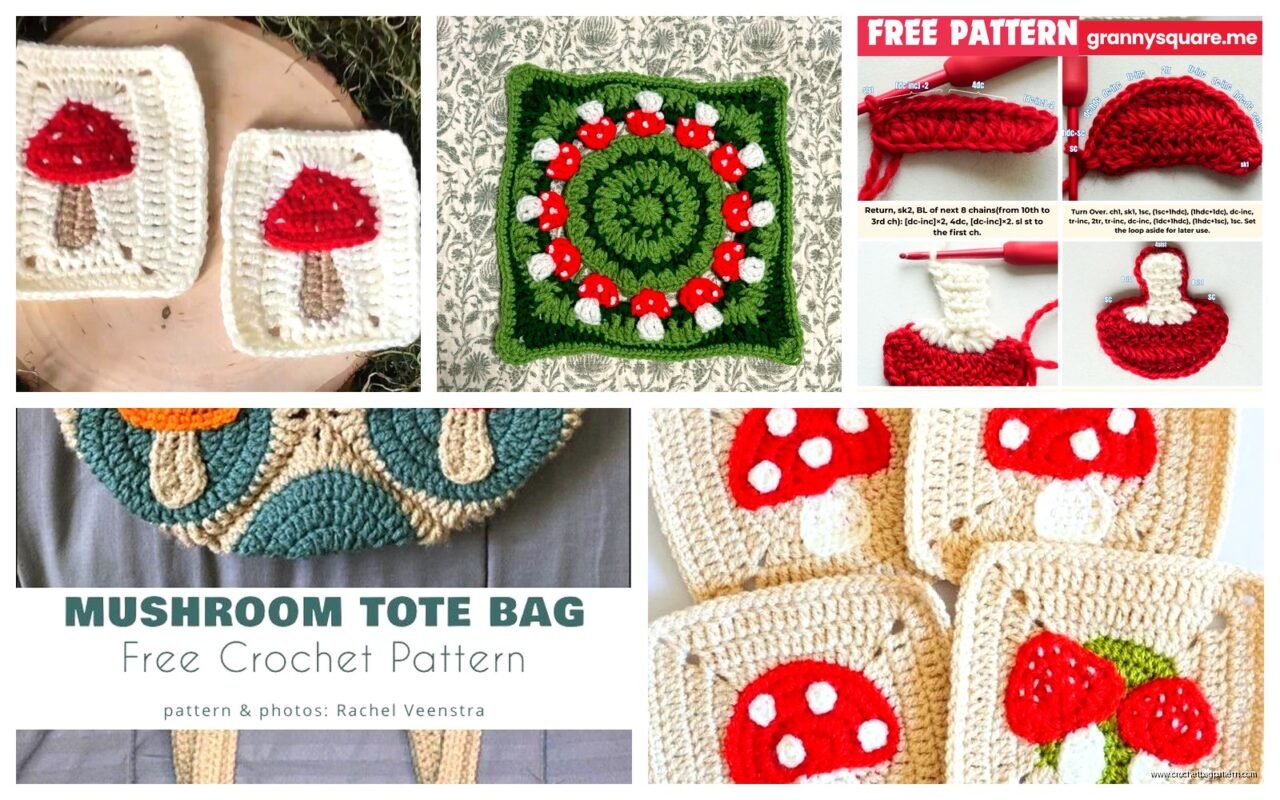
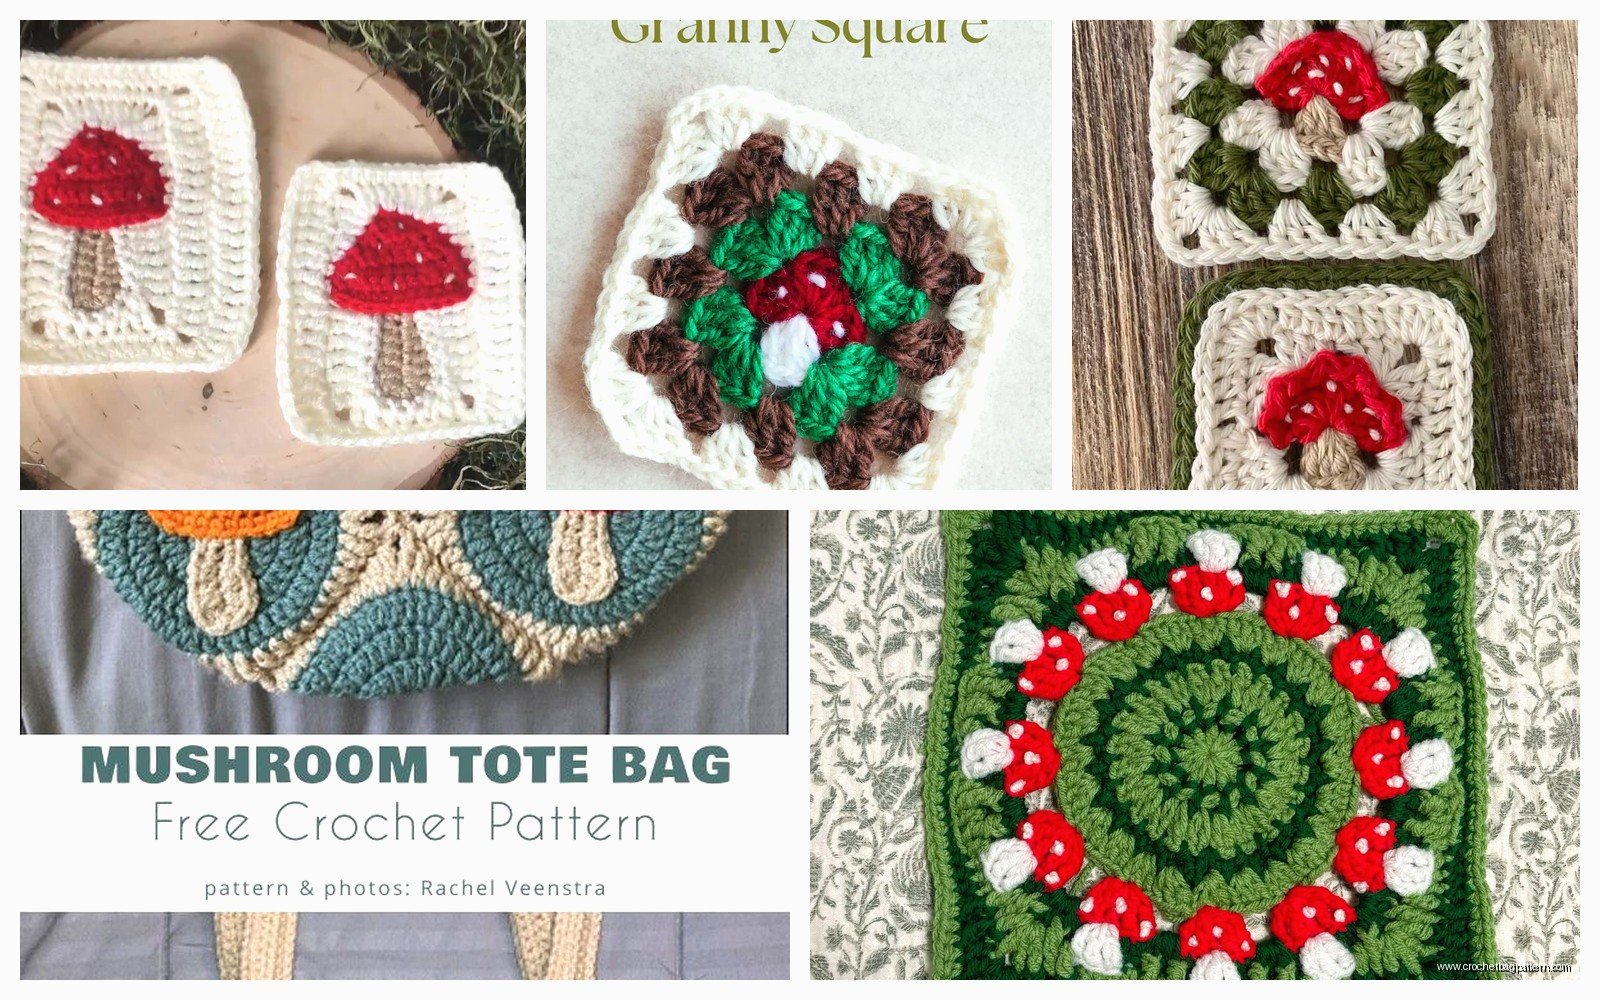
You’re gonna start with the cap part which is the top of the mushroom. I used Red Heart Super Saver in Cherry Red because I had like three skeins of it lying around from another project I never finished. The thing that annoyed me most about this whole pattern was keeping track of which round I was on because the cap needs to be worked in a specific way and if you lose count you end up with a weird lopsided mushroom that looks more like a blob.
Starting With The Cap
Make a magic ring. Chain three which counts as your first double crochet. Then you’re doing eleven more double crochets into that ring for a total of twelve stitches. Pull the ring tight and slip stitch to join to the top of that first chain three.
Round two is where people get confused but it’s just increasing. Chain three again, one double crochet in the same stitch, then two double crochets in each stitch around. You’ll end up with twenty-four stitches total. Slip stitch to join.
Round three you’re not increasing every stitch anymore. Chain three, one double crochet in the same stitch, one double crochet in the next stitch, then two double crochet in the following stitch. That’s your pattern for the whole round—one dc, then two dc in the next stitch. This gives you thirty-six stitches.
Now here’s where the mushroom actually starts looking like a mushroom instead of just a red circle. Round four you switch to white or cream for the spots. I used Caron Simply Soft in White because it’s what I had and also it’s softer than Red Heart if we’re being honest. You’re gonna do little clusters of white stitches scattered around to make the toadstool spots.
Adding The White Spots
This part is kinda freeform which I actually liked even though I usually hate when patterns are vague. With your white yarn, you’re slip stitching into the red round you just finished, then chain one and do like three or four single crochets in a cluster. Fasten off. Do this in like four or five different spots around the cap, spacing them out so they look random but balanced if that makes sense. My cat kept trying to steal the white yarn while I was doing this part which was super annoying.
Some people do the spots differently—they work them into the actual round as they go but I found it easier to add them after. Less ends to weave in surprisingly even though it seems like it would be more.
The Stem Part
Now you need the stem which is the bottom half. Switch to cream or beige or whatever color you want for the mushroom stem. I used Bernat Premium in Linen which is this nice off-white color. You’re basically gonna work in rows now instead of rounds which feels weird after doing the cap in rounds.
With your stem color, chain however wide you want your stem to be. I did like fifteen chains I think? The stem should be narrower than the cap obviously. Then you’re working back in double crochets. Chain three, turn, double crochet across. Do this for like six or seven rows until you have a rectangular piece that’s roughly the height you want for the stem.
Here’s the thing though—you want the stem to have some texture like real mushroom stems do, so some people do front post and back post double crochets to make it look more realistic. I didn’t bother with that because honestly from a distance you can’t really tell and also I was getting impatient.
Putting It All Together
This is where it gets a little tedious. You need to attach the stem piece to the bottom of the cap. I just whip stitched mine on with the same cream yarn which worked fine. Position the stem in the center of the cap on the back side and sew around the edges. Make sure you’re catching both pieces securely because if one corner comes loose the whole thing looks sloppy.
The actual granny square part comes now. You’re gonna work a border around the entire mushroom shape to square it off. This is what turns it from just a mushroom shape into a granny square block that you can connect to other squares.
The Border Rounds
With a neutral color—I used the cream stem color to keep it simple—you’re working around the entire edge of your mushroom. This is honestly the most annoying part because the edge is all wonky with the cap being round and the stem being rectangular and you gotta figure out where to put your stitches so it lays flat.
Start at one corner where the stem meets the cap. Chain three, work double crochets evenly around the entire edge. In the corners you’ll do like five double crochets in one stitch to make it turn the corner properly. When you get to curves you just kinda eyeball it—put more stitches where it’s curving out, fewer where it’s curving in or whatever. I know that’s not helpful but there’s no exact count because everyone’s tension is different.
The goal is to end up with a square-ish shape. My first one was more like a rectangle that was wider than it was tall and I had to redo the border round twice which was super frustrating.
Do at least two or three border rounds in the neutral color. Each round you’re doing double crochet in each stitch and then five double crochets in each corner space. This builds up the square shape and makes all your edges even.
Making It Actually Square
If your square is still wonky after three border rounds, add a fourth or fifth. I ended up doing five total because I wanted mine to be a consistent size with some other granny squares I was making. Each square ended up being about six inches across which worked for what I needed.
You can also do a final round in a contrasting color if you want. Some people do black or dark green to make it look more… I don’t know, finished? I stuck with cream because I was gonna make a whole blanket of different mushroom squares and wanted them to all have the same border.
Variations I Tried
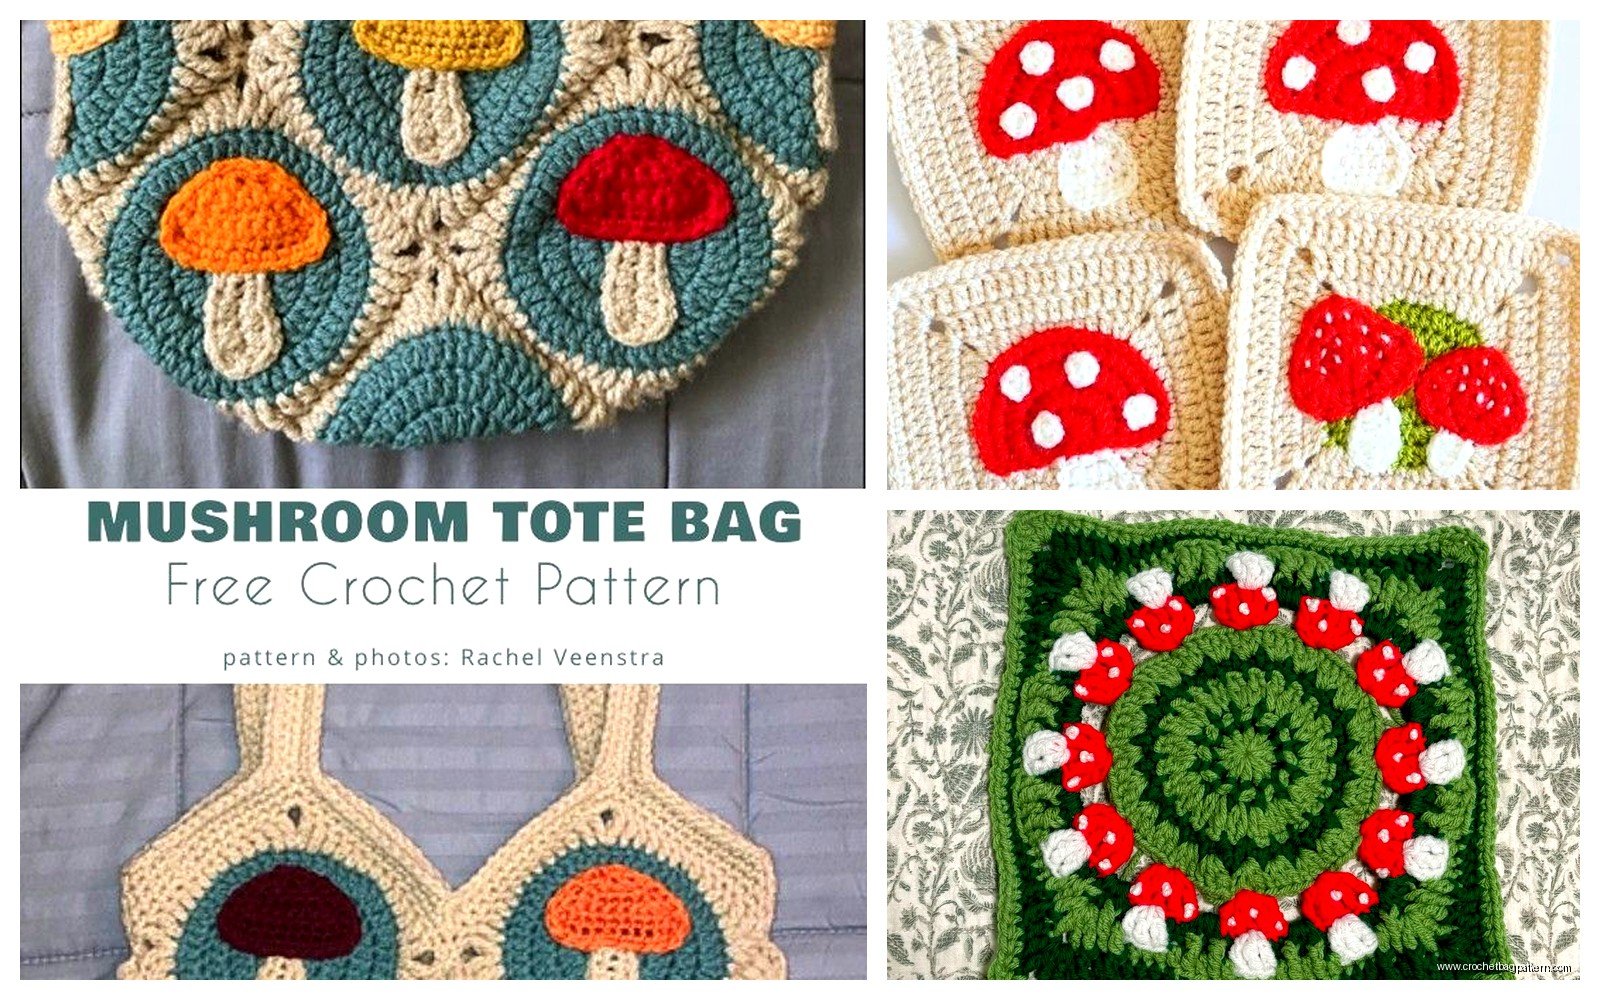
After making like eight of these I started experimenting. Did some with brown caps instead of red—used Red Heart Super Saver in Coffee for those. Those look more like actual forest mushrooms instead of the fairytale toadstool vibe.
Also tried making the stems different lengths. Shorter stems make the mushroom look more squat and cute, longer stems look more elegant or something. One time I made the stem too long and it looked ridiculous like a mushroom on stilts.
You can add more spots or fewer spots. I did one with just one big spot in the center of the cap and it looked kinda minimalist which was cool. Another one I went crazy and did like ten tiny spots all over and it was too busy in my opinion.
Actually Using These Squares
So what do you do with mushroom granny squares once you make them? I was originally planning a blanket but then I realized a whole blanket covered in mushrooms might be a bit much. Instead I made like twelve squares and turned them into a cushion cover which actually looks pretty good on my couch.
You can mix them with regular granny squares in coordinating colors. Like do mushroom squares alternating with solid cream or green squares and it breaks it up. Or make a bunch of different mushroom types—red toadstools, brown mushrooms, even those blue-grey ones if you’re feeling adventurous.
Some people make them into bags. I saw someone online who made a tote bag with mushroom squares and it was honestly really cute even though I personally wouldn’t—actually wait I probably would carry that now that I think about it.
Tension Issues And Fixes
One thing I noticed is if your tension is too tight on the cap rounds, the whole thing cups up like a bowl instead of laying flat. If that happens you need to either go up a hook size or consciously work looser. I switched from a 5mm to a 5.5mm hook for the cap and that helped.
If it’s ruffling instead of laying flat, you’re working too loose or you’ve increased too much. There’s not a great fix for this except frogging it and starting over which sucks but sometimes you gotta.
The stem part usually isn’t a problem tension-wise since it’s just straight rows. Just keep your edges neat and don’t pull too tight on the turning chain.
Yarn Choices Matter More Than You’d Think
I used acrylic for all of mine because that’s what I had and also I’m not spending money on fancy yarn for practice squares. But if you use cotton like Lily Sugar’n Cream it’ll have a different drape. More structured maybe? I made one with cotton just to see and it was stiffer which might be good for something like a placemat but not great for a blanket.
Wool would probably be nice and soft but also expensive and also I don’t want to hand wash a mushroom blanket so acrylic it is.
The Red Heart Super Saver is squeaky when you work with it which drives some people crazy but I’m used to it. It does soften up after you wash it which is good to know.
Color Combinations That Worked
Red cap with cream stem is classic. Brown cap with tan stem looks natural. I did one with a purple cap and lavender stem that looked kinda magical and weird in a good way. Orange cap with yellow spots could work for a fall theme.
You could even do a dark grey or black cap with white spots for like a goth mushroom I guess? Haven’t tried that but it might look cool.
The border color really affects the whole vibe. Cream border makes it soft and neutral. Black border makes it bolder and more graphic. Green border gives it a forest-y garden feel.
What I’d Do Differently Next Time
I’d probably plan out my color scheme better before starting. I just grabbed whatever yarn I had and ended up with mushrooms in random colors that didn’t really go together. If I was making another set I’d pick like three or four colors and stick to those.
Also I’d make a gauge swatch first to figure out exactly how many border rounds I need to get consistent sizing. My squares ranged from like five inches to seven inches and joining them together was a pain because of that.
Maybe I’d try adding some texture to the stem with post stitches just to see if it’s worth the extra effort. Or even just alternating rows of single crochet and double crochet for some variation.
Joining The Squares
When you’re ready to join multiple mushroom squares together, you can whip stitch them, slip stitch them, or do a join-as-you-go method. I whip stitched mine because I’m lazy and it’s fastest. The seams show a little bit but whatever, it’s handmade.
If you want invisible seams you gotta do the mattress stitch thing which takes forever but looks really professional. I did that for like two seams and then gave up and went back to whip stitching.
Make sure all your squares are blocked to the same size before joining or you’ll have puckering and weird gaps. I didn’t block mine properly and regretted it later when everything was joined and lumpy in places.