

Mar
okay so the moon granny square thing
I made one of these back in spring 2022 when I was supposed to be organizing my closet but obviously that didn’t happen. The moon granny square is basically a circular motif worked into a square if that makes sense, and it looks pretty cool when you’re done even though the process is kinda weird at first.
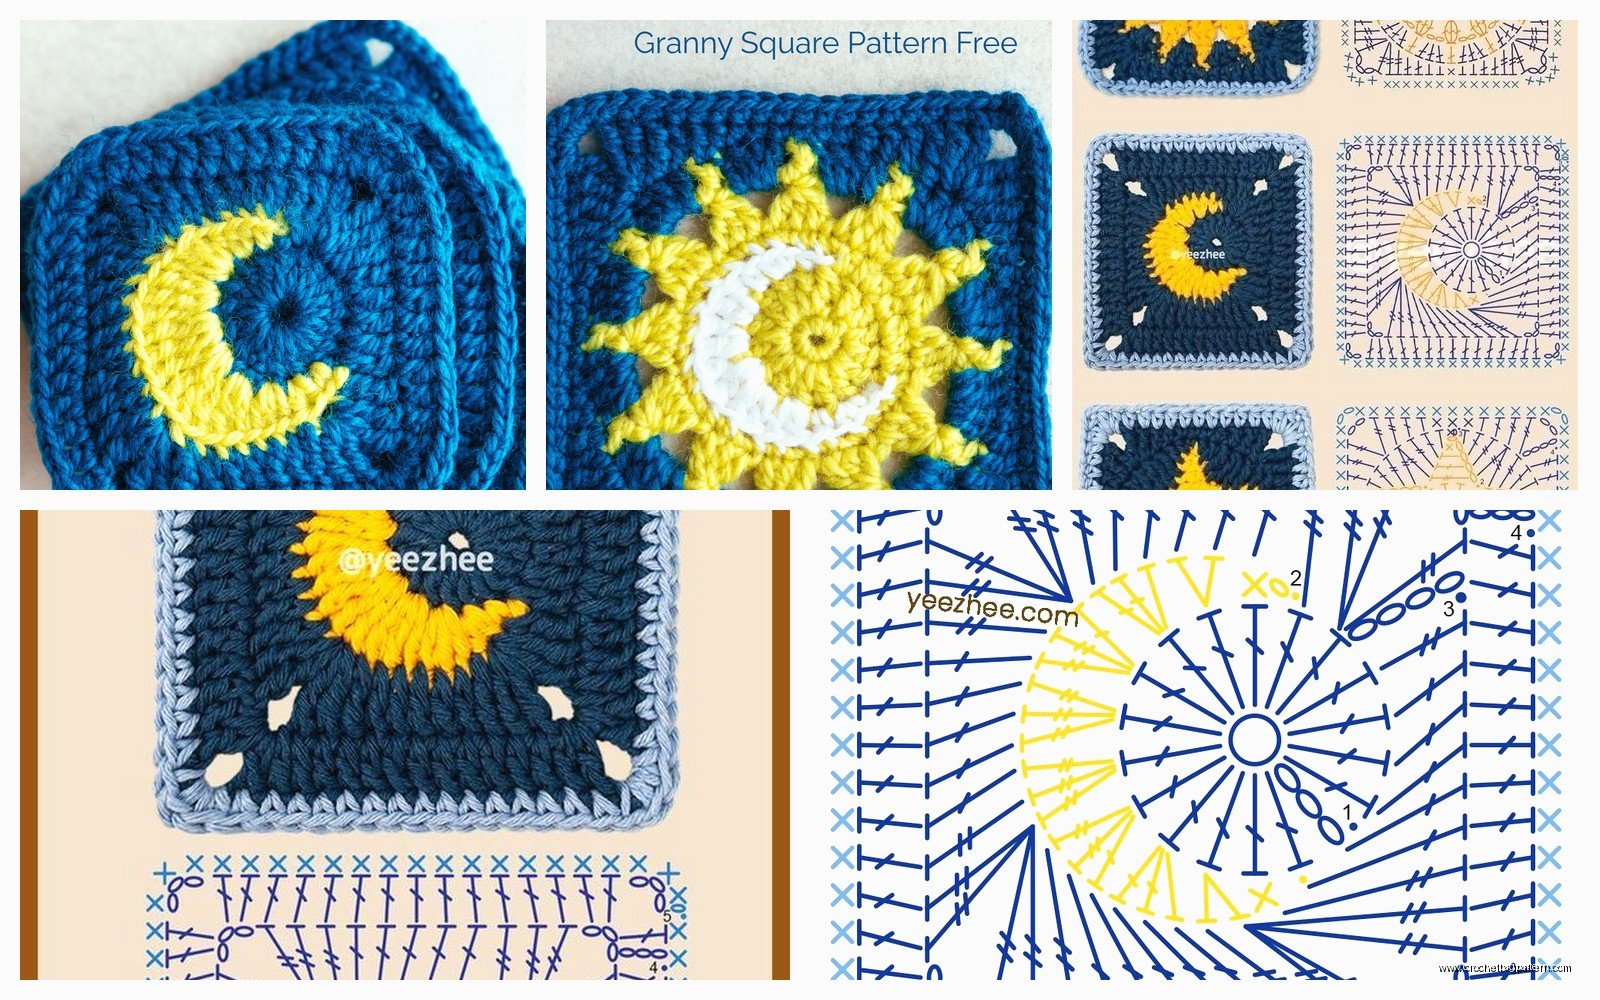
So you start with a magic ring which I know some people hate but honestly it’s the best way to get a tight center. Chain 3 (counts as your first double crochet), then work 11 more double crochets into the ring. Pull it tight. You should have 12 dc total. Slip stitch to join to the top of that chain-3. That’s your moon center and it should look like a little circle.
building the actual moon part
Round 2 is where it starts looking more moon-like. Chain 3 again, dc in the same stitch. Then 2 dc in each stitch around. You’re basically doubling your stitch count so you’ll end up with 24 dc. Join with a slip stitch.
Round 3 you’re gonna chain 3, dc in same stitch, then 1 dc in the next stitch. Then *2 dc in next stitch, 1 dc in next stitch* and repeat that around. This gives you 36 stitches total and the circle should be getting pretty solid looking. I used Caron Simply Soft in Off White for the moon part because I had like three skeins of it lying around and didn’t know what else to do with it.
The thing that really annoyed me was trying to keep track of where each round started because I kept losing my stitch marker. My cat knocked it off the table at least twice and I found it later stuck to my sock which was just… anyway.
transitioning to the square
This is where it gets weird and also where people usually mess up. After your moon circle is done, you need to square it off but you can’t just randomly start making corners or it’ll look lumpy. What I did was switch to a navy blue yarn (I think it was Red Heart Super Saver in Navy?) for the “sky” part.
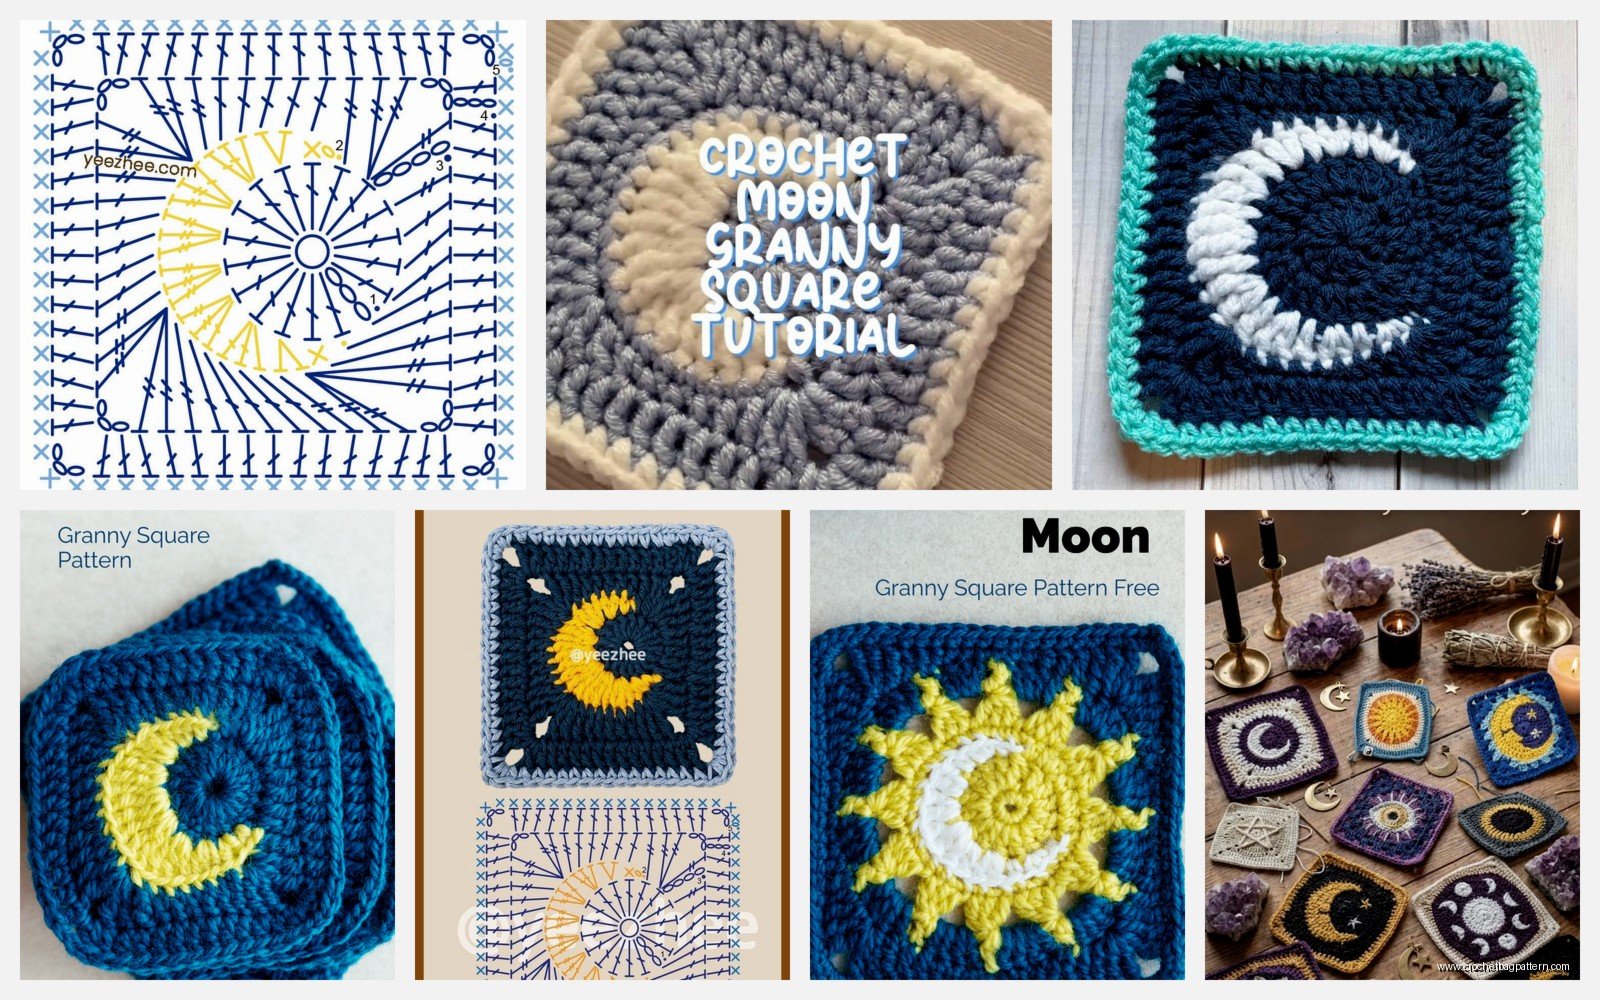
Round 4 is your corner round. Chain 3, work 2 dc in the same stitch. Then dc in the next 8 stitches. In the 9th stitch, you’re making your first corner: work (2 dc, chain 2, 2 dc) all in that same stitch. Then dc in the next 9 stitches. Make another corner in that stitch. Keep going around like this so you have 4 corners total with 9 dc between each corner.
The spacing is important here because if you don’t count right your square will be wonky. I had to frog this round twice the first time I made one because I wasn’t paying attention and was also watching that show about the chess prodigy, what’s it called, Queen’s Gambit or something.
filling out the square edges
Round 5 and beyond you’re just building up the square part to make it bigger. Chain 3, dc in each stitch across to the corner space. In the corner chain-2 space, work (2 dc, chain 2, 2 dc). Continue around doing the same thing for each side and corner.
You can make the square as big as you want really. I usually do about 2-3 more rounds after establishing the corners so the moon doesn’t look too big compared to the sky part. Some people like a bigger sky section though so it’s whatever you prefer.
yarn weights and tension stuff
I’ve made these with worsted weight yarn mostly because that’s what I have the most of. The gauge doesn’t matter that much unless you’re making a bunch of them for a blanket and need them all the same size. If you’re using different yarn weights for the moon vs the sky you gotta be careful because the tension will be different and it might pucker.
One time I tried using Bernat Blanket yarn for the moon part thinking it would look cool and fluffy but it was just too bulky and the whole thing looked weird. Stick with similar weights or at least similar thickness even if one is acrylic and one is cotton or whatever.
color variations that actually work
The classic is white/cream moon on dark blue or black background obviously. But I’ve also done a yellow moon on purple which looked kinda cool in a sunset way. Gray moon on light blue for daytime. You could even do a orange moon on dark red for that harvest moon vibe.
Someone told me they made one with a black moon on white background which sounds backwards but apparently it looked really modern and graphic. I haven’t tried that yet but it’s on my list of things to maybe do eventually if I remember.
joining them if you’re making multiples
If you’re gonna make a blanket or something with multiple moon squares, you can join them as you go on the last round which saves time later. When you get to the corner of the side you’re joining, instead of doing chain 2, do chain 1, then slip stitch into the corresponding corner space of the other square, then chain 1, and continue with your double crochets.
I prefer just making all the squares first and then whip stitching them together later because I’m bad at planning and never know what layout I want until I see them all spread out on the floor. But that’s just me being disorganized probably.
the math for blanket sizing
A typical moon granny square with worsted weight yarn ends up being about 6-7 inches depending on how tight you crochet. So for a baby blanket you’d need like 12 squares (3×4 layout). Throw blanket maybe 30-35 squares. Full size blanket you’re looking at 60+ squares which is a whole commitment.
I started a blanket with these back in 2022 and got about 18 squares done before I got bored and started a different project. Those squares are still in a bag somewhere. Maybe I’ll finish it eventually or maybe I’ll just make them into individual coasters or something.
common problems and fixes
If your moon circle is ruffling up, you added too many stitches in one of the early rounds. If it’s cupping inward, you didn’t add enough. The increases need to be evenly spaced or it won’t lay flat. I know that sounds obvious but it’s easy to mess up when you’re not paying attention.
If your corners aren’t square enough, you might not be working enough stitches into the corner chain space. That (2 dc, chain 2, 2 dc) in each corner is pretty standard but some people do 3 dc on each side of the chain 2 instead. Try different variations and see what looks right to you.
The edges curling up usually means your tension is too tight. I had this problem for a while until I went up a hook size for the square rounds. I use a H hook (5mm) for the moon center and then switch to an I hook (5.5mm) for the background which helps keep everything flat.
embellishment ideas
You can add french knots in white or yellow yarn scattered around the sky part to make stars. Or lazy daisy stitches for star shapes. Some people crochet tiny separate stars and sew them on which looks cool but is also way more work.
I saw someone who embroidered a face on their moon with black thread which was cute in a kids room kinda way. Not really my style but it looked good for what it was. You could also add texture to the moon by doing surface crochet in a lighter shade to make craters but that seems complicated.
alternative moon shapes
Instead of a full circle moon you can do a crescent by working the circle off to one side of the square. Start your magic ring closer to one edge instead of center. Then when you square it off, you adjust the stitch counts so the moon ends up in the corner area. It’s harder to get right though and I’ve only successfully done it once.
Half moon is easier – you basically crochet half a circle using rows instead of rounds, then incorporate it into one side of the square. The moon sits at the edge instead of floating in the middle. Good for a border effect if you’re making a blanket where you want the moons along the edges.
what to actually make with these
Blankets obviously. Also pillowcases if you make 2 squares and sew them together with backing fabric. I made a tote bag once using 4 squares (2 for each side) and it turned out okay but the bottom got saggy because I didn’t add any structure. Would recommend using a stiff interfacing if you’re gonna do that.
Wall hangings are popular – just make one big square, block it so it’s nice and flat, and hang it up. You can add a dowel rod at the top with string. Less work than a whole blanket and you still get the cool celestial look.
Coasters are good for using up single squares that don’t match anything else. Just make sure you seal them with something waterproof or they’ll get gross from condensation. I haven’t actually done this yet but it seems like it would work in theory.
blocking makes a huge difference
I never used to block anything because it seemed like extra work but these squares really do look better after blocking. The moon circle gets more round, the square edges get more square, everything just looks more intentional.
Wet blocking works fine – just soak it in lukewarm water for like 10 minutes, squeeze out the excess water (don’t wring it), pin it to a blocking board or foam mat in the shape you want, and let it dry completely. Takes overnight usually. Steam blocking is faster but you gotta be careful not to melt acrylic yarn.
I use those interlocking foam floor tiles as blocking mats because actual blocking boards are expensive and these work just as well. Got them at Harbor Freight for like $10.
yarn amounts for reference
For one square with worsted weight yarn, you need maybe 30-40 yards for the moon and 60-80 yards for the background depending on how many rounds you do. So basically less than one skein of each color per square. For a throw blanket with 30 squares you’re looking at buying several skeins of each color.
I always buy extra because running out of yarn in the middle of a project is the worst and dye lots can vary. Better to have leftovers for other small projects than to have a blanket you can’t finish because that specific color is discontinued.
mixing it with other granny squares
Moon squares look cool mixed in with regular solid granny squares in a blanket. Like every 4th square is a moon or something. Or you could do a whole row of moon squares across the middle with solid squares above and below. Lots of layout options.
They also work with other celestial themed squares if you can find patterns for sun squares or star squares. I haven’t really looked for those patterns but they probably exist somewhere. Would make a cool astronomy themed blanket for a kid or whatever.
The main thing is making sure all your squares end up the same size if you’re mixing different patterns. Sometimes you gotta add or subtract a round to make things match up which is annoying but necessary.
Anyway that’s basically how you make moon granny squares and what you can do with them. They’re not that hard once you get the hang of the corner placement and they look more impressive than they actually are which is always good. Just don’t lose your stitch markers or you’ll be counting stitches constantly which gets old fast.