
Mar
Making the Actual Bag Holder
So I made one of these in spring 2022 when my kitchen drawer was literally overflowing with plastic bags and I was honestly just tired of looking at the mess. The pattern is basically a tube with elastic at the top and bottom, super straightforward once you get going.
You’re gonna need worsted weight yarn, maybe 200-250 yards depending on how long you want it. I used Red Heart Super Saver in that off-white color because I had like three skeins lying around from another project. Some people use cotton which probably looks nicer but acrylic works fine and it’s cheaper. Lion Brand Pound of Love also works if you can find it on sale.
The elastic part is important though – get the kind that’s about half an inch wide, the stuff you’d use for waistbands. You need maybe a yard total, cut into two pieces. One for top, one for bottom.
Starting the Tube
Chain like 40 or so, but honestly you need to measure this around your elastic when it’s stretched slightly. Join it into a circle with a slip stitch. The thing that annoyed me SO much about this project was figuring out if I was twisting the chain or not when joining – I had to restart twice because I wasn’t paying attention and ended up with this weird mobius strip situation.
Once you’ve got your circle, just single crochet around and around. I don’t even use a stitch marker most of the time which probably isn’t great advice but whatever, you can see where your rounds start if you look close enough. Keep going in a spiral, single crochet in each stitch.
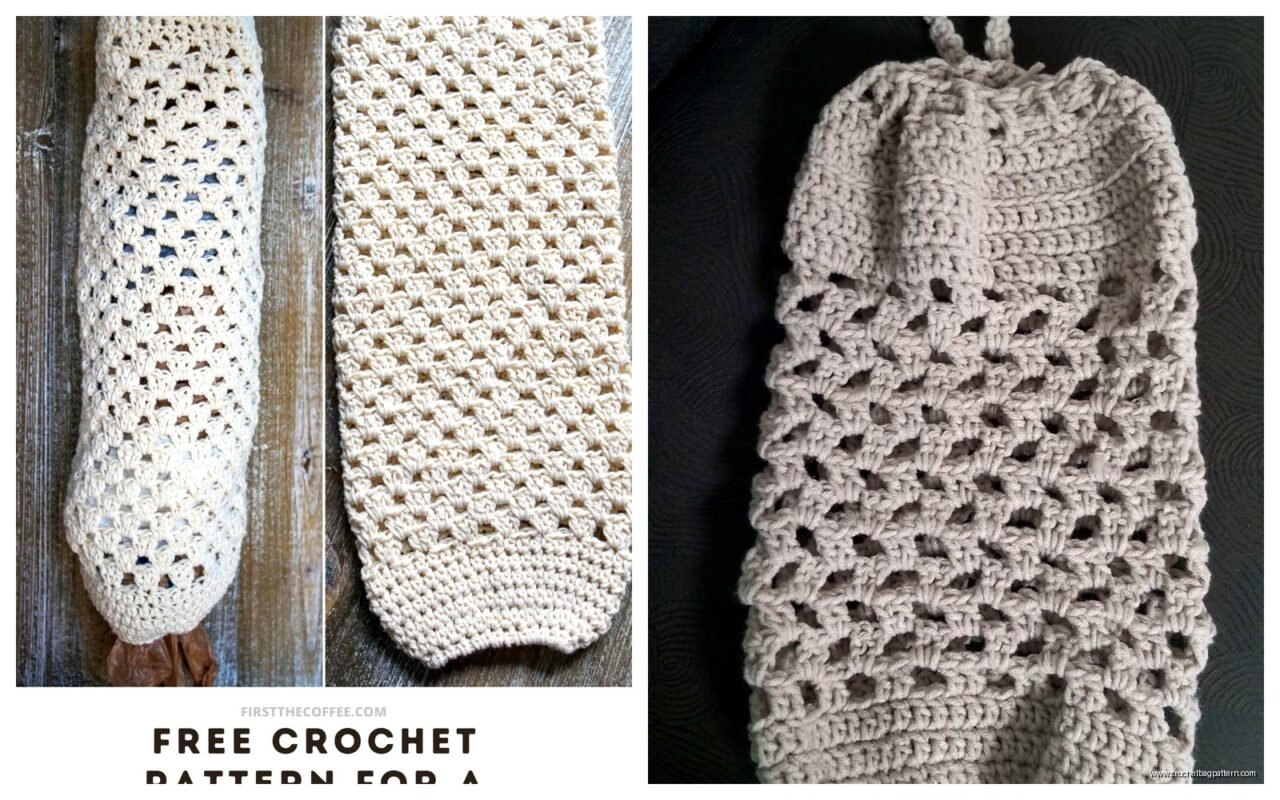
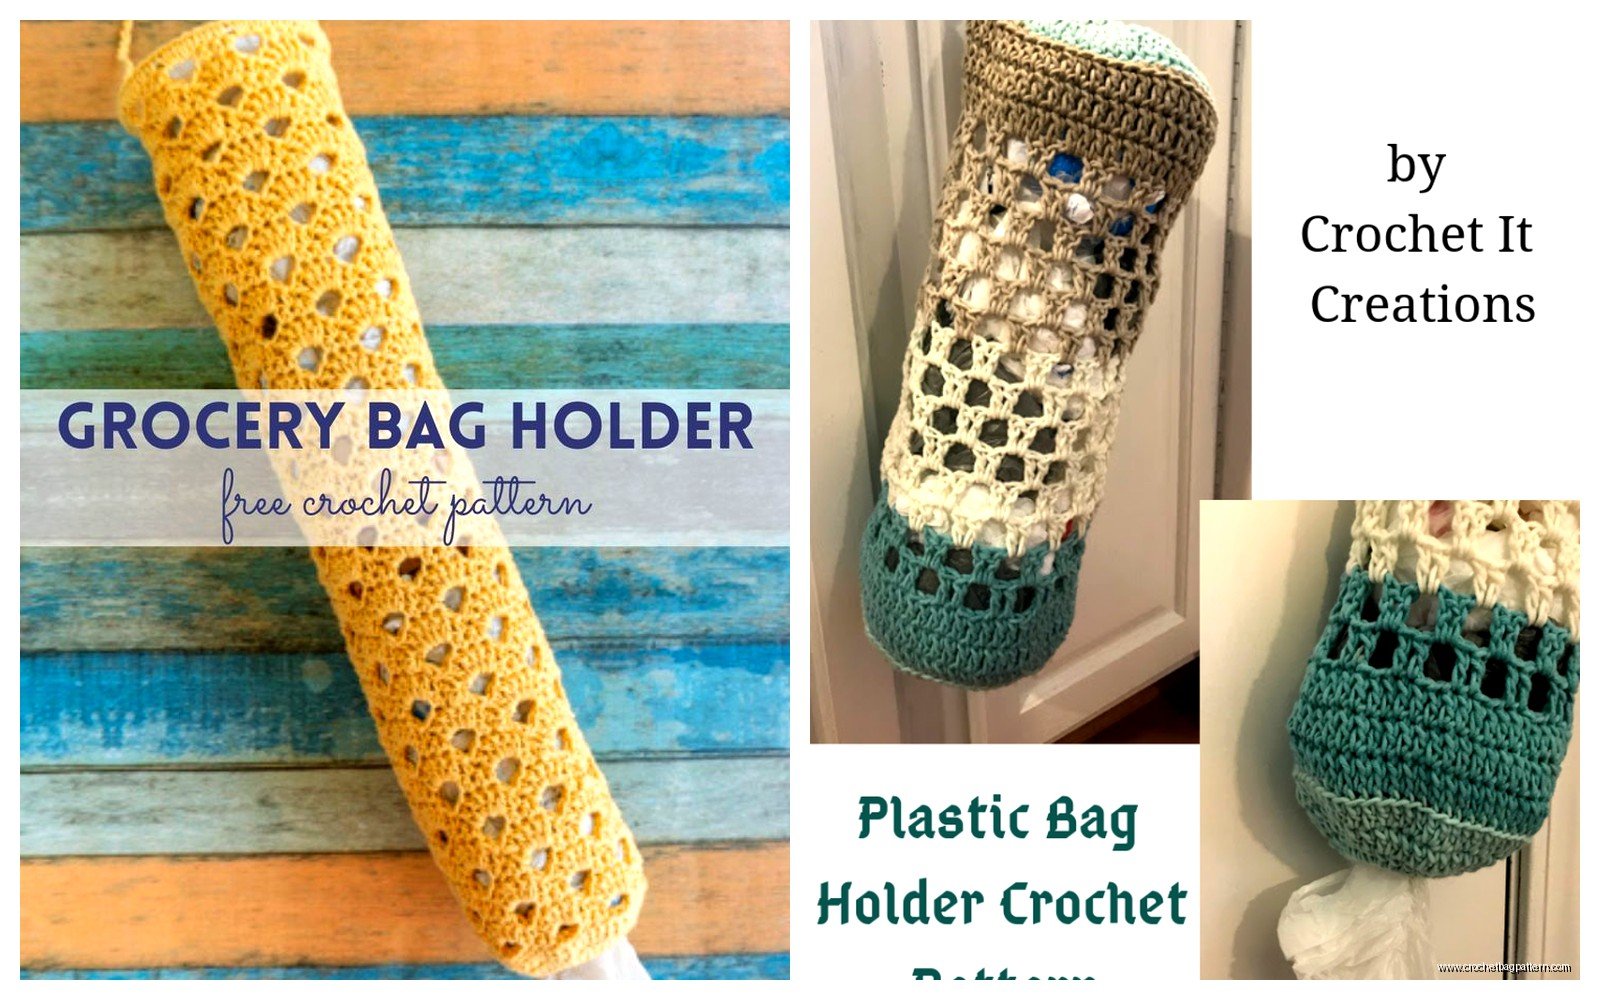
The tube should be about 15-18 inches long before you start thinking about finishing. I made mine 16 inches and it holds maybe 30-40 plastic bags which is perfect for my kitchen. You could go longer if you’ve got the wall space or if you’re one of those people who saves every single bag from the grocery store.
Adding the Elastic Casings
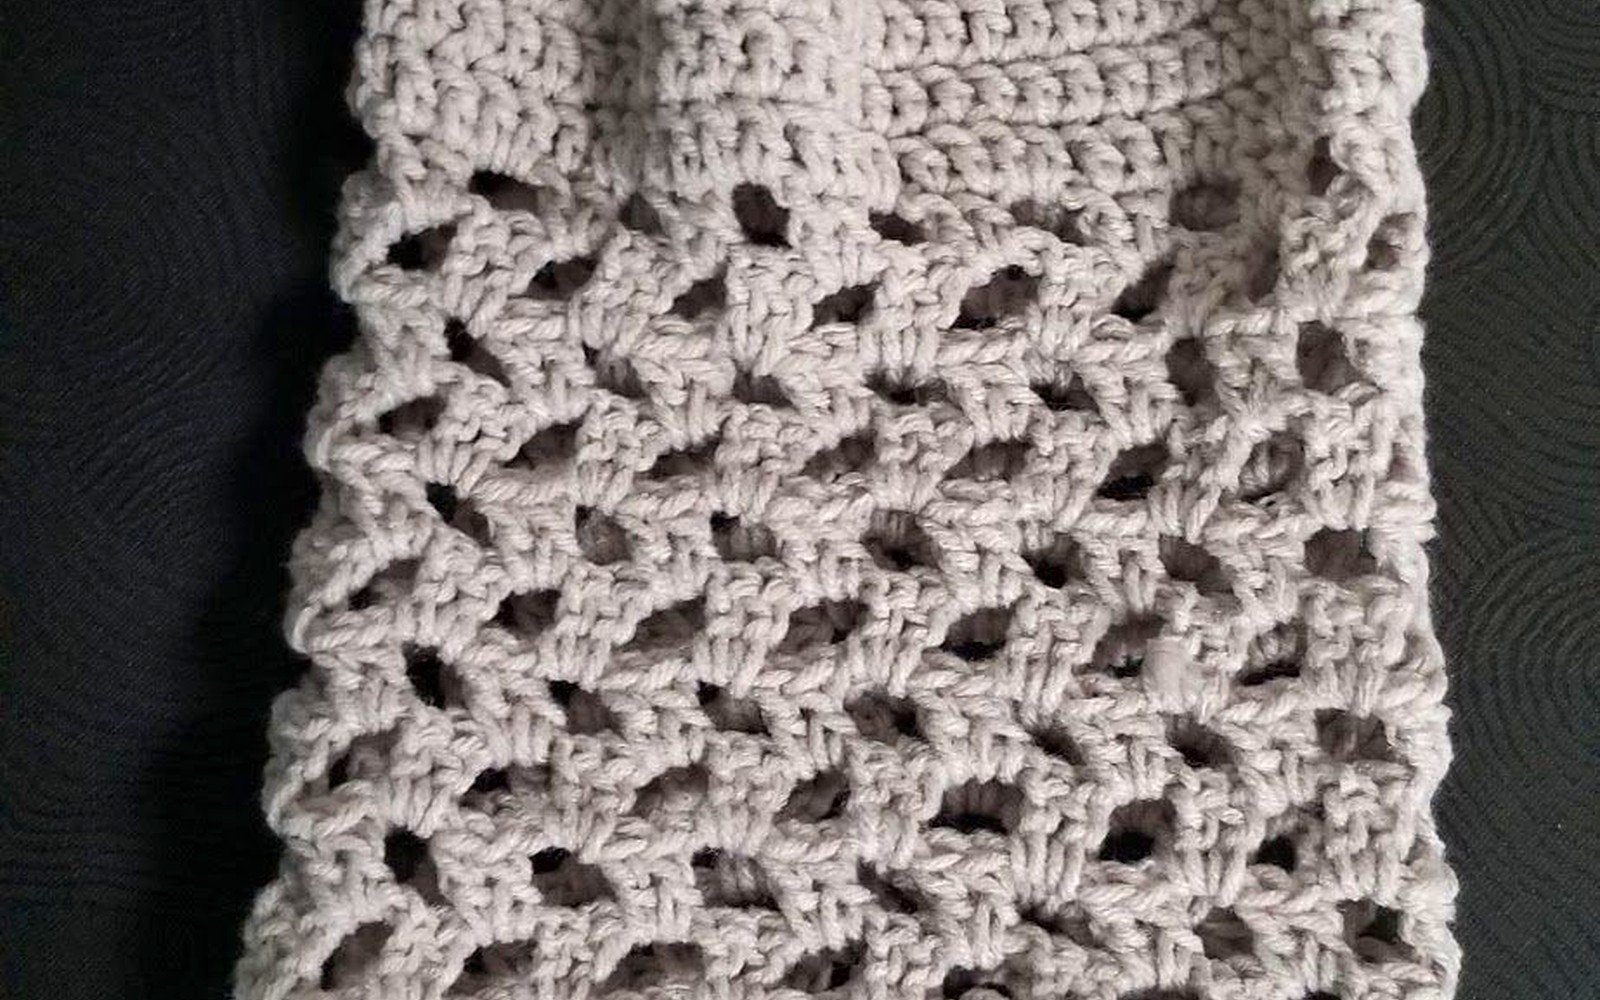
This is where it gets slightly fiddly. At the top of your tube, you need to make a casing for the elastic. Switch to half double crochet for like 5 or 6 rounds – this creates a looser fabric that’s easier to thread elastic through. Actually wait, some people do double crochet here but I think that makes the holes too big and the elastic shows through weird.
After those rounds, fold the edge over about an inch and slip stitch it down to create the actual casing. Leave a small opening so you can thread the elastic through later. I use a safety pin attached to the elastic end to push it through the casing, same way you’d do pajama pants or whatever.
The bottom is the same process – half double crochet rounds, fold and slip stitch, leave opening for elastic. Make sure both casings are on the outside of the tube so when you hang it up everything looks intentional and not like you messed up.
Threading and Assembly
Cut your elastic pieces to fit snugly but not super tight. For the top opening you want it stretched enough that you can push bags through but not so loose that they fall out. Maybe 12-14 inches depending on your tube circumference. Bottom elastic should be similar, maybe slightly smaller so bags don’t slide out the bottom when you’re pulling one out.
Thread the elastic through using that safety pin method. When you get it all the way around, overlap the ends by about an inch and sew them together. I just use regular needle and thread, stitch back and forth a bunch of times so it’s secure. Then push that seam inside the casing and close up the opening with a few slip stitches.
Do the same for the bottom elastic. The whole threading part takes like 10 minutes but feels longer because you’re just sitting there pushing fabric around.
Hanging System
You need something to hang this from. I crocheted a simple loop at the top by chaining about 15, then slip stitching it to the opposite side of where I attached it. Makes a loop sturdy enough to hang from a hook or command strip or whatever you’ve got on your pantry door.
Some patterns tell you to make a fancy decorative loop but honestly who cares, it’s gonna be stuffed with plastic bags anyway. Functional is better than pretty here.
If you want to get technical you could single crochet around the chain loop to make it thicker and stronger. I didn’t bother on mine and it’s held up fine for two years now.
Variations I’ve Seen
My friend made one using granny squares sewn together into a tube which looked cool but seemed like way more work. She used Caron Simply Soft in like four different colors. It was very cottage-core or whatever but took her three times as long.
You can also make these with mesh or open stitches so you can see how many bags are inside. Chain 2, skip a stitch, single crochet, repeat. Creates a lacey effect. I started one like this in summer 2024 while watching that baking show with the British people, but I got distracted and never finished it because my cat kept attacking the yarn ball.
The solid version I made is better anyway because you can’t see the mismatched bags from different stores all jumbled together. Looks cleaner from the outside.
Sizing Options
If you want a skinnier holder, chain less at the beginning. Maybe 30 chains instead of 40. Good if you’re hanging it inside a cabinet door where space is tight. Just remember you’ll fit fewer bags inside.
Wider versions need more yarn obviously. I’d say add 50 yards for every extra 10 chains you start with. Don’t quote me on that math though, I’m terrible at estimating yardage.
Length is easier to adjust – just crochet more or fewer rounds in the middle section. I’ve seen people make really short ones that are maybe 10 inches, more like a bag dispenser than storage. Those work okay if you only keep like 10 bags on hand.
Yarn Choices That Actually Matter
Acrylic is gonna be your best bet for durability. Cotton looks nice but stretches out over time, especially at the elastic parts where there’s tension. I used Bernat Super Value once and it was fine, maybe slightly rougher texture than Red Heart but it crochets up quick.
Avoid anything fuzzy or with a halo effect because the bags will catch on the fibers when you’re pulling them out. Learned that the hard way with some Lion Brand Homespun I tried to use – looked pretty but was completely impractical.
Variegated yarns can hide any tension issues or mistakes which is nice if you’re like me and your stitches aren’t perfectly even. That Red Heart Super Saver in the Candy Print colorway would probably look fun for this, though I haven’t tried it myself.
Some people get real fancy and use T-shirt yarn or fabric strips but that seems unnecessarily complicated for something that’s gonna live in your pantry holding garbage bags essentially.
Common Problems
If your tube is twisting or spiraling, you’re probably crocheting too tight on one side. Try to keep even tension as you work around. I have this problem constantly because I hold my hook weird – never learned the “proper” way so my tension is all over the place.
Elastic showing through the fabric means your stitches are too loose in the casing section or you didn’t fold the edge over far enough. You can fix this by adding another row of slip stitches along the fold line to make it more opaque.
Bags getting stuck when you pull them out usually means your bottom elastic is too tight. You want bags to feed through smoothly, not require yanking. Might need to replace the elastic with a longer piece if this keeps happening.
Actually Using the Thing
Stuff bags in through the top opening. They compress down pretty well so you can fit more than you’d think. When you need one, pull from the bottom – they should feed out one at a time like tissues from a box, though realistically sometimes you get two or three at once.
I hang mine on the inside of my pantry door with a command hook. Takes up almost no space and keeps all those bags contained instead of shoved in a drawer or under the sink. You could also hang it in a closet or mudroom or wherever you tend to accumulate plastic bags.
The elastic does wear out eventually. Mine loosened up after about 18 months and I had to replace both pieces. Not a huge deal, just open up the casings and thread new elastic through. Takes maybe 15 minutes total.
What I’d Do Differently
Make the bottom elastic tighter from the start so bags don’t slip out as easily. Mine occasionally drops a bag if I bump into it or if I’ve stuffed it really full and the weight pulls things down.
Use a stitch marker even though I said I don’t – it would’ve kept my rounds more even and prevented that slight spiral thing that happened. Not noticeable unless you really look but it bugs me when I notice it.
Maybe try a different color because off-white shows dirt and dust more than I expected. A medium gray or navy would probably hide that better.
Time Investment
The whole thing takes maybe 3-4 hours if you’re working steadily. I spread mine over two evenings because sitting and crocheting for hours straight makes my hands hurt. If you’re faster than me you could probably knock it out in an afternoon.
Threading the elastic and finishing takes another 30 minutes. So total time is like 4-5 hours from start to completely done and hanging on your wall.
Not a quick project but not a massive time sink either. Good for something to work on while watching TV or listening to podcasts or whatever. I made mine while binging that space show with the – actually that’s not relevant, never mind.
Anyway that’s basically it. Chain a tube, crochet around forever, add elastic casings, thread elastic, hang it up, stuff it with bags. Pretty simple once you get past the initial joining without twisting part which I swear is the hardest thing about the entire project.