
Mar
okay so I made this strawberry bag last summer – like june 2024 I think? – when I was binge watching some cooking show I can’t even remember the name of now and honestly it turned out way cuter than I expected but also there were definitely some moments where I wanted to throw the whole thing across the room
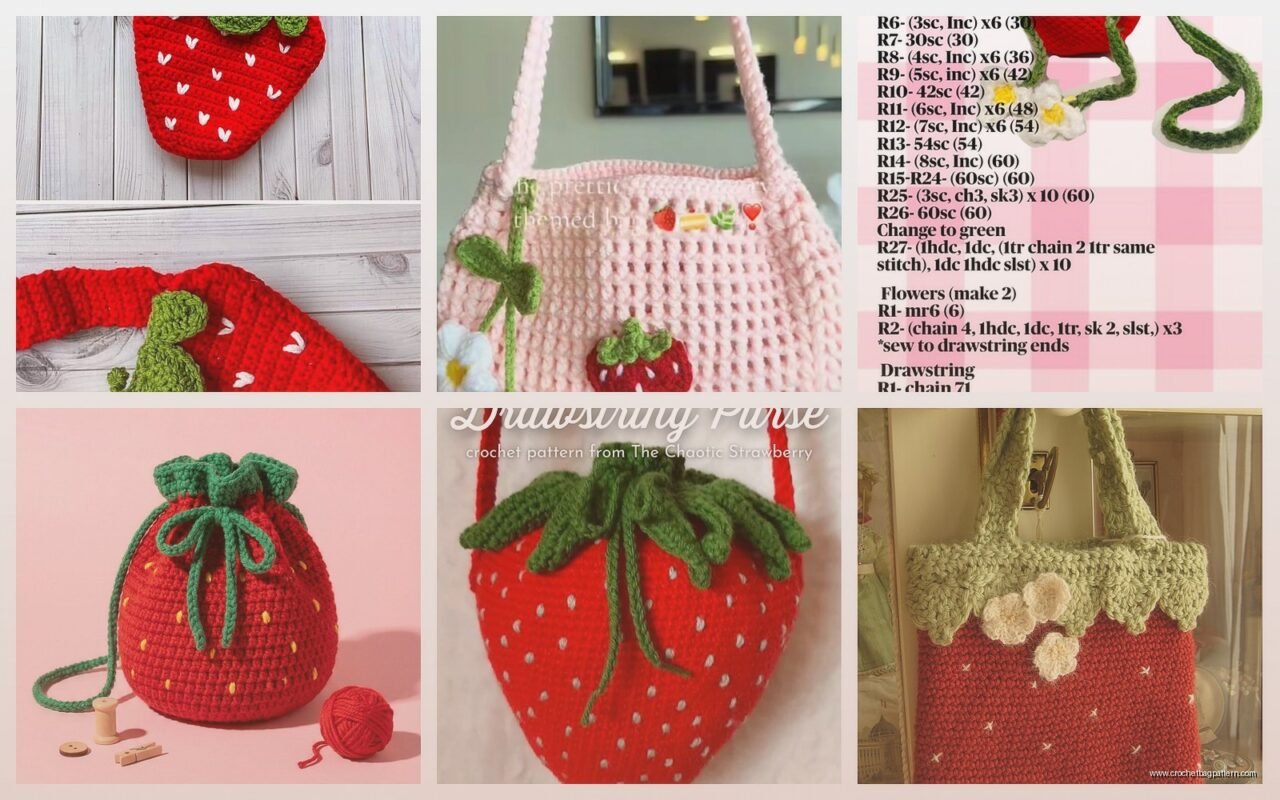
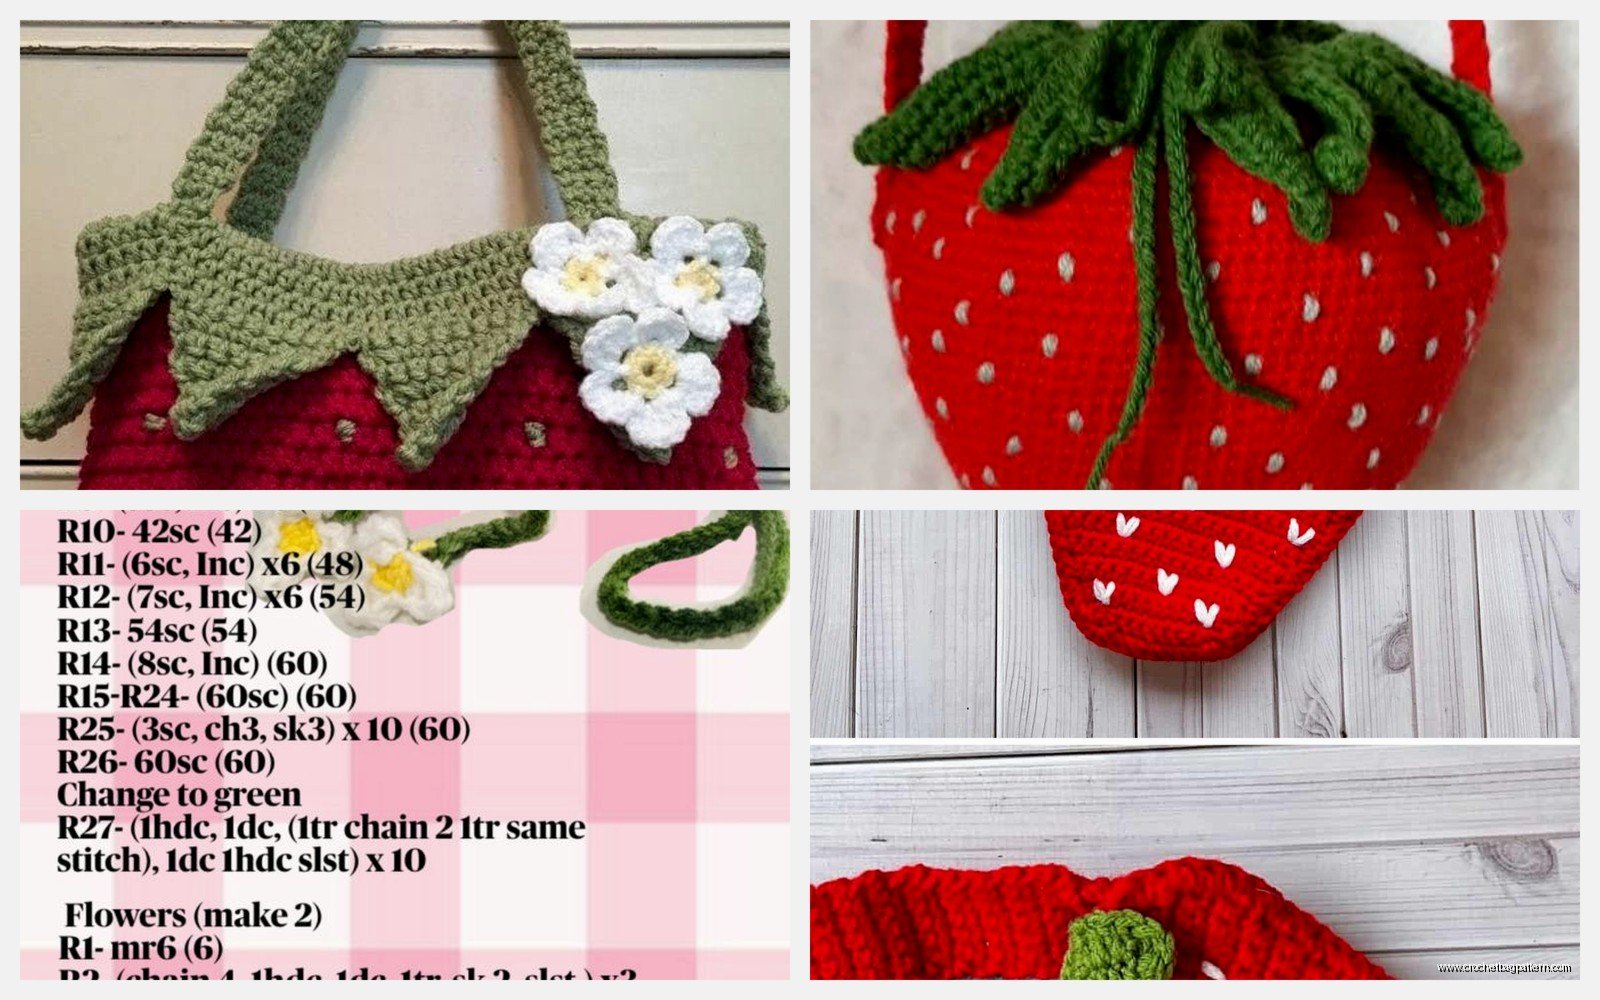
The thing about these fruit bags is they look super simple in pictures but there’s actually some annoying parts nobody tells you about. Like the shaping. Getting that strawberry shape where it’s kinda rounded at the bottom and tapers at the top is not as straightforward as you’d think
I used Red Heart Super Saver in Cherry Red for mine because that’s what I had lying around and it was like $3 at Walmart. For the seeds I used some random cream colored yarn – might have been Caron Simply Soft? The green leafy top part I did with Red Heart again in Spring Green I’m pretty sure. You don’t need anything fancy for this honestly
So basically you’re gonna start with a magic circle at the bottom. I did 6 single crochets in the circle to start. Then you increase in every stitch for round 2 so you get 12 stitches. Round 3 you do the whole sc in first stitch, 2 sc in next stitch pattern to get 18 total. Keep going like that – increasing every other stitch, then every third stitch, then every fourth
I went up to about 48 stitches around because I wanted mine to be like a decent sized bag not just a tiny coin purse thing. You could go bigger or smaller depending on what you want. My cat kept sitting on my yarn while I was doing this part which was super helpful as you can imagine
Once you get to the width you want you just crochet straight without increases for a while. This is the easy part where you can zone out and watch TV. I did probably like 15 rounds of just straight single crochet? Maybe more. The annoying thing here is you gotta pay attention to tension because if you crochet too tight it’s gonna pucker and if you’re too loose it gets floppy and weird looking
Here’s the part that frustrated me – the decreasing to make it taper at the top. I thought I could just wing it and decrease randomly but that makes it look lumpy. You actually need to plan it out kinda evenly. I did decreases every 6th stitch for a few rounds, then every 5th stitch, then every 4th. It’s tedious and you gotta count which I hate doing
The seeds are what make it actually look like a strawberry though so don’t skip that even though it’s extra work. I used the cream yarn and just made tiny little slip stitch bumps all over the red part. You basically insert your hook, yarn over with the cream color, pull through and make a slip stitch but leave it kinda loose so it puffs out a bit. Space them randomly but evenly if that makes sense? Like don’t put them all in one area
Some people embroider the seeds on after but I found it easier to add them as I went along every few rounds. That way you don’t forget where you are or… actually I did try embroidering them after on my first attempt and it was way harder to get the needle through all those stitches so yeah just do it as you go
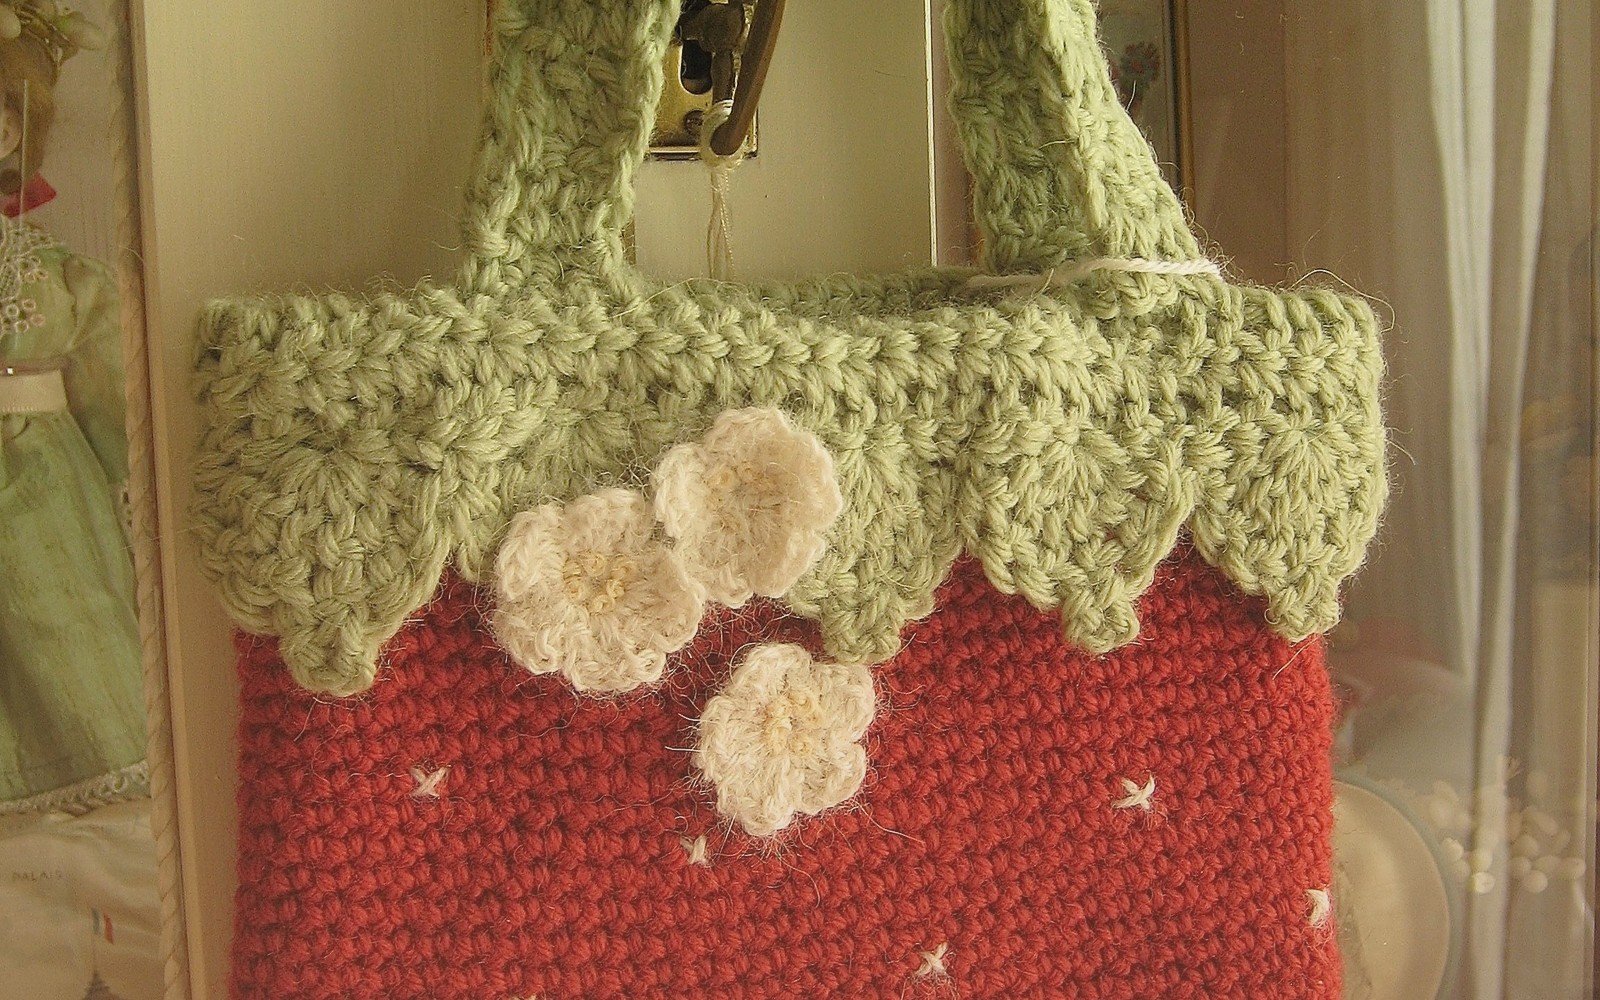
For the leafy top part I switched to the green yarn. You can either crochet the leaves separately and sew them on or do them directly onto the top edge. I did mine directly because I’m lazy about sewing things together. Basically you attach the green yarn to the top edge and then chain like 8 or 10, then single crochet back down the chain to make a leaf shape. Skip a stitch or two on the edge and make another leaf. I did about 6 or 7 leaves going around
The strap was honestly the most annoying part of the whole thing. I wanted it to be sturdy enough to actually hold stuff but not so thick that it looked weird. I ended up doing a simple chain stitch strap but then going back and single crocheting over the chains to make it thicker and sturdier. You could also do a braided strap or just a regular crocheted strap – whatever
I made my strap probably 30 inches long? Maybe 35? Long enough to wear crossbody because wearing it on your shoulder looks kinda weird with the strawberry shape. Attach it on opposite sides of the bag opening. I just stitched it on with the same yarn but you could probably use a different method if you know something better
One thing I wish I’d done differently – I should’ve added a lining. Without a lining stuff can poke through the stitches and also it’s not very structured. I tried to add one after the fact by hand sewing some cotton fabric inside but it was a pain and didn’t look great. If you’re gonna line it do it before you finish the top edge so you can fold the lining over and crochet through both layers
Oh and the closure – I totally forgot about how to close the thing until I was basically done. I ended up just making a simple button loop on one side and sewing a big red button on the other side. You could do a zipper if you’re ambitious but that seems like too much work for a strawberry bag honestly. Some people leave them open which is fine if you’re just using it for like… I don’t know what you’d use an open bag for actually but whatever
Size wise mine ended up being about 7 inches wide and maybe 8 inches tall not counting the leaves. It fits my phone, a small wallet, keys, chapstick. Not like a full size makeup bag or anything but decent for running errands or whatever. You could make it bigger by starting with more stitches in your initial circle and doing more rounds
Gauge doesn’t matter a ton for this project unless you’re trying to match a specific size. I used a 5mm hook with the Red Heart Super Saver which is probably bigger than recommended but I like how it worked up. Smaller hook would make tighter stitches and a sturdier bag but would also take longer
The whole thing took me maybe 6 or 7 hours total? Not all at once obviously. Spread out over a few days while watching TV. The seed part probably added an extra hour because you gotta stop and add them every so often and it breaks up your rhythm
If you want to get fancy you could add details like embroidering a little face on it or adding a flower to the leaves or whatever but I kept mine simple. I’ve seen people do strawberry bags with like googly eyes and stuff which is cute I guess if you’re into that
Color variations – you could do a white strawberry by using white or cream for the main body and keeping the seeds yellow or light pink. Or do a chocolate covered strawberry with brown yarn. I thought about doing a pink strawberry but couldn’t find the right shade of pink yarn when I was at the store
The pattern is pretty forgiving honestly like if you mess up a few stitches here and there it’s not gonna be super noticeable because of the textured seed stitches covering everything. That’s nice for when you’re watching TV and not paying full attention
Washing it – I haven’t washed mine yet because I’m scared it’ll get misshapen but theoretically acrylic yarn is machine washable. I’d probably hand wash it in cold water and lay flat to dry just to be safe. The button might get weird in the washing machine too
You could also make matching strawberry accessories like a little coin purse or a phone case using the same technique just smaller. Or go bigger and make a tote bag sized strawberry which would be ridiculous but also kinda amazing
The main thing is getting that strawberry shape right which just takes practice with the increases and decreases. My first attempt looked more like a red blob than a strawberry because I didn’t decrease evenly. Second one was better. This third one from last summer actually looked like what it was supposed to be
If you’re making it as a gift I’d definitely add the lining and maybe use nicer yarn than Red Heart Super Saver. Like Lily Sugar’n Cream would work and it’s cotton so it’s a bit nicer. Or splurge on something from your local yarn store if you want it to be really special
Handle variations – instead of a long crossbody strap you could do short handles like a little handbag. Or do a wrist strap. Or even add a chain strap if you want it to look more like an actual purse. I stuck with crochet for everything because that’s simpler
The leaves can be tricky to get to stand up properly. Mine kept flopping over at first. I ended up doing an extra round of single crochet around each leaf edge to stiffen them up a bit and that helped. You could also starch them if you really want them to stay upright but that seems excessive
honestly the whole project is pretty beginner friendly as long as you know basic stitches – single crochet, increases, decreases, chain stitch. Nothing fancy required. The shaping takes some practice but it’s not like you need to know complicated stitch patterns or anything
I’ve made probably three of these now and given two away. People always think they’re cute which is nice. They’re good for summer obviously because strawberries are a summer thing but also people use them year round because they’re just fun
Storage – when you’re not using it stuff it with tissue paper or plastic bags to help it keep its shape. Otherwise it’ll get flat and sad looking sitting in your closet