
Feb
When I Actually Made These Things
So last spring, April 2023 I think, I was making a bunch of these sunflower squares because my sister wanted a blanket for her new apartment and I figured sunflowers would be cheerful or whatever. I was also binge-watching that show Succession at the time which was probably a weird combo because I’d be crocheting these bright happy flowers while everyone on screen was screaming at each other about money.
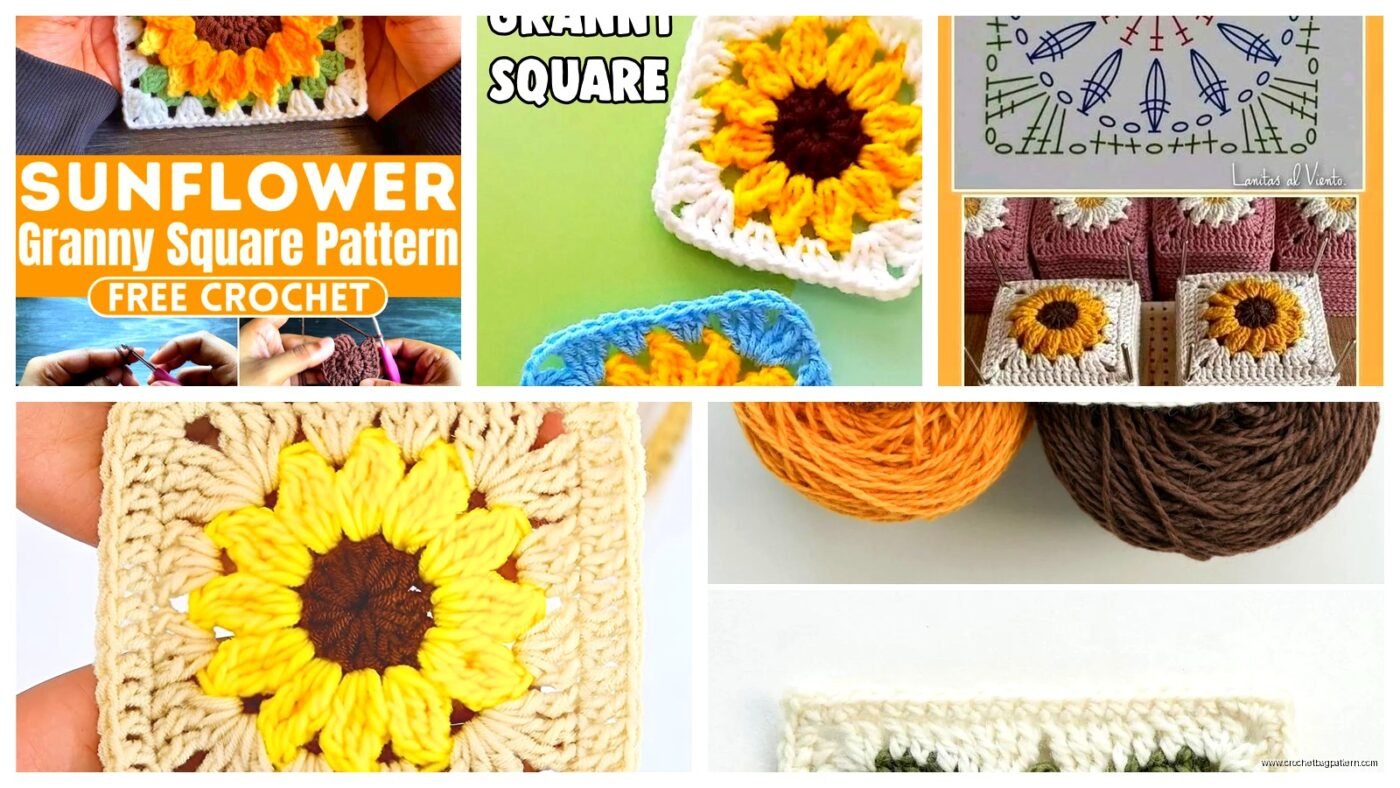
The sunflower granny square is basically just a regular granny square but you work it so the center looks like a sunflower. You need at least three colors – brown or dark color for the center, yellow or gold for the petals, and then usually green or whatever you want for the background/border part.
What You’re Gonna Need
I used Red Heart Super Saver for most of them because honestly it’s cheap and when you’re making like 40 squares for a blanket you don’t wanna spend a fortune. The brown was “Coffee” and the yellow was just called “Bright Yellow” I think. For some of them I used Caron Simply Soft in “Sunshine” because it was on sale at Michael’s and it’s a bit softer than Red Heart but whatever, both work fine.
You need a hook size that matches your yarn weight. I used a 5mm hook for worsted weight yarn. Also you’re gonna need scissors and a yarn needle for weaving in ends which is the worst part but we’ll get to that.
The Actual Pattern Part
Start with a magic ring in your brown color. Chain 3 (counts as first double crochet), then work 11 more double crochets into the ring. Pull it tight. Slip stitch to the top of your chain 3 to join. That’s your sunflower center.
Now here’s where it gets kinda specific – you need to switch to yellow. The thing that really annoyed me about this pattern is that you have to weave in SO many ends because of all the color changes. Like every single square has at least 6 ends to weave in and when you’re making 40 squares that’s… I don’t even wanna do that math. My cat kept batting at the yarn tails while I was working which didn’t help.

For round 2 with yellow: chain 3, work 2 dc in the same stitch. Then work 3 dc in each stitch around. This creates the petal effect sort of. Slip stitch to join. You should have 36 double crochets total I think? I sometimes lost count honestly.
Making It Look Like Actual Petals
Round 3 is still yellow and this is where it starts looking more like a flower. Chain 1, single crochet in the same stitch. Then you’re gonna do *skip 2 stitches, work 5 dc in the next stitch (this is a shell), skip 2 stitches, sc in the next stitch* and repeat that around. You should get 6 shells total which become your petals.
The shells give you that petal shape that actually looks like a sunflower instead of just a yellow blob. When I first tried making these I didn’t skip enough stitches between shells and they got all crowded and weird looking.
The Granny Square Border Stuff
Now switch to your background color. I used “Spring Green” from Red Heart for my sister’s blanket but you could use white or cream or literally anything. Some people even do multiple border colors but that’s even MORE ends to weave in so…
Round 4: Join your new color in any space between petals. Chain 3 (counts as dc), work 2 dc in the same space. Then you need to create corners. The way I do corners is *chain 2, work 3 dc in the same space* and that forms your first corner.
Then work 3 dc in each space between petals until you get to where the next corner should be. For a square you want corners spaced evenly – so I usually do corner, 3dc in next space, 3dc in next space, then corner. Keep going around like that.
Actually wait, let me clarify because I’m explaining this badly. After your first corner you’ll work 3dc in the next two spaces (so 6 dc total), then work (3dc, chain 2, 3dc) for the next corner. Keep doing that pattern around all four sides.
Making It Bigger If You Want
Round 5 and beyond: If you want bigger squares just keep adding rounds of regular granny square pattern. That’s chain 3 to start, then 3dc in each chain-2 corner space with chain 2 between them, and 3dc in each space along the sides.
I made mine about 6 inches square which was like 5 rounds total I think? You can make them whatever size but just remember if you’re making a blanket all the squares gotta be the same size or it gets weird when you try to join them.
The Stuff Nobody Tells You
Your tension matters WAY more than you think. I made the first like 8 squares and then took a break for a week, and when I came back my tension was different and those squares were noticeably smaller. I had to redo them which was super frustrating.
Also the brown center sometimes doesn’t stay perfectly circular depending on your yarn and tension. Mine usually ended up slightly hexagonal but once you add the petals you can’t really tell so don’t stress about it too much.
When you’re working the yellow petal round, the shells tend to curl forward a bit. That’s normal and actually makes them look more dimensional and flower-like. Don’t try to flatten them out too much or they’ll lose that effect.
Color Variations I Tried
I made a few with Lily Sugar’n Cream in “Hot Orange” instead of yellow for like autumn sunflowers or whatever. Those actually looked pretty cool. Also tried using variegated yarn (I think it was Red Heart Soft in “Parfait”) for the background and that created this kinda rainbow effect around the sunflowers.

You could also do the center in black for a more dramatic look. Or use multiple shades of yellow in the petal round if you wanna get fancy – like start with a darker gold and switch to lighter yellow partway through.
Joining The Squares Together
When I finally had all 40 squares done I used the join-as-you-go method which I sort of regret because it’s hard to keep track of and I messed up the layout twice and had to undo sections. Probably easier to just make all your squares and then whipstitch them together or do a flat slip stitch join.
For whipstitch you basically line up two squares wrong sides together and sew through both loops along the edge. It creates a visible seam but it’s sturdy and pretty easy.
Slip stitch join is flatter but takes longer. You put the squares right sides together and slip stitch through both loops along the edge, then when you open them up the seam is on the wrong side.
I also saw someone do a join with single crochets on the right side which created this decorative ridge between squares. That could look cool with a contrasting color but it’s more yarn and more work so.
What To Actually Make With These
Obviously blankets are the main thing. The one I made for my sister was 5 squares by 8 squares which ended up being like a throw blanket size. You could do a bigger one for a bed but that’s a LOT of squares.
I also made a set of 4 for coasters which was cute. You just make the squares smaller by stopping after round 3 or 4 and maybe use cotton yarn so they’re more absorbent.
Pillow covers are another option – make two identical squares or do a back-and-front design. You’d need pretty big squares for that though, like maybe 8-10 rounds depending on your pillow size.
Someone told me they made a tote bag with these by making 6 squares and joining them in a cube shape with one side open, then adding handles. I haven’t tried that but it sounds like it could work.
Fixing Common Problems
If your squares are coming out wonky and not actually square, you’re probably not doing the corners right. Make sure you’re always working the chain-2 spaces for corners and not accidentally skipping them or working in the wrong spot.
If the petals look too small or too big, adjust how many dc you put in each shell. I’ve seen patterns that do 4-dc shells or 6-dc shells instead of 5. Just experiment and see what looks good to you.
When the edges are ruffling or curling, that usually means your tension is too loose. Try going down a hook size or just being more conscious of keeping even tension as you work.
If you lose track of where you are in the pattern (which I did constantly while watching TV), use stitch markers. Put one in the first stitch of each round so you know where to join.