
Feb
The Basic Beanie I Always Come Back To
So I made this chunky beanie in March 2023 when my heater broke and I was freezing my butt off waiting for the landlord to fix it. Took maybe 3 hours total and I used Lion Brand Wool-Ease Thick & Quick in like, this dark grey color called Charcoal I think. The pattern itself is stupidly simple but here’s the thing – you’re gonna work in rounds from the top down, starting with a magic ring.
Make a magic ring, then do 10 double crochets into it. Pull it tight. Then you increase every round until the circle measures about 7 inches across for an adult head. The increases go like this: round 2 is 2 dc in each stitch, round 3 is *2dc in first stitch, 1 dc in next stitch* repeated around, round 4 is *2dc, 1dc, 1dc* and you keep adding one more single dc between increases each round.
What annoyed me SO MUCH was counting stitches constantly because I kept losing track while watching The Last of Us and then I’d have to rip back like half a round. Just use a stitch marker. Seriously.
When To Stop Increasing
You measure the circle flat and when it hits about 7-7.5 inches for adults (6 inches for kids), you stop increasing and just work even – meaning one dc in each stitch around and around. Keep going for like 8-9 inches of straight sides and that’s your beanie. I usually try it on as I go which is weird because it looks dumb halfway done but whatever, better than making it too shallow.
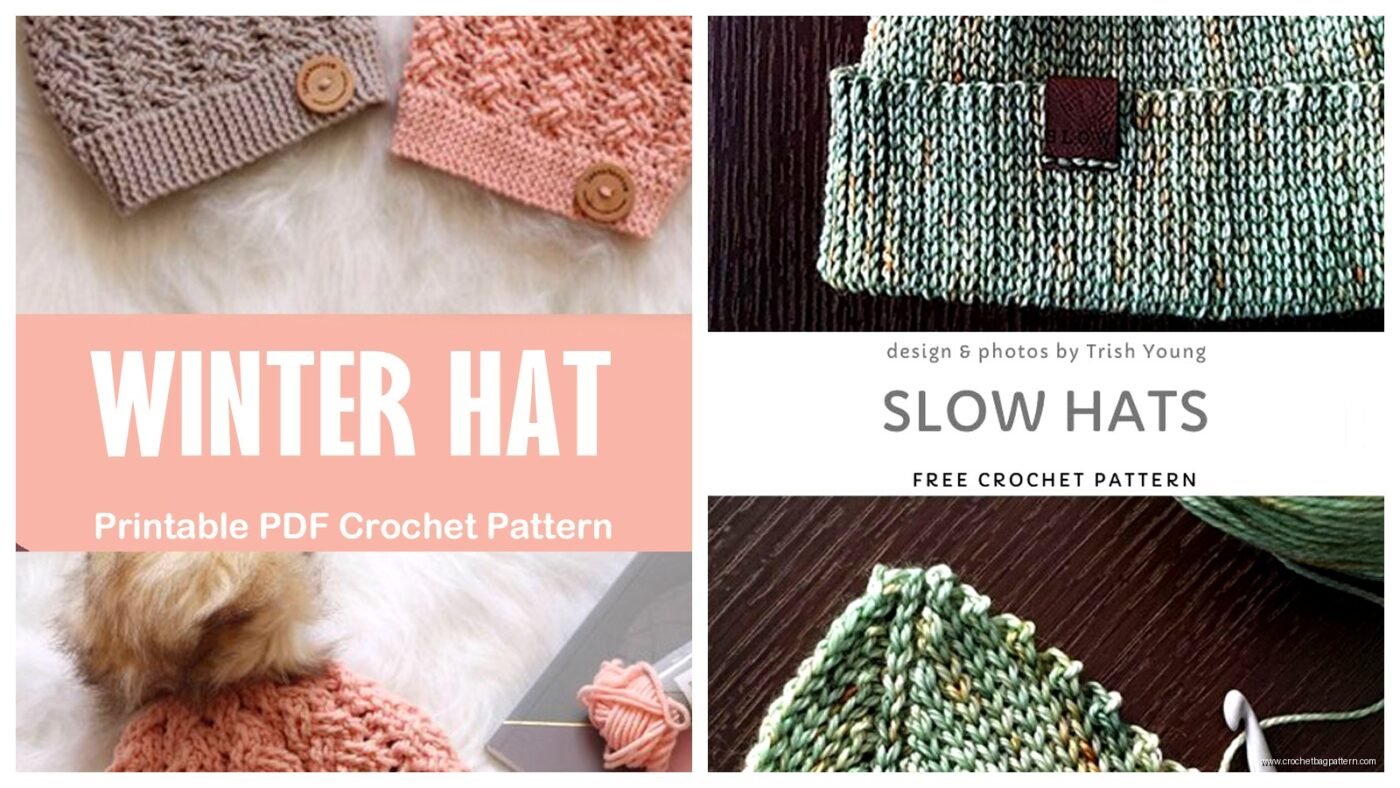
Ribbed Brim Version That Actually Stays Put
Okay so the regular beanie is fine but it doesn’t have that snug fit around your head. In summer 2024 I made one with a ribbed brim using Red Heart Super Saver – I know people hate on it but it’s cheap and it works and I had like 5 skeins of it in my closet already in this color called Coffee.
For this one you actually start differently. Chain enough to fit around your head comfortably – probably 60-70 chains depending on your yarn thickness and hook size. Join with a slip stitch to make a circle. Then you’re gonna work in the third loop only for ribbing effect.
Work half double crochets in the third loop (that weird horizontal bar on the back of each stitch) for about 2-3 inches. This creates those vertical ribs that stretch. Then switch to working normally in both loops and start your increases to shape the crown. The math gets wonky here because you’re working bottom-up instead of top-down so…
Crown Shaping From Bottom Up
After your ribbed section, work even (no increases) for about 4 inches. Then you gotta start decreasing. Divide your total stitch count by 8 – that’s how many stitches between each decrease. So if you have 64 stitches, you dc2tog every 8th stitch. Next round do it every 7th stitch, then every 6th, and so on until you have like 8 stitches left. Cut yarn, thread through remaining stitches, pull tight.
My cat kept attacking the yarn ball while I was making this one which was incredibly annoying but also kind of funny.
Slouchy Beanie Because Sometimes You Want That Look
I made one of these during a really bad breakup in spring 2022 and honestly just kept crocheting because I needed something to do with my hands. Used Bernat Softee Chunky in like a cream color, can’t remember the exact name.
Same start as the basic beanie – magic ring, increases until you hit 7-8 inches diameter. But then instead of stopping there, you keep going with the increases for another round or two so the circle gets to about 9 inches. THEN work even for like 10-11 inches of length. The extra fabric is what makes it slouch.
The annoying part is that slouchy beanies look terrible when you’re making them. They look like a floppy pancake UFO thing and you’re gonna think you messed up but trust me, once you actually wear it the slouch happens naturally.
Earflap Hat For When It’s Really Freaking Cold
This one’s more complex but worth it if you live somewhere actually cold. Start with making the earflaps first as separate pieces, then connect them while making the hat body.
For each earflap: chain 4, then work increases on each end every row until you have a triangle shape that’s about 3-4 inches wide. Make two of these. Then chain enough stitches to connect one earflap to the other across the back of the head – the chain should measure from ear to ear across the back, probably 10-12 inches or so.
Connecting Everything
Now you work in rounds starting from one earflap, across the chain, to the other earflap, then chain across the front (forehead area) to connect back to the first earflap. From here you just work in rounds going up, and start your crown decreases same as the bottom-up beanie method when you’ve got enough height.
I used Caron Simply Soft for this in like a burgundy shade and added some braided ties to the earflaps using three strands of yarn. Just attach yarn to the bottom point of each earflap and braid for however long you want – 8-10 inches probably.
Messy Bun Beanie Thing
Okay this is basically a regular beanie but you leave a hole at the top for a ponytail or bun to stick through. Same basic construction as the top-down beanie but when your circle measures about 3-4 inches across, you stop increasing and instead work even (no increases) for about 2 inches to create the hole. Then start increasing again until you reach the 7 inch diameter, then work the sides normally.
I made this for my sister in December 2023 using some fancy alpaca blend from We Are Knitters that she bought and then never used herself – it was SO soft but also kinda splitty which drove me crazy. The hole needs to be big enough for thick hair but not so big it looks stupid when you’re not wearing your hair up, so aim for about 2.5-3 inches diameter for the opening.
Actual Practical Tips Nobody Tells You
Use a hook one size larger than the yarn suggests. Seriously, you want a hat with some drape, not a rigid helmet. I use a 6.5mm hook with most worsted weight yarns even though the label says 5mm.
Gauge matters more than you think for hats because if it’s too tight it’ll give you a headache and if it’s too loose it’ll fall off. Make your starting circle and actually measure it flat before you keep going.
For winter warmth, double-strand cheaper yarn instead of buying expensive chunky stuff. Two strands of Red Heart held together works just as well as one strand of fancy merino and costs way less. I do this all the time with leftover yarn.
Yarn Weights And Hook Sizes
Bulky or super bulky yarn makes the fastest hats – you can finish one in like 2-3 hours. Use a 9mm or 10mm hook. Worsted weight takes longer, maybe 4-6 hours, but you get more stitch definition. I rarely use anything thinner than worsted for hats because it takes forever and also doesn’t feel as warm even though technically more stitches should equal warmer but… I dunno, it just doesn’t work that way in my experience.
If you’re using acrylic yarn (which is fine, don’t let yarn snobs tell you otherwise), avoid Red Heart With Love for hats because it’s too slippery and the hat won’t hold its shape as well. Super Saver or Vanna’s Choice work better.
Color Work And Stripes
Stripes are easy – just change colors whenever you want. Cut the old color leaving a 6 inch tail, start the new color and work over both tails to weave them in as you go. For horizontal stripes work in rounds like normal. For vertical stripes you’d need to work in rows back and forth which changes the whole construction so honestly I never bother.
I tried doing a fair isle pattern once using a tutorial I found and it was a disaster. Ended up with weird puckers and the floats on the inside were too tight. Gave up and just did stripes instead. This was gonna be a Christmas gift in 2023 but I ended up keeping it because it looked homemade in a bad way, not a charming way.
Pom Poms And Other Additions
You can buy pom pom makers but honestly just wrap yarn around your fingers like 100 times, tie it tight in the middle, cut the loops, trim into a ball shape. Attach it to the top of the hat by threading the tie strings through to the inside and knotting them. Makes any basic beanie look more finished.
Faux fur pom poms from the craft store also work and look fancier. They usually have a snap attachment which is nice because you can remove it for washing.
Common Problems I’ve Run Into
Hat too shallow – you didn’t work enough rounds before starting decreases. Should be about 8-9 inches of straight sides for adults.
Hat too floppy – your tension is too loose or you’re using a hook that’s too big. Go down a hook size.
Hat too stiff – opposite problem, hook too small or tension too tight.
Pointy top – you decreased too fast. Spread the decreases over more rounds.
Hole at the top after finishing – didn’t cinch the final stitches tight enough. Thread yarn through them again and pull harder, or just sew a button or pom pom over it.
The brim rolls up – this happens with all double crochet hats eventually. Either add a ribbed brim section in half double crochet or single crochet, or just accept it because honestly it looks fine.